

Grumman EA-6B Prowler (completed)
 1November 13, 2017The separation lines of the air breaks and panel lines has the same definition (not ok). It should be reworked.
 2November 13, 2017Upper side: the same situation. Separation lines of the air breaks should be deeper than panellines. White parts are attachment pints for static discargers.
 3November 13, 2017Exhaust area should be reworked. Unfortunately the panellines are completely wrong.
 4November 13, 2017
 5November 13, 2017
 6November 13, 2017Aires' set is a jewel. You don't need any further parts. The three white parts are replacement for damaged originals.
 7November 13, 2017
 8November 13, 2017On real plane the framing is a part of the fuselage not a part mounted on the fuselage.
 9November 18, 2017
 10November 18, 2017
 11November 18, 2017
 12November 18, 2017
 13November 20, 2017Most colors of rear panel are light grey and different shades of "black". In fact are the black panels dark grey.
 14November 20, 2017
 15November 20, 2017Temporary small pieces of plastic helps to hold to both fuselage halves during drying of CA.
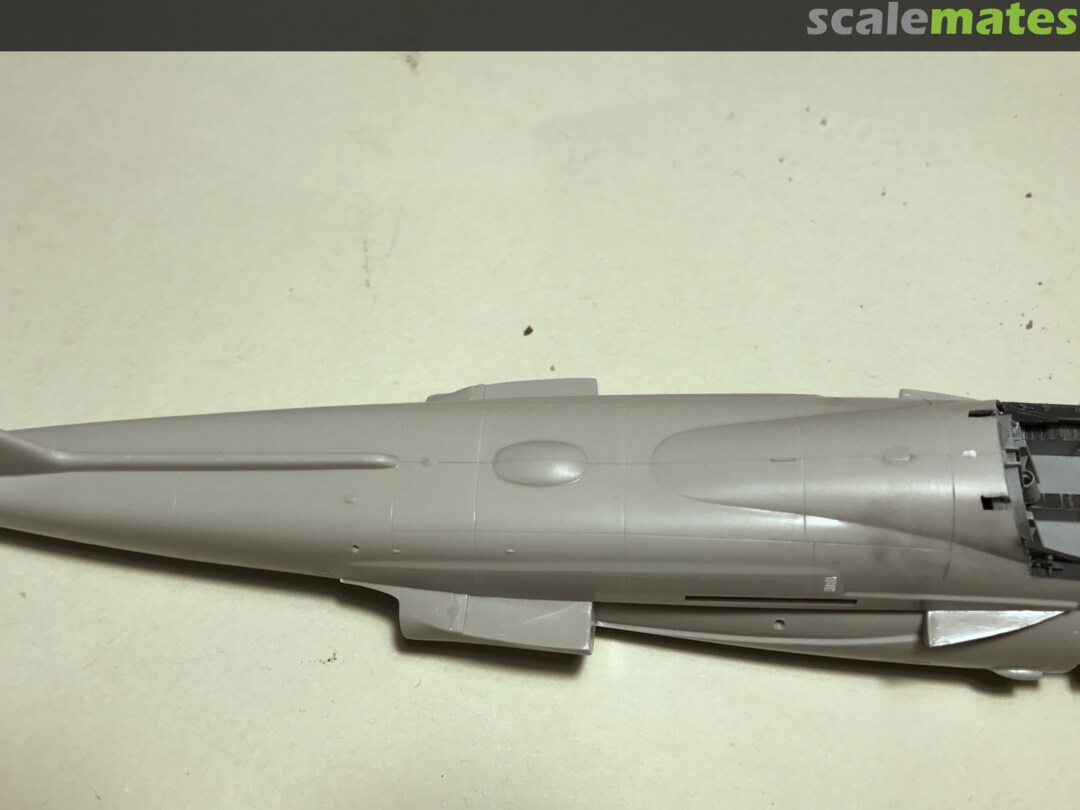
 16November 20, 2017The antennas under the nose should be removed and replaced with the late configuraton.
 17November 20, 2017The opening for the arresting hook should be closed from inside with thin plastic.
 18November 21, 2017
 19November 21, 2017Cleaned seams. Restored panellines. All antennas removed: all will be restored in the correct number and configuration.
 20November 21, 2017Aires' framing for the forward side of the middle column sanded smooth with plastic. No gap remains.
 21November 21, 2017
 22November 21, 2017White rectangular rod pushes up the cockpit hub (width was too low and under to much strain).
 23November 21, 2017My last and only Intruder project is nearly 20 (!!!) years old. I'm really not sure but I think that the Intruder in 1:72 is a tail sitter. Because of that I filled the nose with lead pieces.
 24November 23, 2017From left: GPS antenna, baseplate for red collision light, base plates for 4 antennas, cooling inlet.
 25November 23, 2017Baseplate for red collision light, base plattes for 3 different antennas.
 26November 23, 2017Hinges for the tail hook.
 27November 25, 2017Corrected panellines. Oil-deflector (V-shaped), hinges for the avionic bay.
 28November 25, 2017Fuel dump pipe, tail bumper, tail light, antenna, attachment points for the static discargers.
 29November 26, 2017Connection between fuselage and wings should be reworked (see picture 31).
 30November 26, 2017
 31November 26, 2017
 32November 26, 2017Wheel bay, small doors: very poor fit. A lot of plastic and CA needed.
 33November 26, 2017Wheel bay small door: the same situation on the left side (very poor fit).
 34November 30, 2017Despite the kit age the fit of the windcreen is perfect.
 35November 30, 2017Eduards ladder.
 36November 30, 2017Nose wheel bay doors. Top left, kit🙁, middle: Eduard:/, right from scratch🙂
 37November 30, 2017In my opinion its impossible to represent not even 10% of details in the nose wheel bay.
 38November 30, 2017
 39December 3, 2017Each ECM-pod needs a lot of power. Because of that each pod has an own wind driven generator.
 40December 3, 2017. Kit parts for the propellers are designed very well and are so tiny that it is nearly impossible to hold them during cleanup. Because of that I first glued the propellers on the pods and cleaned them later.
 41December 5, 2017
 42December 5, 2017Fuselage painted.
 43December 7, 2017Upper wings painted.
 44December 7, 2017Masking for coroguard on the wing leading edges.
 45December 7, 2017Coroguard: a mix of HU127, alu Metalizer & Sealer (Testors), gold Mr. Metal (Gunze),
 46December 7, 2017Vertical stabilizer: coroguard on leading edge.
 47December 7, 2017
 48December 7, 2017Exhaust area: Humbrol Steel cote & Testors Sealer.
 49December 9, 2017
 50December 9, 2017
 51December 9, 2017
 52December 10, 2017
 53December 10, 2017
 54December 10, 2017
 55December 11, 2017Weathering completed: ready for decals.
 56December 11, 2017I've forget the pilots windscreen deicing system & red light....
 57December 13, 2017Decals in place (minus here and there semimatt varnish.
 58December 13, 2017
 59December 13, 2017
 60December 13, 2017
 61December 18, 2017
 62December 18, 2017
 63December 19, 2017
 64December 19, 2017
 65December 20, 2017
 66December 20, 2017
 67December 21, 2017
 68December 21, 2017
 69December 21, 2017
 70December 23, 2017
 71December 23, 2017
 72December 23, 2017
 73December 23, 2017
 74December 23, 2017
 75December 24, 2017Merry Christmas to all of you and a happy and peaceful New Year!
 76December 29, 2017Unfortunately Hasegawa has divided the pilots canopy int two parts!! I.m.o. it is impossible to glued both parts without trouble, sanding and polishing.
 77December 29, 2017Left: 1 Lamp, 2 mirrors and thin piece of Black Magic tape for the edge (in my opinion the better choice as the etched part from Eduard).
 78December 29, 2017Right: 2 lamps and 4 mirrors and a narrow stripe of Black Magic tape (CE).
 79December 30, 2017
 80December 30, 2017
 81December 30, 2017
 82December 30, 2017
 83December 30, 2017Unthinned dark grey paint sprayed on decal produced the correct finish for antiskid - "mat".
 84December 30, 2017The round thing behind the canopy is the GPS-receiver.
 85December 30, 2017
 86December 30, 2017In fact the turbine is located deeper but it looks better than "nothing" (Hasegawa left the s-shaped exhaust tube🙁 )
 87December 30, 2017
 88December 30, 2017
 89December 30, 2017Static discharger made of grey fishing line. White light made of white "rounded" round rod.
 90December 30, 2017
 91December 30, 2017Eduards etched ladder.
 92December 30, 2017
 93December 30, 2017Refuling probe has an offset to the right side.
 94December 30, 2017
 95December 30, 2017
 96December 30, 2017
 97December 30, 2017
 98December 30, 2017Static discharger on topside of the airbreakes.
 99December 30, 2017


Komentáře
24 July 2026, 23:29 -


