

Sikorsky S-61A Seaking JMSDF - completed


Komentáře
24 7 June 2019, 17:42
A very promising start, great details added, I particularly admire the switches on the center console... Hope something of that lovely stuff will remain visible once the clear parts are on!
10 June 2019, 15:16
I have to agree with Hans... Found that out the hard way while masking a windscreen covered in Future...
18 June 2019, 18:06
Very often you have to reduce the thickness. It's important to see when the material is thin enough. The best way to manage such a task: I light my work bench with a powerful lamp, powerful enough to shine THROUGH the material. Voila!
18 June 2019, 18:12
Oh, my favorite helicopter in your hands - that will the best 1/48 Seaking seen ever 👍 Great work, but I think the mesh could be finer as it is on the plastic parts (merciless macro!).
20 June 2019, 16:56
Thx. Bughunter: it seams that now I have to check each part two times before glueing. 🙂
23 June 2019, 10:53
Although the sponsons look like the real thing now, will those pins be able to support the weight of the model?
23 June 2019, 17:05
Thx Patrick. I used 0,5 mm needle (steel). I'm sure that this is strength enough in connection with the support strut.
23 June 2019, 17:17
OK, cool! If that is hypodermic needle, that's really though stuff. 👍
23 June 2019, 18:30
Wow, that instrument panel is just insane ! Looking like the real thing and functional. The seatcover is very convincing too, exemplary as usual 🙂
3 July 2019, 20:35
What a lovely dash! 👍 Is there a particular reason the attitude indicators are in such an inclined position?
4 July 2019, 06:08
Following! I think Nathan is right, when no battery is on, the instruments with gyros show whatever they want. After Battery power on, the Pilots have to pull the instrument knobs to align the attitude indicators.
4 July 2019, 12:49
Thx mates. I'm glad that you like the pilots workbench. Thx for watching the correct function of the instruments. I checked both and discovered that the charge 45/EDR-a has a male function. My mechanic changed both and fixed the problem.🙂
4 July 2019, 14:22
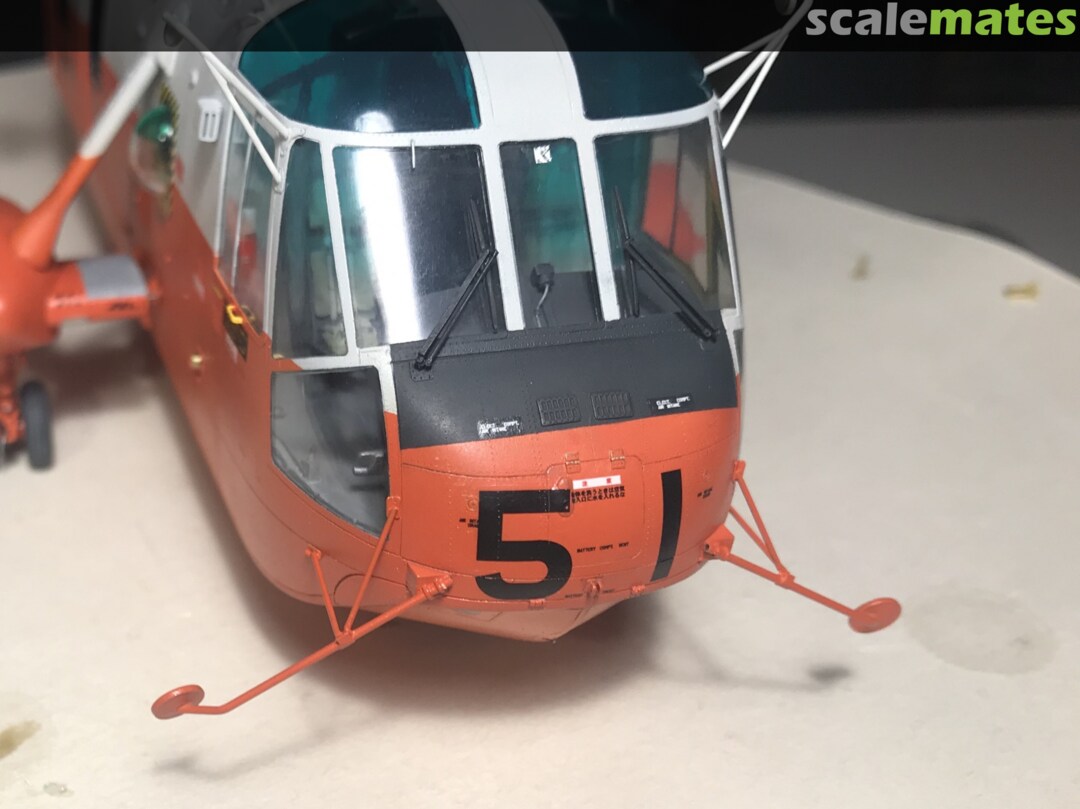
Today was the day of the windows: I managed different painting tasks on the windows. Inside of the large cockpit side windows is yellow. 3 oval cabin windows has black rim (rubber). Upper cockpits windows are more turquoise than green (despite description in the instructions). The upper 1/3 of the bulged side windows is green.
7 July 2019, 18:15
Ohhh Bernhard, you and your mastermind only cause me a problem, more and more attempts fail and enen in the dustbin 😉 simply spectacular as you handle many problems with simple means 👍 👍 👍 but my Sea King stays in the Stock, better for the plastic 😉
7 July 2019, 18:19
This time I took a lot time mix the orange. Not only the color was crucial but the "shininess". This is important regarding dust partial inclusion. It's an mix of H132, H69, H18 and H19.
9 July 2019, 17:48
Every small step of this is inspiring... The embedded lenses in the pylons - wow! 👍
11 July 2019, 16:01
Very nice sponsons! Especially the landing lights as Slavo already mentioned!🙂
12 July 2019, 06:37
Absolutely perfect - as usual, Bernhard! I am eagerly waiting for more progress.
12 July 2019, 07:57
Interior padding looks very convincing ! Looks like you've changed your mind, away from the initial Maskol - Idea ? Bare Metal or lead foil I presume ?
17 July 2019, 20:39
First look in my feed thought it was a sub. Looking great so far!!!! Gunna be huge!!!
17 July 2019, 23:13
Thx for the nice comments. Tesa as cover for lights is surprisingly a very taff and durable material. It hase never come loose yet. Interior padding: I changed my plans und used thick self adhesive aluminium foil. Very quickly to produce and very easy to apply.
18 July 2019, 05:42
Your way to describe the work is just awsome! It will help other people who will build this chopper. Very nice work so far 👍
18 July 2019, 06:36
This has me thinking of doing the Marine1 of the President of the USA. 👍 :-0
18 July 2019, 06:41
Are you serious Bernhard? I can almost imaging those switches are working.... 😮
26 July 2019, 15:35
Oh my, I am missing the show! You know how much I love to watch you work Bernhard. Very impresive, so far!
26 July 2019, 15:40
Yeah... now I know for sure: knitting would be a better suiting hobby for me.... Seeing Bernhard's work always humbles me. 😉
26 July 2019, 18:05
Just testet the funktion of the switches: they work - and even individually! 🙂
26 July 2019, 18:15
As expected, the switches work perfectly 😄 Next, some working cockpit ventilation fans would seem proper...😉
26 July 2019, 20:49
Hmm, I would be satisfied if the cyclic and collective worked the rotors and tail rotor. Bernhard, just joking, but what are the red & white lights for? Anti-collision beacon and interior or tail lights? Are you going to use fiber optics to spread the light around?
26 July 2019, 20:59
As we all suffer from the current weather conditions ( burning heat in Germany), I would suggest to focus now on proper airconditioning aboard....😢 of course that would be no problem for you
Superb work on that panel !
„Dem Ingeniör ist nichts zu schwör"😉
26 July 2019, 21:17
Back from vacation. Let see which parts I can "electrify". By the way: both LED's just kidding, I just quickly cobbled the parts together🙂
The inner side of canopy framing on the original is black. I mixed dark grey and sea blue. If you don't have a reference it's impossible to see that it's not black. That make that easier to airbrush the light grey.
11 August 2019, 08:14
Bernard, take a look at Augies F-111 build where she has used a stunning thing called 'glow tape' for her 'slime lights' , possibly for some internal/cockpit low light illuminations with your Sea King mate. 👍 🙂
11 August 2019, 08:26
Bernahrd, the cleannes of your work really amazes me... 👍 Absolute master-class modeling in live progress, a pleasure to watch!
11 August 2019, 16:39
Wow, Craftsman at work here. Thanks for sharing your build pictures. Very well done.
14 August 2019, 19:06
Thx Kerry, Patrick, Slavo and John. I'm glad to read such nice comments🙂
Today was a great modeling moment; demasking of all windows. It was worth the effort to mask and seal the interior? Is the inner side clean or dusty?
After taking off the masks I was surprise how well everything turn out. I retouched some parts for about one hour with a small brush and now I'm very happy with the results.
16 August 2019, 19:30
Dream-outcome on the clear parts... 👍 particularly the side & lower windows betray zero scale deformation & warping, happy indeed you can be 🙂 the two-color side bulb also fits perfectly... Hope all goes as well in the final steps, a masterpiece in the making... 👍
16 August 2019, 19:40
You feedback admire me very and it was the best motivation to do my best applying decals. Ready minus very few corrections with a small brush (tomorrow). Now it's time for a glass red wine and Pixar's Ratatouille with my son🙂
17 August 2019, 18:22
So crisp and clean Bernard, and one to be proud of mate. 😉 👍
Salute. ! 👍
(I love the curled up comms cable.) 🙂 🙂
It adds so much depth when the detail is added.
17 August 2019, 19:19
Now the Hinomaru is in place, the color selection just makes so much sense... 👍 I anticipated it, but it's cool to see it happen. Well struck & I guess a wash & final treatment will make the effect just that much better (already being great).
PS: I guess these were decals... not that one could see that from any perspective...😉
17 August 2019, 19:42
Thank you Augie, Kerry and Slavo. Indeed I has a lot of fun applying the decals. I must say that Hasegawas decals are excellent. But in my opinion the "key to success" is Mr Colors Mark Setter Nr. 232 (the original version, not the NEO version Nr. 234). In combination with this fluid it's possible applying decals on each surface (matt, or semimatt too) without silvering. Furthermore after additional applying the red softer of Microscale the carrier film is no more visible (has the same shininess as the surface). That is the reason that you can't see the carrier film. The additional advantage is the fact that no varnish is necessary. Mr. Setter 232 is in my opinion the "product of the decade" 🙂
17 August 2019, 20:10
Thanks Bernard for the decal intel - really valuable info for me, since I work with MRP's & oils a lot which creates a very nice irregular semi matt/gloss surface effect which I like a lot & am hesitant to ruin with varnish coats, which leads to the obvious conflict with decal carrier film... Will definitely try No. 232! 👍
17 August 2019, 22:23
Beautiful „legs", excellent work on these winch struts and wires !
24 August 2019, 08:26
Thx mates. Today morning I added the last remaining 4 wires per strut and prepared the wheel wells.
24 August 2019, 08:42
There are now pictures from almost every imaginable angle and perspective, and all look just super clean & excellent in every aspect - no scale judgement being possible, no trace of any residue of "model making" processes visible on any surface or detail... 👍 This level of quality is absolutely remarkable.
26 August 2019, 12:23
Bernhard, Simply outstanding work! Let's all climb in and fire her up! She looks as if she could truly fly!
26 August 2019, 12:28
Outstanding work Bernhard. I always admire your work on the rubber look of the tires.
26 August 2019, 20:42
Normally I know what to say but now I'm speechless when I read your comments. Thank you so much!
Nathan: a usually I use a dark gray (not black) paint. It's important that the shininess of paint is between matt and semimat: when the paint is drying I use a shaving brush for true dry brushing of the wheels (true dry brushing = completely without paint).
27 August 2019, 04:26
After holiday I had to catch up - what a winner build 👍 All your fine details are looking so RAEL and WORKING! How the hell are you doing this?
28 August 2019, 22:57
Berhard, Very nice work adding the details. I can't wait for the rotor to be installed so we can go for a ride! Just one question: Why are the upper mirrors canted at that angle? In order to see into the intakes if icing is occuring? I have seen helos with downward canted mirrors to see the sling load or tow sled, in the case of mine hunters. Just curious. R/ Dutch
29 August 2019, 16:07
Why are the upper mirrors....? Good question! I think you are right Dutch: possibly because icing of the inlet or foreign objects? Does anyone else have an idea?
29 August 2019, 17:31
I only said that because this is the Artic Search and Rescue helo, correct? Oh, wait, maybe that one was dark grey with orange? This one should be the standard SAR bird for JMSDF. Maybe the mirrors are canted so that the stbd pilot can see the winch operator? But then, why the port mirror? Hmm.....
29 August 2019, 17:44
If they were convex mirrors, the would have allowed you to see 99% of all that was happening , top and bottom. 👍
30 August 2019, 01:01
Tail rotor: sometimes the cleaning of the complex parts is so expensive that it's worth to separate the part respectively to make something new.
31 August 2019, 11:56
'something new´ is the result in most such cases... Something new that looks much better & true to the original like in this - that depends...😉
31 August 2019, 13:18
No wonder your the champion you are, going the full 9 yards on detailing. 👍 🙂
Inspiring stuff Bernard. 😉
31 August 2019, 20:59
Thanks Slavo, thanks Kerry. About "no traces visible of the modeling process": what I do is: every piece that I glue to the rest (like an antenna or mirror booms) is fitted with one or more piece of wire. So it is fixed in the right position and I only need very little glue.
A good trick to get a clean, smooth surface is to hold the parts into the light at an angle and to use a blunt skalpell (with a slightly rounded tip) to remove dust particles and lint (without damage of the entire surface).
1 September 2019, 05:38
Don't be surprised if Sikorsky wants to hire you as a mechanic/painter 🙂 What a wonderful Sea King!!
1 September 2019, 05:56
Thank you for your tip and wisdom Bernhard. Learning something every day is what makes tyhis hobby so worth while. 👍
Cheers. 😉
1 September 2019, 08:16
Bernard, your attention to detail is once again, NOTED. 😉 👍
The rotor head is just stunning mate. 🙂
5 September 2019, 21:10
Just in time I found yesterday on a Japanese website an excellent walk around of a Japanese Seaking. One of the pictures (6 MB, 6000x3500 pixel) shows mercilessly a hundred and hundred and more details. So I could detail the blades and was astonished how rigid the 0,15 mm wire I used for the electric wire could be🙂
8 September 2019, 08:18
Augie; all the pictures I found on wiki commons. uploaded on 04. Juno 2015. You must scroll about 150-200 piictures down (approx 3/4 of the index).
commons.wikimedia.or.._uploads/2015_June_4
8 September 2019, 12:15
Make that 4/5 of the index. But indeed, great pictures! Thanks! 👍
8 September 2019, 15:07
Having watched this build grow from early on, I get accustomed to the fact that excellence in execution can be expected - but it's still a pleasure to watch & get surprised in what exact form it's going to come😉
8 September 2019, 15:45
my hat, jaw and hopes of ever achieving this kind of level, are all on the floor... what an incredible level of detail, not many people can do this (Ronan, Bughunter, K Munch.....). I simply love this build.
interesting idea using the maskol and the PE , but at the end, you did not use it?
11 September 2019, 10:15
Holy Sh*t! What a rotorhead! Looks nearly as god as the one you did in 1:72!👍
11 September 2019, 11:13
Thx: but ...not yet completed🙂 Bart: you are right. David Funke aka Helo Stuff designed 3D printed rotor hinges. They are superb!
11 September 2019, 14:03
I maybe sometimes get off with stuff looking sort-of-OK-good when painted & co... Your work looks crazy awesome even in bare material... Exactly the same thrill as seeing the real planes in their finished-assembly - pre-painted factory style... 👍 👍 👍
11 September 2019, 14:18
@Spanjaard Thank you for mentioning my nickname here, but next to Bernhard I am a little dwarf. What he is doing with this bird leaves me bewildered!
11 September 2019, 19:08
We all have our own skill level and talents, every body on here builds amazing models from the beginner there are things i never knew about to the veteran builder there are thing i can learn and enhance my achievements, my point is just because you think you cant build as good as the next guy dose not mean you cant get there, keep building and having fun because on day some one will look upto you. We all make grate models, keep up the brilliant work guys.
11 September 2019, 19:31
Spanjaard: It was only an attempt. Later I noticed that thick self— adhesive aluminum foil and the structured wall of the Huey is the better way to produce realistic upholstery.
Rotor head: Today I mounted very few parts and one cable and realized that I have a problem to hold the entire rotor head during detailing, especially laying of cables.
12 September 2019, 20:02
There are a lot of excellent pictures of the rotor head especially of Mr. Burkhard Domke (thx for sharing!). But all have a common problem: they are taken from below. I have to guess what they look like from above. Moreover there are great differences between the original Sikorsky machines and the license-built ones by Westland and Mitsubishi.
13 September 2019, 04:29
Today I solved the problem of holding the rotor head during assembly: glued the axis and held the axis with a cloths pin. One problem solved next one up: what do I use for the cables and hydraulic lines. The right diameter would be approximately 0,3 mm. Wire would be good but is astonishingly too stiff. I installed some of them and noticed that parts come apart🙁.
Ideally i would like to use fine isolated cable but the fines I have is 0,43 mm and theft is way too much... after some attempts I found the solution. I combined 0,1 mm wire with a piece (approx 4 cm long) 0,65 mm isolation, held them with tweezers and put it into hot water. Then I pulled as long is possible to lengthen the isolation. The result was 0,33-0,35 mm thick and something I could form well, put into place and glue. It also stay in place!
By the way: Hans, I would like to know how many parts there are going to be and ARSQ means Actual Rotor Status Quo🙂. I suppose that the actual status after a good modeling day is approx 580...
14 September 2019, 18:15
This is simply overwhelming, only very few modelers will be able to reach this skill level. All I can say is : Chapeau Bernhard !
15 September 2019, 18:32
Kerry: I asked Ben Schumacher already about 3D printing the ENTIRE Japanese Seaking. Unfortunately it's impossible. 🙂
Hans: indeed the ARSQ represents the actual amount of all parts of the whole rotor. Blades consist of 170 parts.
Hanno: thx.
15 September 2019, 19:05
Absolutely amazing job! Yeah, rotors are pretty complicated stuff, and your work is pretty close to that complexity. Hats off Bernhard!
15 September 2019, 20:21
Bernard. I think I gave you the wrong impression on the 3D print issue. 🙁
I was actually referring to the rotor head and all its protrusions and piping. 😉
Just a thought mate. 😉
15 September 2019, 23:13
Already yesterday it seemed to me that the "coolie hat" sits too low... Today i started an intensive research for more pictures of the JMSDF Seakings and I really found several excellent pictures. Conclusion: too low🙁 Meanwhile this bug Is fixed and the rotor head received a "little paint".
18 September 2019, 19:33
Sensationeller Rotorkopf! Das habe ich so bis jetzt noch nie gesehen, meinen Respekt!
19 September 2019, 09:46
I have an urge to start a death metal band "Rotorhead" and use this as the title pic...😉
Fascinating - As it looked "naked" with every imaginable type of material used, I thought it will actually lose some charm when the color goes up... It definitely did not... On the contrary... 👍
19 September 2019, 10:03
Today I could finish my Seaking without mess bacause the conection & fit of the 3D printed rotor hinges is excellent! It was possible to install the blades without glue. THX David!!
And I would say "thank you" to all mates for supporting me and all the fabulously comments.
I post a first batch of pictures of the completed Heli: more comming soon (tomorrow).
21 September 2019, 19:12
Hallo Bernhard, amazing model, can´t wait to see you and the Sikorsky in Lingen 🙂. Cheers Stefan
21 September 2019, 19:22
I'm sitting here with a open mouth - holy shit! THAT is a model 👍
Would be a reason to drive through the whole country to visit Lingen the first time.
21 September 2019, 19:29
Moin moin Mates: I'm glad that you like my Seaking. As promised... a second batch of pics. See U in Lingen...🙂
22 September 2019, 05:26
this is a fascinating work Bernhard 👍 👍 👍 - I like it a lot - see U in Lingen 🙂
22 September 2019, 06:50
The Sea King is my favorite helicopter type since I was a little kid. I grew up with Sea Kings flying over my head and there's no other helicopter in the world I like more. If I ever asked someone to build a Sea King model for me, you would be the one. Congratulations for making this outstanding model.
BTW: This might seem to be a bit funny because of all the little details that you realized in this model but I especially like the droop of the rotor blades. You can ruin every heicopter model by messing up the droop but you nailed it. 👍
22 September 2019, 14:47
The Seaking obviously makes you exceed yourself everytime you tackle one, If I recall a certain „High speed Testbed" that made my jaw drop just like this one !
Absolutely incomparable work Bernhard, my admiration.
22 September 2019, 19:38
Absolute 48-scale mastery 👍 👍 👍 - it´s pointless to point out single details, It´s a gem from A to Z & from every angle and distance - Final pics just great, the whole project was an absolute pleasure to watch, looking for your next projects & techniques!
23 September 2019, 10:38
another stunner from your hand Bernhard... splendid model... just looks ready to fly
24 September 2019, 06:36
Dear mates, it was truly big fun to build here this Japanese "whisk" and participate in all your original and supportive comments. During the last days I combed my stash for other JMSDF objects and I fear you must "go through" one more helicopter in Japanese markings.... starting soon🙂
25 September 2019, 18:08
Bernhard, das ist wirklich eine erstaunliche und erstklassige Arbeit! 👍
26 September 2019, 06:24
The level and attention of / to details is amazing. Clean work. Exceptional model, congrats
28 September 2019, 11:01
A wonder of the art of imagination and genius skill. 👍 🙂 Just superb. 👍 👍 👍
30 March 2021, 20:26
Very nice, clean and detailed work. The red and white livery suits the Seaking very well and you did a great job on it.
12 April 2021, 07:03


