

DeHavilland DH.88 Comet 'Grosvenor House'


Comentarios
97 4 December 2024, 11:33
Those familiar with the kit might have noticed the absence of the firewall. I simply lost it and decided that I will just omit it as it is invisible anyway.
5 December 2024, 17:42
A very interesting plane! You made a good progress with another (parallel?) project 👍
5 December 2024, 18:39
Interesting build and very promising start - I´m in for this 🙂
9 December 2024, 09:13
Interesting approach to simply sand the control surface structure in the primer. I'll keep my fingers crossed for a good result.
18 December 2024, 13:53
As a base for the red color, you need to use yellow, then the red will be bright.If you put red on white, you will get just pink.
18 December 2024, 14:08
Michael, using different primers for one top coat is my idea! The usage of my idea is geBIERenpflichtig! 🙂
18 December 2024, 15:38
Looks like you're the partial member of The Infanous Order of The Pink Primer 😋
18 December 2024, 18:19
@ Nicolas: I cross my fingers too. But looks like I have to do some homework before the final coat (see below 🙂 )
@ Denis: thanks for your input. I tested your suggestion on a scrab wing. With LP-7 I get a nice hue as well over white primer and pink base alike. Problem is that there is almost no difference between them. Over yellow (XF-3) the red receives a rather orange hue which I do not like for this project. But I am optimistic to finetune that and use lighter yellow or buff as base coat and see how that turns out. I'll keep you posted.
@Frank: So, se wollen erheben ne kleene GeBIER?!
Da trifft es sich ja gut, dass mein diesjähriger Adventskalender aus 24 Flaschen feinem fränkischen Bier aus 24 verschiedenen Brauereien besteht. Es wird mir eine Freude sein, ein-zwei-drei mit Dir zu teilen - in N?! In M?! Gruß 🙂
@Lukasz: I applied, but as PartPrimerer I am only allowed into the Entree so far. Full membetship pending. 🙂
Welcome Guy
19 December 2024, 09:52
Yes, I will be interested in what your red color will turn out to be. I recently painted small parts red, but there was a noticeable difference in color, depending on the color of the soil. Perhaps your LP-7 is better.
19 December 2024, 10:09
I tested a couple of base coat variations for LP-7. A nice combination in my eyes is achieved when using Mr. Hobbycolor H413 yellow as base for the darker areas and pink (Tamiya X-17) for the lighter ones. But that would have meant to redo the whole base paint. So I stuck to my combination and mourned the loss of contrast.
21 December 2024, 23:27
Add some white today and it will be perfect Xmas gift just in time 😋
1 24 December 2024, 09:43
Really great job. I appreciate your approach.
I didn`t test different base color. I used GS Aquarius H23 at first piece at black surfacer, and it wasn`t fine. I will use gloss yellow at 2nd piece.
How did you do such perfect wing bottom side. It looks really nice. I had relatively big gap there and some residual step although I precisely brushed big material layer out from both wing half. Maybe, the used glue did a step at the end.
I thing, that this, wings bottom, is weakest part of this model although, as you ar writing, engine nacceles also need some attention.
26 December 2024, 13:04
Welcome mates and thanks for your encouraging and funny comments. Bottomline I am quite happy with the shade of red. I just haven't made up my mind about how gloss it should appear finally. If I would have had access to a cutter I would have scanned the bigger decals and cut masks for painting the letters.
Now what's left are the tail skid and a few bits and pieces at the wings and the stabiliser.
@Jakub: wing assembly requires some scraping and dry fitting. With super thin cement I didn't encounter any issues afterwards. But there still remains a considerable gap towards the flaps and ailerons which I filled with super glue.
1 27 December 2024, 08:21
Thanks mates. Let's see whether the year is still long enough to finish the plane.
1 28 December 2024, 17:59
Nice 👍
Regarding the cutter - you know I can always help here! If you still want to do it may another mate can scan the decals ... or next project.
29 December 2024, 20:08
I agree with everyone; great job, nice result, and I like it very much.
30 December 2024, 21:10
Thank you all for sneaking in.
Couldn't finish it last year, so might be the first to be completed this year.
Wish you all a lot of happy modelling in 2025.
1 2 January 2025, 01:27
Thanks mates for yor very nice feedback. Is a nice kit. Still pondering about a few details for a little vignette.
5 January 2025, 12:23
The figures and other elements look great. Are they 3D printed or commercial?
13 January 2025, 19:39
Thanks Christoph and Cuajete,
all items are commercial, some classic resin casts, some 3D-printed.
1 13 January 2025, 22:27
The comet turned out beautifully 😊 - excited to see the finished dio my friend 👌🤞
24 January 2025, 08:07
Thank you Thomas.
progress is a bit slow as the last figure I bought needed a decent makeover due to casting imperfections. Same with the barrels I bought. Issues I weren't used to from.Balaton and White Storck Models.
24 January 2025, 13:47
Thanks Alec. Yesterday two figures were painted, the barrels redone and after I went full circle I am back again at the high base which I left for - first a bigger, then a smaller one with different layouts. Now I am confident with the actual concept and I am optimistic that I can still finish it for the Moson Model Show end of april.
1 4 April 2025, 17:03
I like the red headdress; the pump on the barrel looks nice, and I'm getting excited about the completed dio.
14 April 2025, 07:13
Thanks Nick and Jennifer for the heads up. I finished preparing the base and should be able to put things into place within the next days.
14 April 2025, 15:15
Thanks Cuajete. Little by little I inch myself toward the finish line.
1 17 April 2025, 07:03
Excellent! I have this kit in my stash so I don't only love the pictures but your comments on the building too!
19 April 2025, 10:51
If I don't change my mind again, then this build is completed. I shot some preliminary pictures but hope to add better ones under daylight conditions.
Thanks for joining, for your interest and your feedback.
19 April 2025, 22:43
The combination of the beautiful aircraft and very impressive mini diorama is truly extraordinary. And precise figures that look as if they were at least in 1/48 and not in 1/72. Really great work. A joy to behold. 👏👏👏
20 April 2025, 15:17
I love the dio, the airplane is sharp too. Is that a dog or a cat?
20 April 2025, 19:38
Due to circumstances I missed this build completely. Very nice build! I reccon the strugle for the good color of a basecolor.
1 20 April 2025, 20:18
Thanks a ton to all of you for your kind comments and praise. I feel flattered.
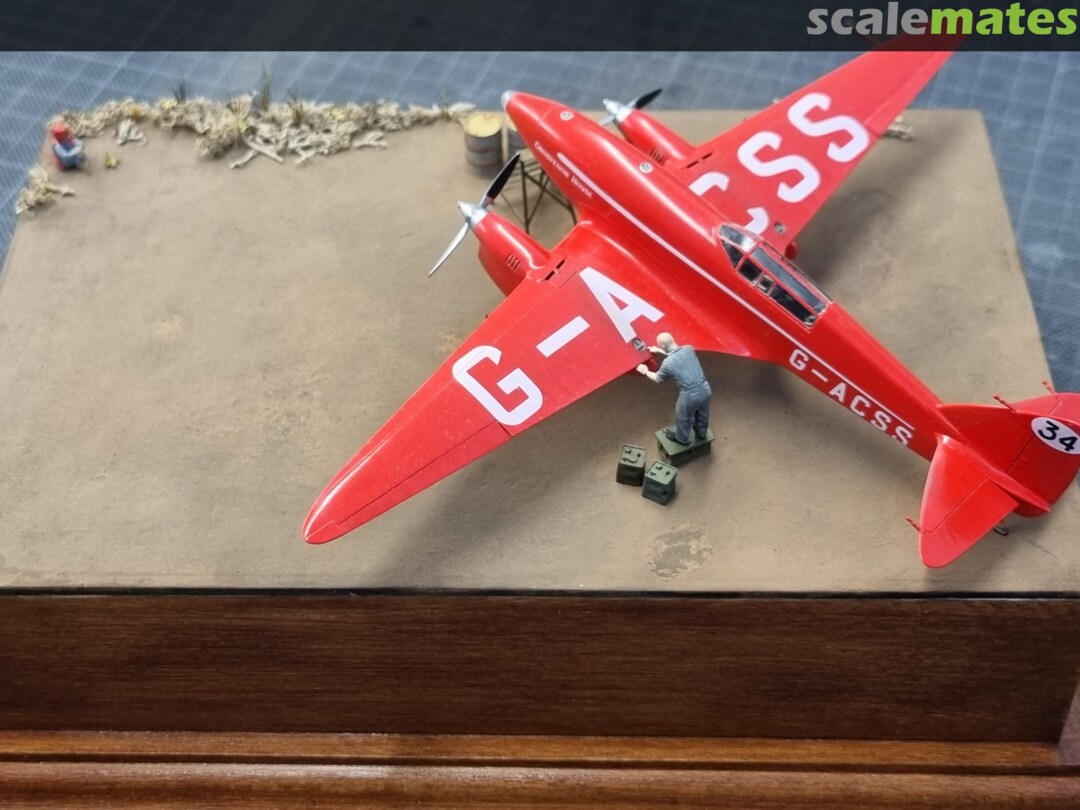
Maybe a word about the idea for the vignette. As said this plane was the winner of the Mcrobertson Air Race which was initiated for the centennials of Melburne and took place in 1934. When announced it was clear that the Americans would win it anyway as some fast and reliable aircraft had been released from there. 'But not without a fight' stated DeHavilland then and developed the DH.88 for this purpose. The race had some compulsory stops and Allahabad in then India (nowadays Pakistan) was one of it. Unfortunately I haven't found any pics of Allahabad airfield of this time and mused that it probably was a dirt strip. So that is the setting.
1 21 April 2025, 11:46
🙂 by the way Jennifer and Lukasz - it is a cat. But I did struggle to paint it the way to make this obvious (and I obviously failed 🙂 ).
Thanks Teeage. (to prevent misunderstandings: all information concerning the race are historically accurate (at least to the best of my knowledge), only the Allahabad setting is the result of my imagination.)
en.m.wikipedia.org/wiki/MacRobertson_Air_Race
2 21 April 2025, 18:04
my dog looks a lot like my cat, the small dogs can easily be mistaken for a cat
21 April 2025, 21:47
Thanks a lot guys. I am actually quite happy how it turned out in the end.
Was a pleasure to have had you on this journey too.
6 May 2025, 17:08


