

Kaman HUK-1 Huskie


Commentaires
53 18 November 2024, 17:11
Eine gute Bausatzwahl Bernhard! Hier ist viel anpassen und säubern angesagt, aber dann passt das gut zusammen. Problem ist das Dach, da musst Du einerseits an den Rumpfschalen bei den Streben etwas wegnehmen und an der Oberseite. Dann überlistet man diese Hürde. Hab so einige Fotos vom HUK-1 bei Flickr gefunden. Als Fotosuche einfach HUK-1 eingeben.
19 November 2024, 20:17
Thank you Mattes: A lot of seats are free yet.🙂
Tom : danke für die wertvollen Hinweise. In der Tat habe ich schon geahnt, dass das Dach nur theoretisch passt. Heute Abend willl ich mich an den Zusammenbau wagen.
20 November 2024, 06:32
I'll plonk my bum on one of the available seats and strap in for the your next plastic spectacular. 🙂
20 November 2024, 09:02
🙂. You are welcome: as usual popcorn for all! 🙂
I found the most usable sequence for installation of the fuselage parts:
cockpit to the left half. Right half. Bottom. Upper roof inserted without gluing. Lower roof inserted without gluing. Front bubble glued to the bottom and to the lower roof. Both roofs glued to the fuselage. Air inlet glued in. Ready without mess and disaster. 🙂
20 November 2024, 17:58
not the everyday subject, and built by Berhard? I am in!, pass the popcorn, please 🙂
20 November 2024, 21:47
Popcorn is almost gone!?! Looking for an empty seat… ahh, there still room 🙂
21 November 2024, 13:26
Any kit, no matter how bitchy, has no chance of fighting back under your hands. And it always looks so easy.
25 November 2024, 14:42
Today I worked on the tail. The detailing and overall fit is excellent. However, I recommend changing the assembly sequence. In my opinion, it will hardly be possible to integrate the parts cleanly if you follow the instruction
25 November 2024, 15:29
Wow. This brings back memories of watching these at the American air force base RAF Wethersfield in England in the 1960s practicing their fire fighting role . They would hover over a fiery crash site and beat the flames back to allow the silver suited ground crew in to rescue the trapped airmen. Wonderful!! Great work.
30 November 2024, 16:51
A model always comes to life with decals and it looks fantastic already 👍
2 December 2024, 14:25
I'm glad you like the interim status. Alec: That's the same yellow I used with you Corsiar/Prototype. A mix with light gray to reduce saturation. The sea blue (H181) is also lightened / reduced in saturation with sea gray.
2 December 2024, 14:36
Thx!🙂
I decided on a different assembly sequence. First I built the complete rotor head (parts D1, D17 and D3). I replaced the plastic axle with a brass tube (1.6 mm). The counterpart (tube with a diameter of 1.8 mm) is installed in the pylon. I recommend to disassemble the vibration dampers (parts d20) and gluing the triangles to the blades first. The middle part can be glued in between later after the installation of painted blades. This achieves a simple and clean assembly of the individual parts.
1 6 December 2024, 21:08
As usual, I attached the doors with two pieces of wire. 0.24 mm hole, 0.25 mm wire.
1 11 December 2024, 16:59
Today was the right time to connect the tail with the fuselage. 5 of 9 struts in place. The decision to replace the etched parts with brass pipes with wire as inlay was right. It's been easy to install and it's all much more stable.
1 18 December 2024, 19:33
Amazing result 👏🎉
It's been a great build to watch and looks Brilliant... well done 💯%👍👍
22 December 2024, 14:03
Today morning I finished my second Kaman whirlybird and I'm glad that you like them. Robert: see please last picture🙂🙂
1 22 December 2024, 15:46
Ein sehr schönes Modell und tolles Weihnachtsgeschenk an dich selber. Freue mich auf deine nächsten Projekte. In diesem Sinne wünsche ich dir und deinen Lieben frohe Weihnachten und einen guten Rutsch ins neue Jahr🙂
22 December 2024, 15:58
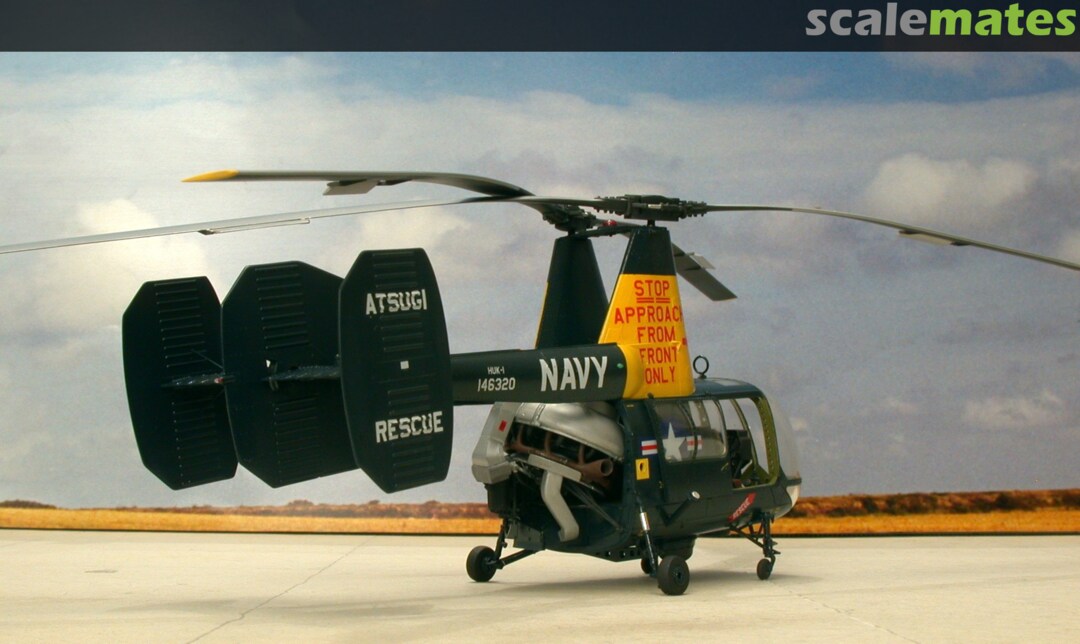
I thought about Robert's comment again… Somehow it's all very tight! Do I have install the axes of the rotors correct? Unfortunately no! 🙁 I glued the axles at a wrong angle!🙁 It can't work like that.
The axes run parallel to the inner EDGES of the pylons and not through the center of the pylons. Thanks to my solution with a brass tubes, I was able to correct the mistake. With a suitable drill (1,6 mm) and a bit of pressure, I bent the tubes into the correct position / angle 🙂. In the last picture the correct position is shown.
2 22 December 2024, 17:29
This just goes to show that having a second pair of eyes can be helpful (a pair that actually pays attention… 😄. Awesome fix, and amazing model in any case. Merry Christmas!
23 December 2024, 13:48
A very nice addition of an interesting type to your heli collection 👍 I hope to be able to see it with my own eyes soon!
29 December 2024, 21:50

