

Sikorsky H-19, MLD, #076 „Salome" (completed)


Commentaires
106 10 March 2025, 05:19
The cockpit is very complete in the kit. I have therefore added very few parts such as 2x 3 operating levers under the instrument panel as well as a few parts on the cockpit floor before the stick. The cushions are not yet mounted, as they are painted separately (leather).
10 March 2025, 05:42
Den Bausatz hab ich auch. Toll gemacht, aber irgendwie bin ich mit den gespritzten Kühlergrillen am Rumpf nicht ganz happy. Lässt Du die so, oder machst Du die weg und neu aus Fotoätzteilen?
12 March 2025, 15:56
You are wellcome! As usual a big bag of popcorn for everybody!
12 March 2025, 17:20
of to a very nice start, I will take a seat next to gorby and Ronan, 🙂
14 March 2025, 21:39

„Seats" for the cabin. Eduards PE parts are designed for the H-21 the "fabric mesh" is a bit too long for the H-19. But after folding the fit is ok. Overall, it is still not as it should be for the Salome, but already much better than with the part from the kit.🙂
19 March 2025, 16:46
Picture 27: Salome and probably all MLD - machines has a cover (insulation) for the rotor great box. Template for the wall (bent already for right side) of 0,2 mm plastic.
ipms.nl/walkarounds/..amp;gid=2&pid=96
2 April 2025, 18:31
Mind blowing, as always... I wonder what will you build after you have built ALL available helicopters on the market...?
1 8 April 2025, 17:35
As so often, I could not decide: on the one hand I did not want to disturb the silhouette of the helicopter by opening bow doors, but on the other hand I wanted to make the beautifully detailed engine visible. That's why I made the doors movable. 🙂
12 July 2025, 17:31
A moveable door is the next step towards a flying model ... but ...
are you sure the plastic hinges are robust enough in long term? I would use/create metal ones.
12 July 2025, 19:13
Movable doors ? There's always a bigger fish …..! 😄. The hinges do not disturb the overall impression at all, phantastic solution as always.
( Wenn ich da noch an meine vergeblichen Versuche denke, die Flächen der Devastator klappbar zu machen…) 😄
16 July 2025, 06:32
Bughunter: of course, you are right that metal hinges are much more stable. But I have no reservations, because I have already used exactly this principle with the H-34 and it really lasts sufficiently. The red one is not plastic but flexible insulation from a cable. Sticks very good and is very flexible. The effort was quite manageable and I think that the result is very close to the original.
Thanks Hanno. TBD: Already 4 years ago? 🙂
1 16 July 2025, 17:42
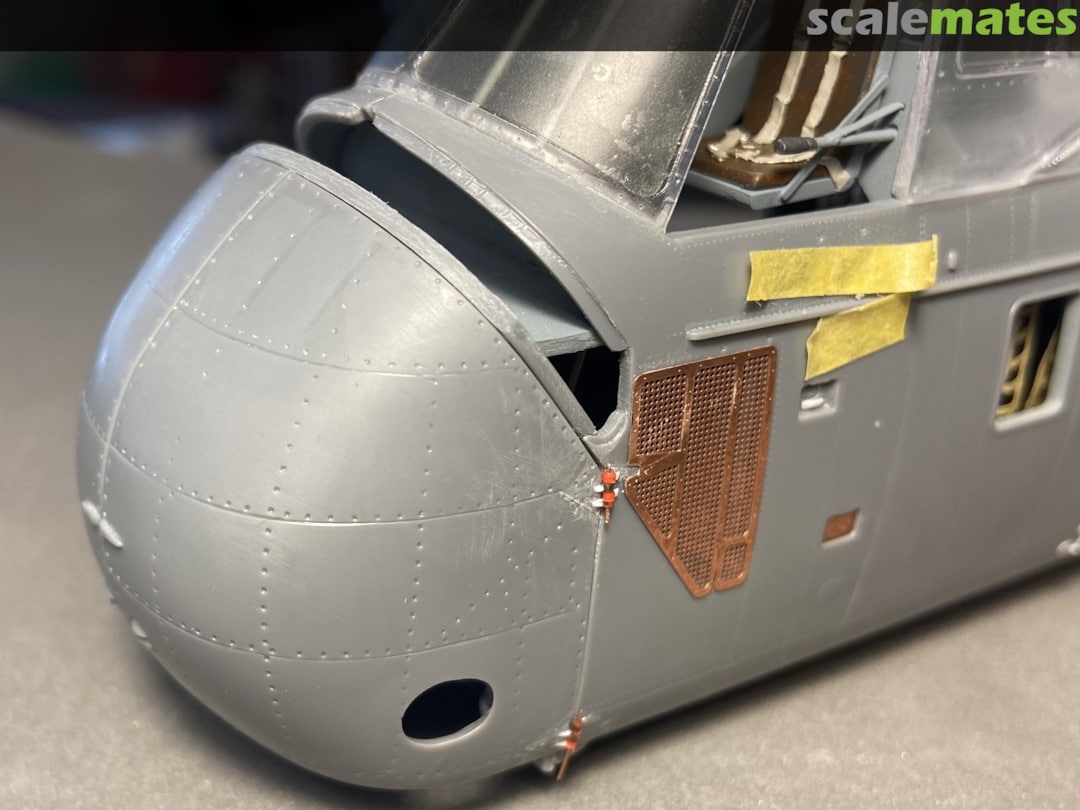
Die Lackierung sagt mir schon mal sehr zu! Wie hast Du das mit den Lüftungsgittern gelöst? Im Kit sind die ja leider nur als Plastikteil dabei. Ist nicht schön gelöst.
23 July 2025, 18:34
Thx Tom. In fact, this is not optimally solved in the kit. Based on the kit part, I cut a piece of Tamiya- tape to size and glued it on mesh as a template. The mesh cut to size with scissors and glued with the smooth side outwards. thin strips of 0.13 mm plastic glued on as edge. Summa summarum it took about 2 hours. See picture 44.
1 23 July 2025, 18:58
Thx Jan 🙂
In my opinion it's very hard / nearly impossible to instal the winch 1:1 without "modifying". As usual I used first a piece of 0,45 mm wire through the window (very unusual kind of installation found only with this type of heli) to fix the winch in the correct position.
31 July 2025, 16:52
As usual, Bernhard - very inspiring and brilliant work. 👏👏👏
Thanks so much for sharing.
1 August 2025, 05:55
Thanks you mates for the very motivating words.
The last scratch build task for the Salome is done: the side mounted Yagi antennas. For better strength I used for most parts brass tubing and soldering.
7 August 2025, 16:27
Bernhard, it's just incredible what you can do! Including subtle nuances in the matte and semi-matte surfaces (tires, helicopter surface, etc), so it really looks extremely authentic.
You're the Paganini of the modeling world.
Your masterpieces are a great inspiration and motivation for me. Thank you!
9 August 2025, 12:07
Hello Mates, your comments make me very happy! AMP has really succeeded in a very good kit. In particular, the 3D printed elements for the rotor heads are very well done. Only the glazing is not optimal: there is still a lot of room for improvement with AMP.
Zbynek: I'm glad you saw the result of my building philosophy. For many years it has been standard/intention to design the „degree of gloss" of the surface differently. That's why I haven't used clear coats for more than ten years.
In addition, I learned a lot about colors in nature and models from ModelFan editor-in-chief Uwe Lacina many years ago. For example, that 100 percent black and 100 percent white are out of place on models. I also learned there that 100 percent shine or dull matt is just as wrong with models.
Therefore, you will not find pure black and no pure white with my models, as well as no high-gloss paint, regardless of whether it was the case with the original or not.
2 9 August 2025, 14:24
Bernhard, I totally agree. There's a bit of alchemy with the white and black tones, where to shift the tone. Whether to just neutrally lighten/darken or make the shade a little warmer or colder. I'd say it depends on the other shades of colour. Do you have any experience or a recipe?
However you do it, the result is just uniquely beautiful.
1 9 August 2025, 20:12
Your extremely clean modelling impresses me again and again. Excellent.
1 9 August 2025, 22:45
What a beautiful finish! I have this kit and your build is great inspiration.
1 10 August 2025, 21:38
Zbynek, I still owe you an answer. 🙂
I haven't a recipe but it varies from model to model. But I can tell you about some "basic ideas". I firmly believe in the "scale effect" in the saturation of the colors. By this I mean that the smaller the model, the lighter the basic tone should be. And also the saturation of the color is lower. This depends on the distance from which the aircraft (model or Original) will be seen. Distance = turbidity of the saturation by air.
Maybe you can remember my XF4U1. I have significantly reduced the saturation of the chrome yellow for the wings with light gray.
I think this exactly reflects the effect I described.
2 12 August 2025, 06:30
Thank you very much, Bernhard!
It's great alchemy and fun.
Not only in colour, but also in detail. What details, such as engraving or rivets, are reasonable to omit at a certain scale. Or pitot tubes in 1/200 scale on airliners....?
Your information goes very inspiring. Many years ago, I read somewhere a reference to similar rules of lightness of colour by scale. But I'd forgotten that, and you've reminded me of it and, more importantly, clarified it. Thanks!
1 12 August 2025, 21:11
Super detailing and so very realistic (I initially thought it was a real life size photo !). Very well done indeed.
31 January, 16:08

