

De Havilland DH-89 Dragon Rapide - completed


Commentaires
74 1 September 2025, 09:25
Oh, that is interesting! Watching for sure as a master tackle this kit 👍
1 September 2025, 09:40
Mates: you are welcome! 🙂
As usual I used wire (0,36 mm) as connection between wings and ailerons. Btw: the fit is excellent and Armory's solution very clever; each part consists the half of the piano-style hinge. So there are after installing no gap between the parts.
3 September 2025, 16:35
Following 😎 I am interested to see what the transitions from the lower wings to the fuselage will look like, from what I've seen Armory didn't get it quite right? It should be flush and not stepped, IIRC?
3 September 2025, 17:59
Excellent! One of my favorite aircraft by one of the best modellers. 🙂
1 3 September 2025, 18:16
Kenneth: I know what you mean, I realized that too. The transition OOB makes it impossible to plug in the wings. I'm going to improvise.
Gorby: thx! 🙂🙂🙂
1 3 September 2025, 19:11
With such an interesting aircraft, I'm definitely following 😊
4 September 2025, 07:23
Kenneth: As promised, I improvised today. I have shortened the tabs and I have revised the slots a bit. The wings fits. 15 minutes needed.
1 4 September 2025, 17:23
Today I worked on the cockpit and the cabin. I found that Armory has curiously forgotten references to colors inside.
Research on the Internet has shown that in most cases seats are covered with red leather and the matching side walls up to the lower edge of the windows were also red. The windows were edged red on the inside, the rest of the cabin was light gray.
Alternatively for red, a medium turquoise/green was also used. The tubular frames of the seats were black.
On the original photos of the Star of Scotia you can not see red on the inside, no matter how you edit the picture (contrast, gray saturation or brightness). Accordingly, it should have been green.
flitetest.com/articl..-in-a-1930s-airliner
1 7 September 2025, 15:37
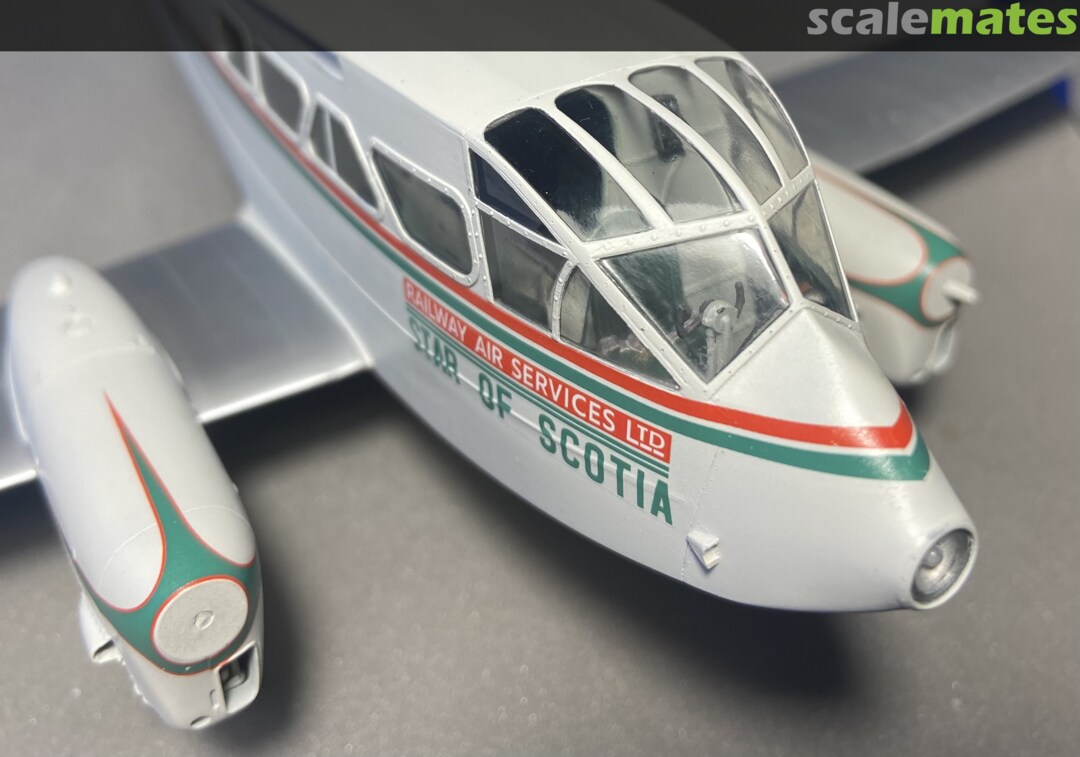
Today I have dealt with the decals and can state that they are very good. You just have to be careful because they can hardly be repositioned.
Fortunately, the Star of Scotia (G-ALXT) has survived. It is a successor machine the crashed G-AEBX and obviously it has a slightly different color scheme than the first SOS. I'm afraid I'm not quite right with my paintwork 🙁
1 29 September 2025, 16:45
Anyway, it looks beautiful on pic 25! I'm sure you will manage it.
29 September 2025, 17:07
Looks fantastic 👍 Don't trust the colours on a restored aircraft though…
3 29 September 2025, 17:34
Nevertheless : A beautiful result with the paintjob, and as usual, smart solutions to otherwise challenging tasks !
The „CA-bulkheads" are simply clever !
29 September 2025, 17:35
There is a song by Sia in which she sings "never give up". I also made this motto my own. Especially today: when I had removed the first masks from the cockpit clear parts, I thought I had to give up the project🙁. Almost every window was fogged up (CA). Whereby I put so much effort and applied all the tricks that came to mind🙁
But the motto is "Never give up!". 2 hours later, the result looks for my very ok. Luckily I left the door open on the left side. 🙂
1 6 October 2025, 16:16
So, what did you use to clear the canopy fog? I've heard Vaseline helps a bit. I only use white glue on canopies now.
6 October 2025, 16:25
Robert: Thx! 🙂
Skyhiker: Tamiya modeling wax.
Modeling Wax (Tamiya 87036, No)
")
1 6 October 2025, 17:23
Thx Mates 🙂
Michael: The windows of the original were white.
1 7 October 2025, 16:59
Today I put the prepared parts together. The work preparation was worth it. However, the rear struts are about 1 mm too short. I'm not sure where the error is: more with me than with the kit. Most likely, when rebuilding the rear and not quite correct struts, I exchanged the front and rear ones. The shorter one taken as a base. 🙁
But it's actually no problem: doing it again takes 15 minutes. I have to airbrushing in the cellar white again anyway. 🙂
1 8 October 2025, 13:23
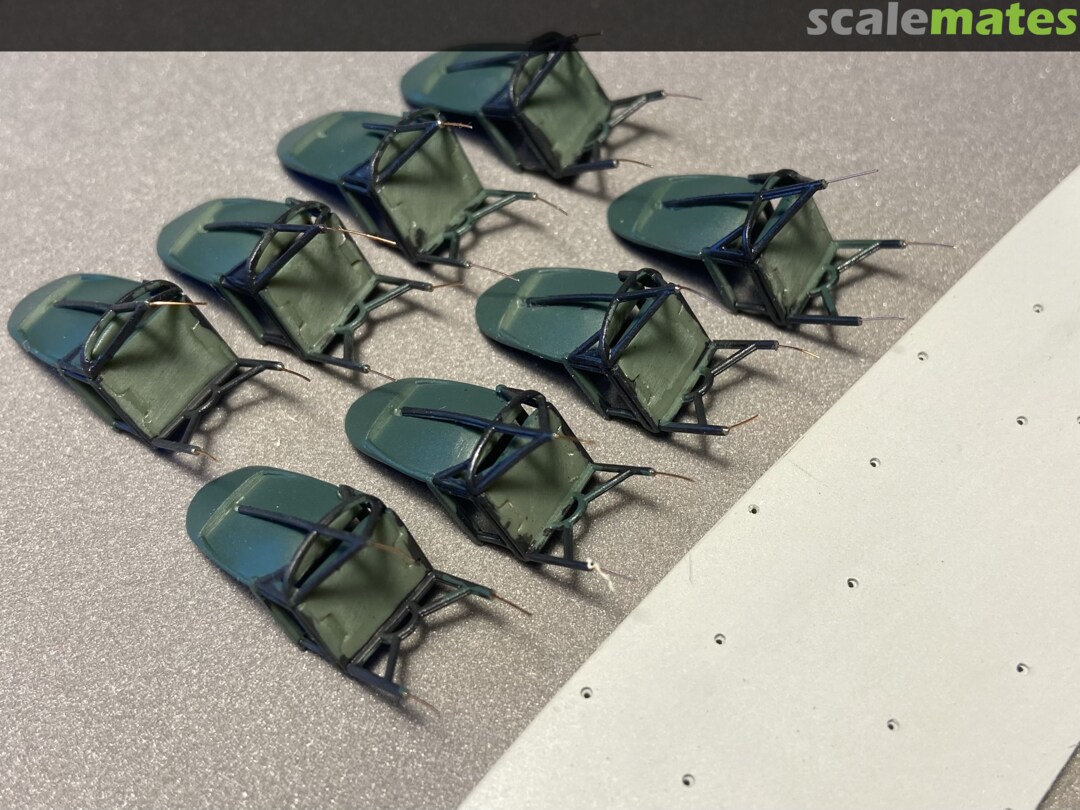
Rear struts 2.0: This time I made them a little longer and they fit.🙂
On this model, I made the flat profiles (rigging ) of 0.2 mm thick guitar wire because of the simplification. I had to think of an article by Bob Steinbrunn (The older model builders will remember this model building legend).
In 1990 he published an article in FSM about Japanese K5Y Willow trainer and used exactly this technique. In 1990 I just started model making and devoured the article with big eyes at the time.
How do I know it was 1990? The Internet knows everything and forgets nothing!
I entered "Bob Steinbrunnen Willow" on Google and got a result immediately!🙂
11 October 2025, 17:18
Ah, I thought you meant the article itself. I have a willow in the stash
12 October 2025, 02:53
Great job on those struts Bernhardt. You may like to know that Bob is still very much active in modeling, I run into him at local competitions and show frequently 👍
1 12 October 2025, 12:54
Alec: I am very happy to hear that Bob is still active. I guess he's about 70 years old? I would love to shake his hand and thank him for the inspiration. 🙂
1 12 October 2025, 15:34
It's incredible how precisely and cleanly you build your models.
1 13 October 2025, 13:24
Another beauty for your collection ! Your skills in rigging and scratchin parts never cease to amaze, flaps, rigging and spreaders look totally convincing and realistic. Looking forward to laying my eyes on this one „live and direct" soon 😊.
2 16 October 2025, 21:37
...a beautiful aircraft...and a great subject for the master....
1 16 October 2025, 21:50
What a build! Your attention to detail is always humbling. Awesome job 👍
1 17 October 2025, 12:23
as expected, another museum piece from Bernhard incredible hands. amazing!!
1 17 October 2025, 19:57

