

PZL W-3A Sokół (D-HSNA, Polizei Sachsen) completed
 1February 27, 2023
 2March 2, 2023On the control sticks there are a lot of red knobs. You can try to plop on red paint or paint the knobs BEFORE you install them on the sticks.
Step 1: thin discs of 0,4 mm round rod prepaired with Tamiya tape for painting. 3March 2, 2023Step 2: dabbing of the knobs with red paint.
 4March 2, 2023Step 3: take up the knobs with sharp scalpel.
 5March 2, 2023Step 4: place the knobs with CA on the sticks.
 6March 2, 2023Step 5: enjoy the red knob result with a glass of red wine 🙂
 7March 4, 2023
 8March 4, 2023
 9March 4, 2023
 10March 4, 2023
 11March 5, 2023Edges of both openings thinned down.
 12March 6, 2023The engine housing is a true puzzle. For such an complex structure the fit is very ok. In the middle I used a piece of square rod as spreader.
 13March 6, 2023
 14January 21, 2024
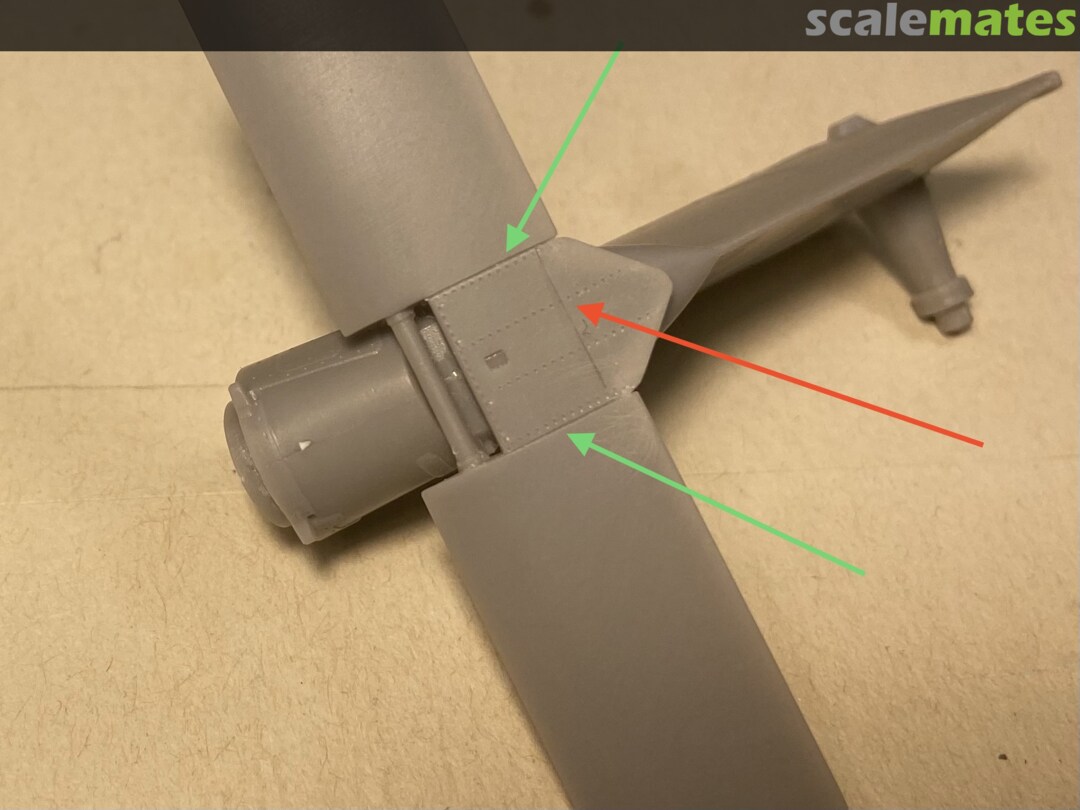
 15January 21, 2024A bit too massive kit parts replaced (cockpit illumination light and engine levers)
 16January 21, 2024Grips/steps and the openings in the fuselage are a bit too thick (0,7 mm). I calculated the thickness with max. 2,5 cm and intend to replace them from 0,45 mm wire.
 17January 22, 2024Upper console completed.
 18January 22, 2024
 19January 22, 2024New research results: not the complete cockpit is painted black. On original pictures is well visible that the rear wall is light grey and not black.
 20January 24, 2024Fuselage prepainted in window area for better & cleaner installation off the windows without masking.
 21January 24, 2024Etched “legs” for the seats replaced with U-shaped piece of 0,4 mm wire for better strength.
 22January 25, 2024For better & cleaner installation & better alignment I used 0,25 mm wire.
 23January 28, 2024Gradually the collection of parts looks like a helicopter.🙂
 24January 28, 2024
 25January 28, 2024
 26January 29, 2024
 27January 29, 2024
 28February 2, 2024Dry fit of windscreen parts, not yet glued.
 29February 2, 2024
 30February 4, 2024They are several configurations for the cockpit step. The Polizei - version is a bit different in comparison with the etched parts so I made them from wire. 4 Installation points for the search light added.
 31February 4, 2024
 32February 5, 2024Mount for the searchlight made of soldered wire (0,38 mm). For comparison the kit part: too small, too weak and flat instead round.
 33February 5, 2024
 34February 5, 2024
 35February 5, 2024
 36February 5, 2024
 37February 7, 2024This time I spent almost 1,5 hours to manage the left step. Because it’s very tricky to soldering I will made the diagonal struts from plastic.
 38February 7, 2024
 39February 8, 2024Finally, I chose wire instead of tubing and a slightly different „division“ in comparison with the other side. It worked better.
 40February 8, 2024
 41February 10, 2024
 42February 10, 2024
 43February 10, 2024Courtesy Felix Troschier (thx!!)
 44February 10, 2024New research results: the center of the stabilizer kit part should be fixed (part of the fuselage). The notch for the tail damper is too short. Will be widened.
 45February 10, 2024
 46February 11, 2024The kit offers simplified pitch control. The actual arms for fixing the pitch links are missing. In reality, on the existing kit-arms are attach the centrifugal force weights.
 47February 11, 2024
 48February 11, 2024
 49February 11, 2024
 50February 11, 2024Red: (fixed) part of the boom. Green: part of the tail rotor, moveable. Consist electrical connection for deicing of the blades (“Schleifkontakte -Ring”). The cable coming from fuselage is well visible.
 51February 11, 2024Courtesy Airplane-pictures.net
 52February 12, 2024Mounting for the moveable hoisting arm. Position and shape of the side-formation lights corrected (round not teardrop)
 53February 12, 2024Although I always take thinner material then I find out in my research I end up with is too thick. 🙁
 54February 12, 2024
 55February 12, 2024
 56February 15, 2024
 57February 20, 2024Yesterday I airbrushed for the second time green (top side). This time I learned from my own error during airbrushing the lower side. I used first the semi mat green 131 as well covering base without dust enclosure problems and finished with the right green tone (H3, a very thin layer was necessary. Today I removed the Tamiya tape I’m very happy with the result. 🙂🙂;)
 58February 20, 2024
 59February 20, 2024
 60February 20, 2024
 61February 22, 2024Yesterday I decided to use red decals for the rim of the door openings (instead of airbrushing). This was the correct decision. 🙂
 62February 22, 2024
 63February 22, 2024
 64February 22, 2024Tail rotor completed. Nothing looks better as imitation of metal leading edge as…. metal.
 65February 24, 2024The last painting hurdle is taken: the narrow green stripe is in place. I decided to use painted decal instead of airbrushing and this decision was right. 🙂
 66February 24, 2024
 67February 29, 2024Decals in place. Masks of any windows removed.
 68February 29, 2024
 69February 29, 2024
 70February 29, 2024
 71February 29, 2024
 72March 1, 2024The last big hurdle of the project is taken: all masks removed. After cleaning of all edges (about 1 hour) I’m very satisfied with the result!
 73March 1, 2024
 74March 1, 2024
 75March 1, 2024
 76March 1, 2024
 77March 2, 2024As usual I used short pieces of wire (0,25 mm) to attaching of the doors instead of glue.
 78March 2, 2024
 79March 3, 2024Ready for installing. Bare metal foil and two pieces fine black cable.
 80March 3, 2024
 81March 4, 2024Finally on own legs…🙂
 82March 4, 2024
 83March 4, 2024
 84March 7, 2024The more the thing looks like Sokół, the harder it becomes to instal
more details. 85March 7, 2024The best way to imitate a mirror in 1:48 is... Mirror foil.
 86March 7, 2024
 87March 9, 2024Before last detail on the fuselage: the wipers. I made them of plastic because the etched parts are only 2D.
 88March 9, 2024Before painting and installing the small spring of the underside.
 89March 9, 2024
 90March 10, 2024In the original the steps are covered with a antiskid mat. Yesterday I tried to use my self made decal based mat and I foundered sadly: Agamas decal softener did not only soften the decals but also the green paint🙁. Fortunately I tried this only on one side so I could today try another technique. I mixed dark gray paint with micro baloons and painted the steps with this mixture. The result is stunning. 🙂
 91March 10, 2024
 92March 11, 2024Another side finished after second airbrushing-session in green 🙂
 93March 11, 2024Last detailing task before rotor: the search light. (Thx FT for detail-picture-support)
 94March 11, 2024
 95March 11, 2024
 96March 13, 2024
 97March 13, 2024
 98March 13, 2024
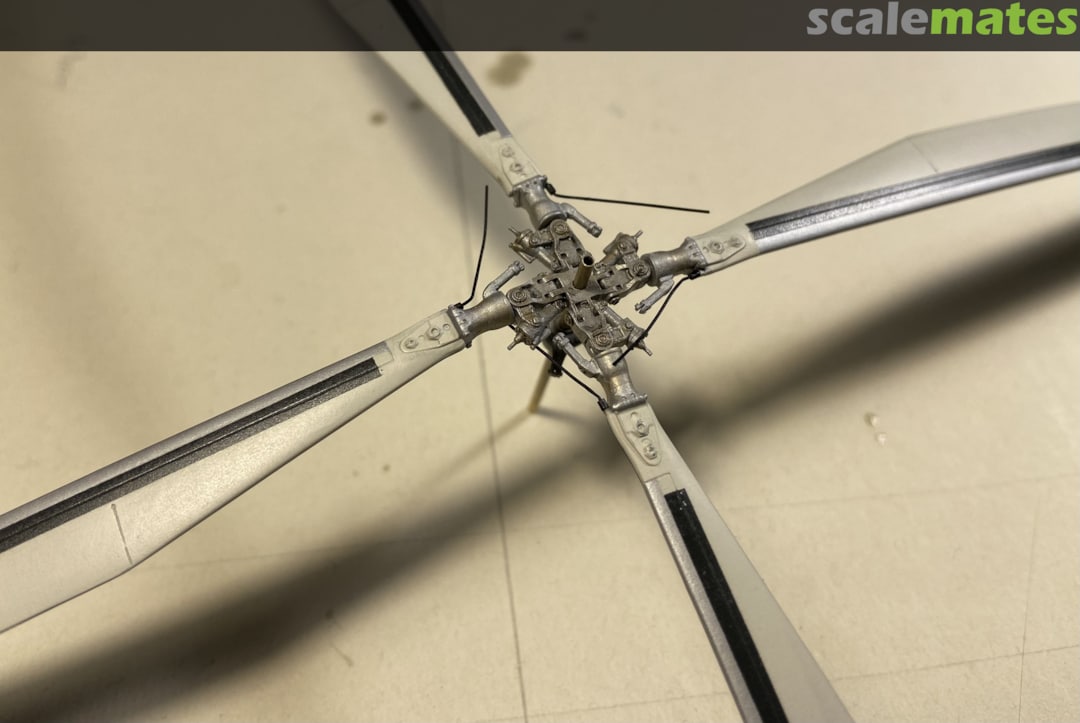
 99March 17, 2024Main rotor: the part - breakdown is not optimal. Because of that I separated the blade-cuff halves from the rotorhead and completed the blades first. Installation of the blades as usual with wire. I left only the pitch link arms and glued them to the blades. The pitch links themselves I will make of wire.
 100March 18, 2024Instead of one common long shaft I used two separate shafts (1,3 mm tube) for lower and upper components. In connection with a third “hidden” connection-shaft (0,85 mm) it’s possible to manage the rotor detachable.
 101March 25, 2024Today I managed the last airbrushing session: dark grey (“black”) rubber areas as deicing system
and metal for the rotorhead. Less than 195 m to run🙂🙂 102March 25, 2024
 103March 25, 2024
 104March 27, 2024
 105March 27, 2024
 106March 27, 2024
 107March 27, 2024
 108March 27, 2024
 109March 27, 2024
 110March 27, 2024
 111March 27, 2024
 112March 27, 2024
 113March 27, 2024
 114March 27, 2024
 115March 27, 2024
 116March 27, 2024
 117March 27, 2024
 118March 27, 2024


Commentaires
24 July 2026, 22:26 -

