

Drakkar, Oseberg


Hozzászólások
283 22 February 2021, 03:21
Should you seek to enter into the world of ship building in wood, I would suggest that you first attempt should be a similar subject. A subject with a decent scale, modest construction (frame, planking, decks, shaping/carving parts) and rigging.
7 March 2021, 10:47
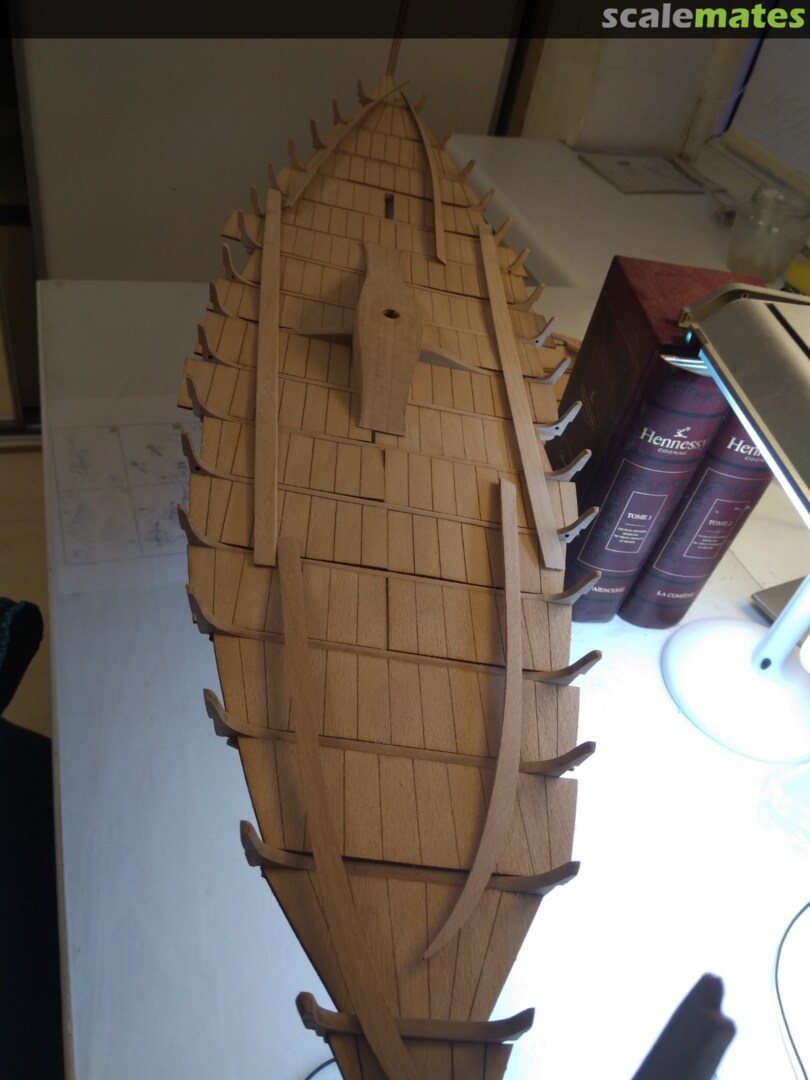
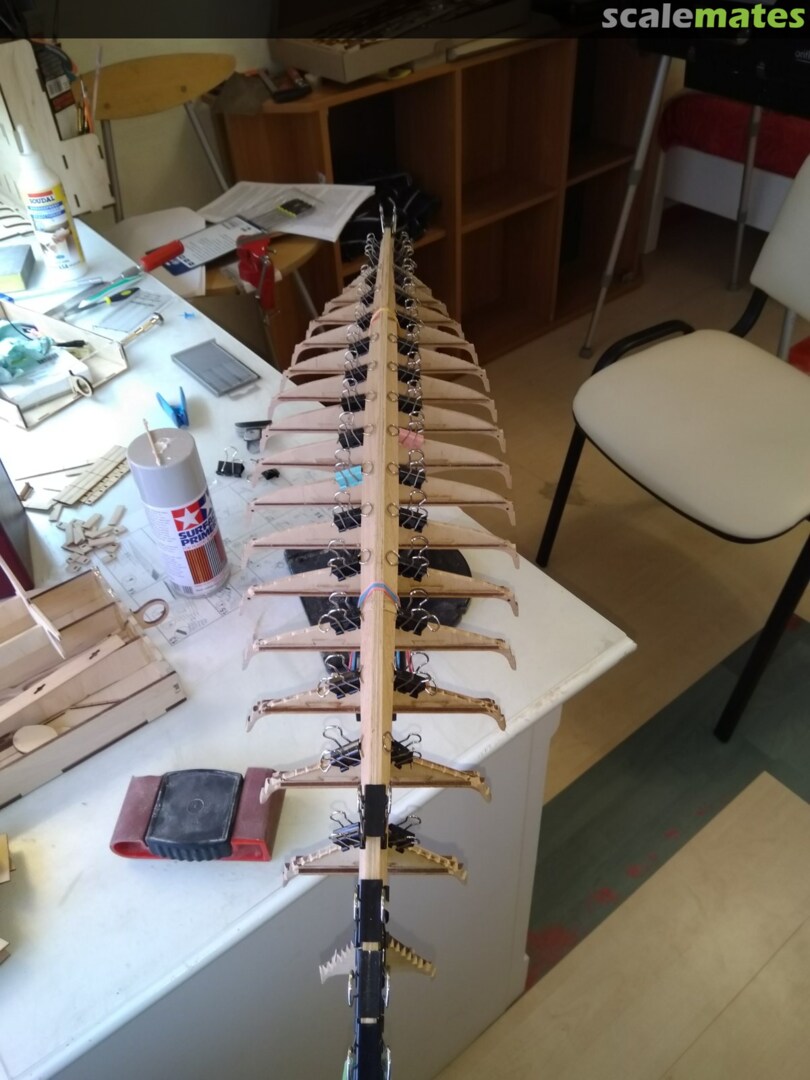
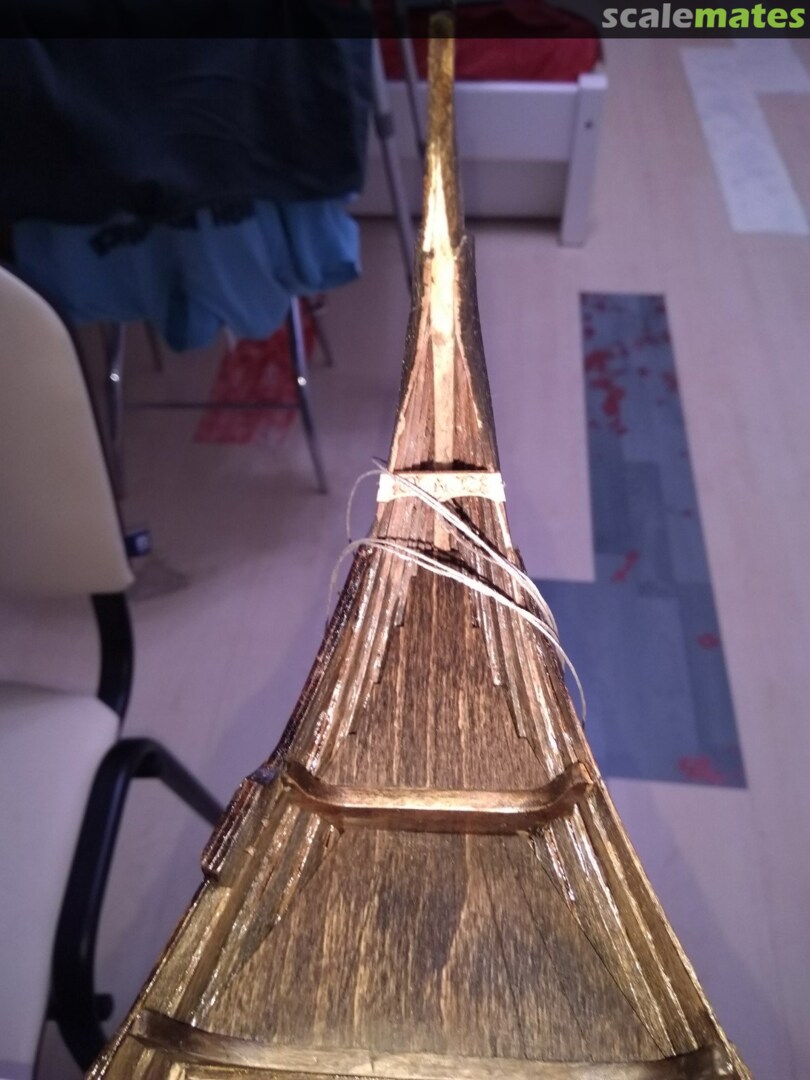
There are clear laser markings indicating where modifications are necessary.
On Rib 0 a rotary tool, a verity of files and sandpaper were used.
On Rib 01 thru Rib 07 a verity of files and sandpaper were used. Chamfering required are more pronounced the further away towards the stern and the bow you move from the Rib in the center. The use of a scalpel was found to be more effective to chamfer the top two levels of each Rib.
9 March 2021, 08:02
The next order of business will be chamfering the bow and the stern (a sharp etch is required), followed by looking how the deck planking will lay between Rib 08 and the bow/stern. As soon as that has been addressed, I need to address the "wobble) in the keel, and only then glue the ribs in place.
Thanks for watching.
10 March 2021, 18:11
Great progress, Villiers! Looking forward to watching your construction. I have a Revell 1/50 Viking Ship in the stash to do one day.
10 March 2021, 18:45
Looks like fun. I know it would be difficult to find, but a few figures would look very nice there I think. 🙂
10 March 2021, 21:22
Emil: The Drakkar seemed to me a logical choice to "ease" into wooden ship building. Sofar, I am happy with my choice.
Ben, Gordon, Rui and Treehugger: Thank you for your encouragement. I must still gather enough courage to attempt figure painting....
11 March 2021, 19:00
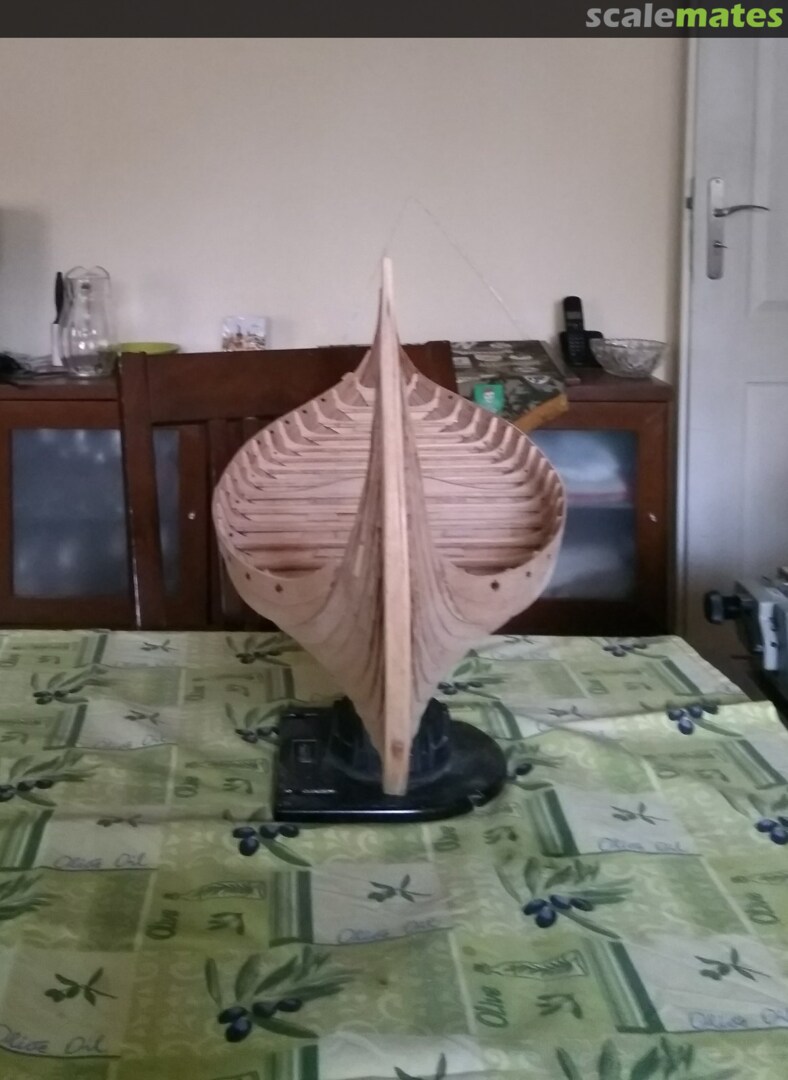
Today, like a big old sissy, I tried to postpone chamfering the keel. Hence the sub-assemblies 🙂
If I had to build this particular model again, I will chamfer the bow and the stern posts before gluing the posts to the rest of the keel. But all in all, I am happy with the results.
I am entertaining the idea to fix the small wobble in the keel and then covering the keel with planking. That way, I can ensure that the ribs are seated at the same depth.
11 March 2021, 19:06
Planking the keel is the first step into "dressing" up the frame of the Drakkar. This brings about the challenge of simulating nails that were used. Cursory research showed that the keel and stems were joined using scarf joints which are fastened with three iron rivets each. At scale 1/25, sewing pins with heads may be in scale. Although pins and eyebolts made from copper or copper plated may be more aesthetically pleasing, but using common stainless pins and eyebolts may be closer to the right material? Next week, after addressing the keel, the frames will get a final onceover before being glued. I will also continue with some of the repetitive subassemblies such as the roving benches (x30), shields (x30) and oars (x30).
13 March 2021, 04:37
Torsten, Rui and Sergej: Thank you for your encouragement!
14 March 2021, 12:10
Yesterday and today while waiting for supplies, I spend the time on shaping the parts required for steering the Drakkar, storage of oars, laminating the large main support for the mast as well as 14 seaman chests.
16 March 2021, 18:37
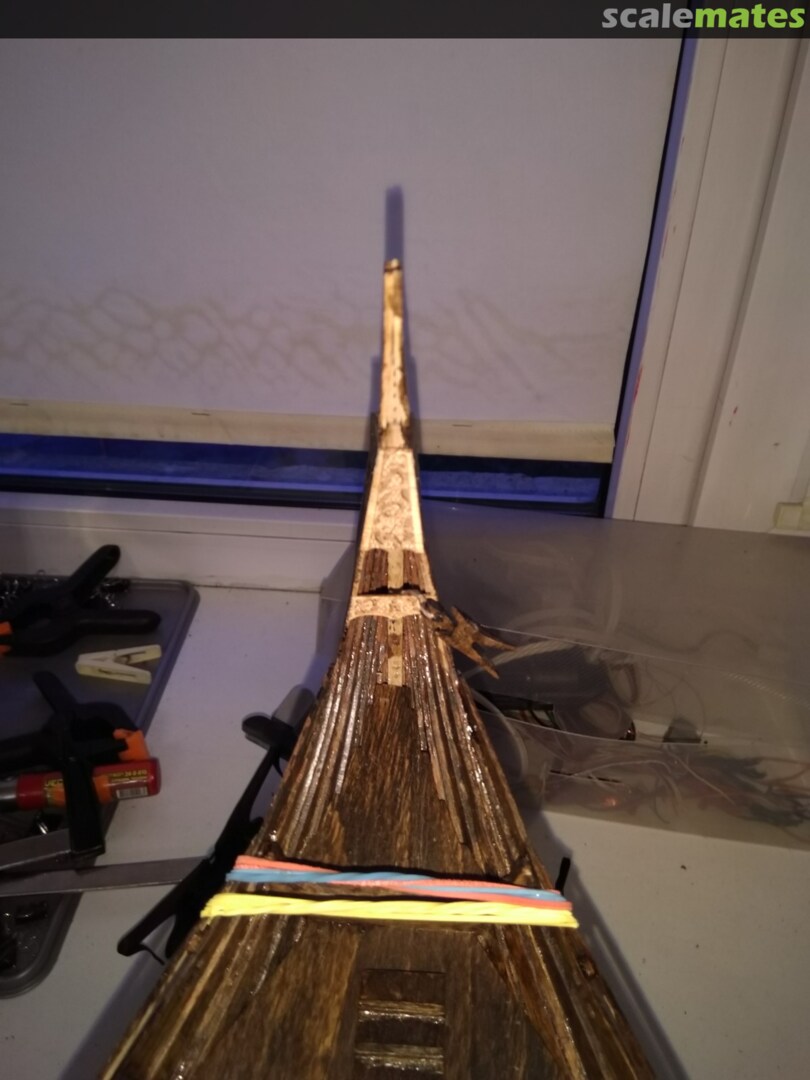
The project has seen progress. Planking started, and the first belt looks good.
21 March 2021, 03:19
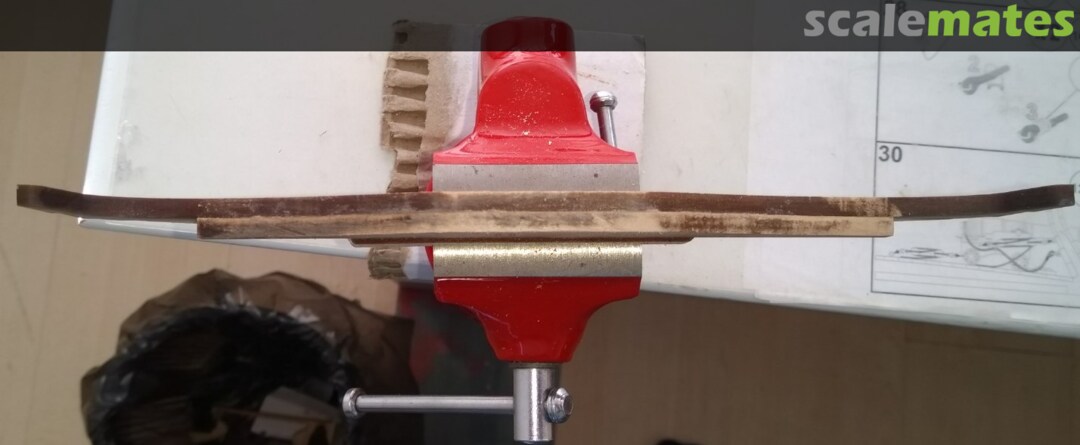
Yesterday I laid the second belt of planking and when this morning I checked on my work, I was not satisfied at all. Because the clinker style of planking is so, and forms such an important part of the model, I decided to remove all the planking (fortunately only two belts). By using alcohol, 90% (not for steadying my nerves), the glue could be softened and the planking could be removed with the minimum damage.
The rest of today was spent inserting inserts between the ribs preventing warping/twisting as well as cleaning up the keel, ribs and planking. I should be able to start planking tomorrow again.
23 March 2021, 19:11
The results of today was much better. A big thank you for the words of encouragement.
24 March 2021, 20:46
Impresionante trabajo, es una obra de artesanía! Seguiré su trabajo. Seguro que le quedará esp! Animo!
21 April 2021, 07:01
@Doug: It's true. That is the nature of most wooden ship models.
@David C, Gastón, Dominik and Spanjaard: Indeed a lot of work, but also very relaxing.
Again thank you for your encouragement.
8 May 2021, 17:37
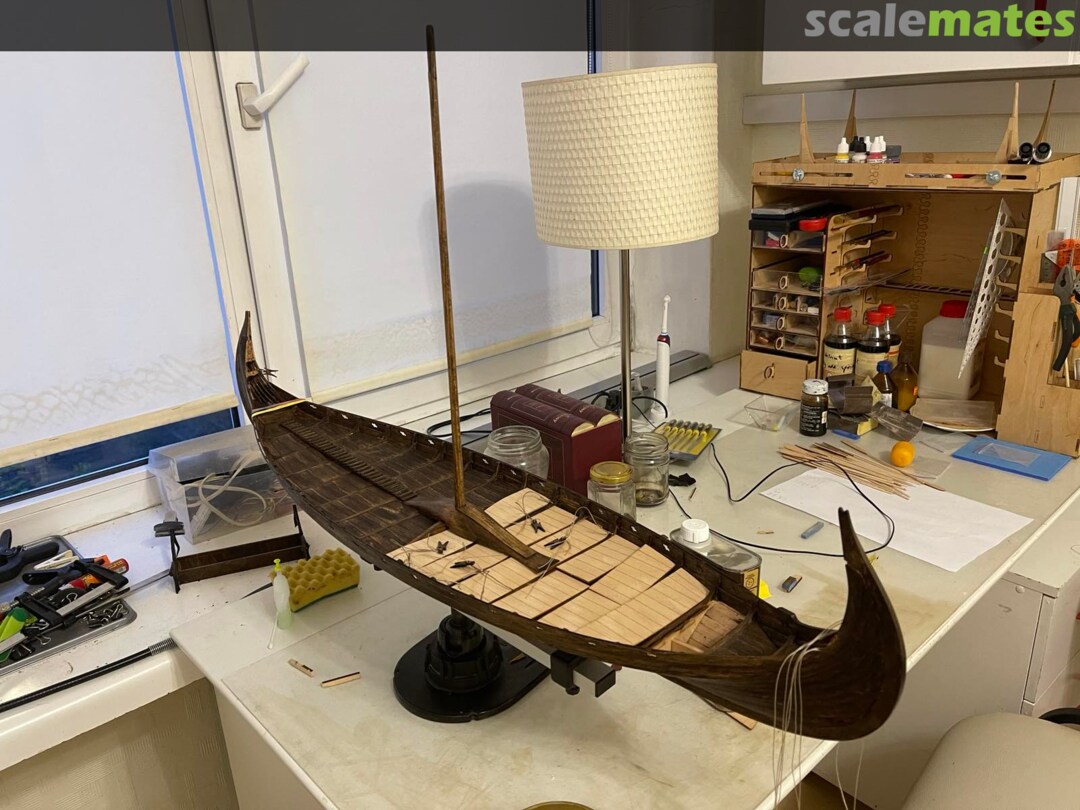
Today, a personal milestone was reached with the hull planking completed. My aim was to accomplish symmetry, and by and large I believe that I have accomplished that. With the planking of the hull completed, 1) The sanding and staining of the hull outside and inside will be tackled, 2)The deck planking will be laid, 3) Fittings will be placed, and 4) Rigging.
8 May 2021, 17:42
@Torsten and Gordon, thank you.
The goal for next week remain to 1) complete the deck planking, 2) the standing rigging to the main mast, and 3) decorative pieces.
5 June 2021, 19:54
What a work!!! 😎
That's so different from what I do in model building, I show you my respect, really great work, ❤️️ it
6 June 2021, 08:38
With all that experience with building the ship it looks like the next level will be building the real one...;) Truly impresive!
23 June 2021, 07:27
Thank you for all your kind words, it is much appreciated.
@Dean, I recommend that you do try a wooden ship. It is very rewarding for me and and a complete change of pace for me from building plastic kits. This is my first wooden ship, but not my last I hope.
25 June 2021, 19:06
I have kept myself busy learning to read the rigging drawings and learning to make the specific knots. On this a lesson learned is that you must treat the ropes/threads with beeswax, be prepared to use more rope than required, be patient and finally trim it back to the required length.
Next I will start work on the main sail, attaching the sail to the yard and attaching the running rigging.
25 June 2021, 19:12
I started work today on the main sail, and posted a few photographs
28 June 2021, 18:00
As I like to work with real wood I need to watch this build! Nice work so far 👍
28 June 2021, 18:24
How are you joining the strips back together, Villiers? Next steps? Hope it's going well ?
15 July 2021, 17:49
Bruce, using white glue, I paint a strip between 1mm and 3mm wide. I then overlap the area painted with glue with the next strip. I then finally use a steam iron to apply heat to the joint.
The next step will be to fold back the borders, secure the bolt rope on the perimeters and finally to secure the running rigging.
15 July 2021, 20:01
I am placing the project on hold for a short while. Please stay stunned for the next grueling episode which will be in September.
15 July 2021, 20:03
The break between two seasons is always gruesome. 😄
Keep up the good work, Villiers. It's a really nice ship. 👍
15 July 2021, 20:06
She is resting but will awaken when you return.... We'll survive somehow ?
15 July 2021, 20:12
Villiers, your post has inspired me to go into my stash and consider starting work on some Billing and Amati model kits I have. But, as you say, after September because Summer in Malta is too hot to work on big models. I look forward to your next post.
1 August 2021, 08:02
very nice detailing of the build and thank you for sharing the tips. what varnish teint do you use for the deck ?
1 August 2021, 08:26
@WhiteGlint, Bruce and Evander: The break from the ship is certainly enjoyable. I will hopefully return with new focus and energy. I am already considering my next projects which will be Columbus' three ships (smallest to the largest one). Fingers crossed!
1 August 2021, 10:51
@Evander and Pierre: I would be interested in hearing your opinion with regards to good manufacturers. Or is it case of what you make of a particular model?
1 August 2021, 10:55
@Pierre, I owe you an answer. I remembered that the tint is "Old Oak", but I cannot remember the manufacturer's name.
@Treehugger, The colour was recommended by the designer/manufacturer. After watching all the seasons of Vikings back-to-back, I have to agree with his choice 🙂
Some of the purists have you covered your model in matt varnish. My personal taste is to hand paint my ship in semi-gloss clear varnish. I may reconsider areas which are painted. Again, it is your model, your joy, your taste.
1 August 2021, 11:01
Villiers, I have found that Amati make good wooden kits. You will have to research a bit (that is after all part of the fun) both on construction techniques as well as the actual ship itself. I have found sites similar to Scalemates but dedicated to wooden ships very useful. Billings Boats has a nice selection also.
1 August 2021, 11:17
Thank you Evander, and I agree with you on the research part. Me, having started with a less complex kit also helped to develop and to be bold.
1 August 2021, 11:32
Like your woodwork. I'm struggling with my Black Pearl - can't cope with dry brush over black primer 🙂. Looking around for tutorials, howtos - doesn't help yet
14 September 2021, 08:39
so nice very inspiring what teinte did you use for the deck ? it is very dark and look good
14 September 2021, 12:55
@Pierre, the tint that I used on the deck and the entire model is a dark oak. Before applying the the stain I tested it on the actual wood. Exactly the same way you tested your San Francisco cross section. After the tint dried, I polished the surface using a Dremel tool and finally covered the surface with semi-gloss clear.
@i_nook, I am still learning painting techniques myself. I am also following your SMK Project with interest.
15 September 2021, 06:45
@John, with a face like mine anything and I mean anything can only enhance its features. The long sword compliments the peg leg, eyepatch and plastic parrot.
15 September 2021, 17:52
Work resumed on the Drakar. I ran out of steam trying to create the perfect main sail by joining individual panels with white glue and reverted back to the traditional tried and tested method of using a single piece of material and using a sewing machine (operated by my wife 🙂 ) to indicate the panels. I will try the individual panel method again in future, but on smaller sails.
22 September 2021, 17:20
Very neat stitching 👍 I'm guessing it will drape better this way too? I'm looking forward to the next steps towards the grand unveiling and launch 🙂
22 September 2021, 17:55
It is good to hear that your wife accepts your hobby so much, Villiers 😉 The sail looks pretty, a testament to her skills - chapeau bas!
22 September 2021, 19:38
@Bruce: I hope that it will help with the draping. Otherwise I may have to revert to starch.
@Robert: Merci! My wife has an artistic streak (painting, drawing, sculpting). We share tools that I have. She loves to help out.
23 September 2021, 08:28
@ Major, I agree. There is fewer things in life more satisfying, for us at least, than to see something coming to life from assembling various materials.
30 September 2021, 19:48
@WhiteGlint, I hope to finish this project by the end of November. Although challenging and slow, this project allows for lots of artistic and problem/challenge solving opportunities.
@ Major Flannel, thank you for your kind comments. I have send you also a PM.
22 October 2021, 08:11
My work on the main sail continuous. I am working on version number four.
1. Version one was tinting the material and working with individual panels. The white glue used to connect the panels turned black when heat was applied and I could not keep the overlapping consistent/parallel.
2. Version two was a second attempt at version one.
3. Version three was experimenting with applying paint and other variations in tones. Paint kept on saturating both sides of the cloth even though a resin type tint was used on the cloth for the initial colouring. This was overcome by before applying paint, to paint your picture with diluted white glue. Every second panel was also painted from top to bottom with diluted white glue. This created subtle differences in the overall tones and breaking up the monotony. Although not on the instruction sheets, I spotted reef strips and lines on reference photographs and drawings. We experimented to replicate this also.
4. Hopefully will culminate in all the above lessons learned.
22 October 2021, 08:26
What else to write, incredible, the details, the work, it's fun to watch it 😎
22 October 2021, 08:59
The neat stitching looks great, so taking time and keeping everything 'just so' makes a lot of difference. The sail with reefing lines looks great 🙂 The bare mast and standing rigging will take on new life when you hoist the main sail 🙂
22 October 2021, 10:44
Version 4 has been placed on ice. I have spilled water (accidently) on the sail.
Version 5 and the adventure is continuing.....
22 October 2021, 17:52
Thank you all for your kind remarks and encouragement.
I am changing gears a little bit, while my wife is working on the latest version of the main sail, I have started work on the shields. Work on the oars are also nearly finished.
23 October 2021, 17:57
Loving the level of detail, even on the reverse side of the shield. These are going to make the ship have even more presence 🙂👍
23 October 2021, 20:16
@Bruce, yes, a simple design. There are thirty shields to be painted 🙂
24 October 2021, 06:39
The main sail is in an advance state of completion. After looking at more reference pictures it was decided to include scaled reef bands and reinforcement patches on the sail. The hope is to make the sail as realistic as possible.
24 October 2021, 07:05
@Spanjaard, thank you.
@Bruce, Robert and Torsten, earlier during the project we briefly entertained the idea to paint each shield with our family crest. I then got to think that it is not that practical. I am not sure what a raider was paid in those years, but I am sure that they did not want to spend money and effort on elaborate art work on their shields that would anyway get damaged. I have included photographs in this thread to illustrate. In the end I opted for a red shield with a green line in the center. That will make masking less complicated.
With the large area presented on the sail we will add the family crest.
26 October 2021, 12:20
The sail looks very good, it is worth every step. I like the solution with the shields and the one with the crests looks good 😎
26 October 2021, 12:34
That's fantastic. I love the idea with the family crest. That's making the kit really your own. 😄
26 October 2021, 13:20
Goodness, are you going to use the Mk 1 sail to try out the mega-crest? This ship is going to look splendid 🙂
26 October 2021, 15:19
Great looking sail, and great looking shields, Villiers! The shield design is simple but effective. Will look great mounted on the boat.
26 October 2021, 16:28
@Torsten, WhiteGlint, Major Flannel, Bruce, David and Gordon: Thank you for your kind words.
27 October 2021, 05:46
The reef-lines were completed last night by my wife 🙂
The number of lines equals 17 panels x 2 reef-lines per panel x 3 reef-bands = 102 reef-lines with a knot at the front and a knot at the back to secure them which equals 204 knots and cutting back the lines front and back to 40mm. She is a keeper, that's for sure!
27 October 2021, 05:52
The sail has been sown to the yard. The braces left and right has also been fitted, ready for final adjustments on the ship.
31 October 2021, 07:24
Looking great - there extra efforts and trials are paying dividends 👍
31 October 2021, 07:31
@Bruce and Kitey, thank you for your kind words.
@Kitey, I have given placing the shelter some thought, but have not yet made a decision.
2 November 2021, 20:06
And now you only need Eric the Viking sailing for a search of the Sun 😉 Your ship looks terrific already, Villiers! I am sooo impressed looking at these photos...
2 November 2021, 20:11
She has very elegant lines for sure, and the drape of the sail is perfect. The rigging too looks the part. This labour of love is something you and your wife can be very proud of. Congratulations 👍👍🙂
3 November 2021, 08:42
@Robert, David, Bruce and Kitey, thank you.
The static-rigging and running rigging has been installed and adjusted. I will leave it as is and Monday take a look again with fresh eyes at the rigging and shape of the sail.
I am in the homestretch. The remaining tasks are to complete work on the shields and oars, cleanup the deck, install the rower's benches and perhaps install a shelter as Kitey suggested.
6 November 2021, 21:58
Awesome looking Drakkar 👍
And by the way, your WIP is a very helpful step by step tutorial.
10 November 2021, 08:03
Extraordinary is the correct term... just wow! Brillant work Mate!👍
15 November 2021, 21:52
Gentlemen, I am humbled by your kind words. For me the journey was unchartered territory.
Thank you very much for your support and interest during this project. Also thank you for all the friends that I made along the way.
I am calling her done for the moment. I may still fabricate an anchor of sorts and still need to box her up in a display cabinet.
15 November 2021, 22:02
It has become a real beauty, I am running out of superlatives, just beautiful 😎
16 November 2021, 04:10
Now I can finally say what I really think… umm.. sorry, I just don't have the words.. 🤯 I raise my tankard and propose a toast in the true Viking tradition:
1. Choose a good drink
2. Choose a good cup
3. Choose your words carefully
4. Choose a good occasion
5. Heap lavish praise upon your brethren and swear blood oaths to vanquish our enemies in battle! 🍺
16 November 2021, 04:25
A very beautiful outcome of a fantastic project! 👍 I really like models with real wood 😉
16 November 2021, 06:27
a truly fantastic job Villiers! great result on those uncharted waters 🙂
16 November 2021, 08:55
Very impressive work and especially your attention to the finer details 👍
21 November 2021, 17:04
Gentlemen, thank you very much for your kind words and stopping by to comment and like.
I am steadily working on an scratch build anchor which I hope to have finished shortly.
22 November 2021, 02:04
I am happy for OP having completed this, and I think this looks really nice as well. 🙂 Incidentally, the ship was found in a grave iirc, at some place in the region that I used to live in as a child.
22 November 2021, 15:25
@Lochsa, Isaac and Treehugger, thank you very much for your positive comments.
@Isaac. definitely. Perhaps a picking from Dusek's classics. My wish for now is to complete the trio from Columbus which has arrived and their rigging is comparatively simple. This should take me through the remainder of 2021 and the whole of 2022. Then perhaps embark on a line covering exploration and another covering flagships.
30 November 2021, 08:04
Recommended reading - "The Oxford Illustrated History of The Vikings" - Chapter 8 is all about the ships.
30 November 2021, 15:46
WOW! Villiers this just looks (as others have said) outstanding and meticulously completed work. It is art not modelling imo. 🙂 👍
1 December 2021, 12:09
@Ben, thank you for the tip.
@Steven and Neil, thank you for your kind words.
My next and final report will see the Drakkar in its acrylic box with an anchor 🙂
2 December 2021, 06:28
Just, wow!
Goes to show that nothing looks like wood like wood, especially if treated properly by the modeller!
BTW, what is this "Antique Varnish Bituminous" you are mentioning - the stuff used on real boats?
23 March 2022, 08:18
@Gluefinger and Guy, thank you for your kind words.
@Gluefinger, yes I believe so. I first sanded the surface smooth and then applied it in a single layer and wiped it off immediately. Using the Antique Varnish was recommended by the manufacturer to me.
23 March 2022, 18:51
This is brilliant 🙂. You are a brave man to tackle such a subject and have got amazing and wide-ranging modelling skills.
2 April 2022, 05:18
@Kyle, thank you for your kind comment. Primarily, the designer of the model ship did an excellent job.
6 April 2022, 04:10
While a nice kit certainly helps, you have done a fantastic job bringing it to life!
6 April 2022, 05:29
Gentlemen, thank you for your kind words. I think there is a bit of stubbornness involved as well encouragement from my wife 🙂
7 April 2022, 03:24
My wife is also my biggest fan. She tells me all my models look good, even when I know that is not the case. 😂
7 April 2022, 04:49
Comments from my wife are as follows,yes dear,nice dear,another box of plastic and how much.LOL
7 April 2022, 14:23
Also Accurate David. LOL. And also, "where are you going to put those? Isn't the stash closet pretty full already?" 😂
7 April 2022, 22:07
@Yves, thank you for your like.
@Kyle and David, you brought a smile to my face. We are lucky to have significant others that takes a keen interest in our hobbies 🙂
8 April 2022, 00:23
Thank you Jörg.
It is true. Our hobby in general allows us to be creative.
8 April 2022, 13:22
Thank you for your kind comments gentlemen.
If any person have the urge to enter the world of wooden ship construction, I suggest a simple kit like the Drakkar. Or at least a single mast ship with simple rigging.
24 June 2022, 09:49
Amazing, and certainly a decent amount of time and patience needed. Wonderful work!
8 October 2022, 09:33
Andy, David and Mina. Thank you for your kind words. It was quite an adventure.
14 October 2022, 03:50
Isaac and Pietro, thank you for your kind words.
Isaac, welcome back and yes, my wife showed her talents painting our family coat of arms on the main sail.
25 October 2022, 08:39
Outstanding work with maximum effort. I'm excited and take a seat, Villiers. 👍👍👍
10 November 2022, 07:47
Hello Brend. Thank you for your kind words. It was my first crack at a wooden ship model. This project has been completed.
10 November 2022, 14:22
Incredible work. You did a great job with the wood and the canvas - i like it very well. I'm curious how it looks finished. Following. 👍 👍 👍
I have five wooden model too, including a very beautiful southern xebec (Xebec 1753 (Amati 1427, 1:60)) . But so far I don't dare to build it.
")
11 April 2023, 14:33
Your labour if love is still as impressive as ever, Villiers. Inspirational skill, craft and ingenuity for sure 👍🙂
11 April 2023, 20:06
Shar and Bruce, thank you for your kind words. The wooden ship bug has bitten me and I hope to build a few more 🙂
Shar, the model has been completed. I may later add a scratch build anchor.
12 April 2023, 02:13
Gentlemen, thank you for stopping by as well as your compliments.
9 November 2023, 04:16
Incredible work! This is the most detailed and amazing step-by-step long ship procedure I've ever seen. Your photos may also give a great help to me for my plastic long ship, better than any other data I've found before. Thanks for your really wonderful work!
28 December 2023, 00:30
Late to the party, but better late than never! What a beautiful build!
28 December 2023, 01:53
I gotta admit Villiers, I admire you ship builders. The amount of work, time, and detail that you put into your builds, is amazing. To me, it's a black art, most definitely a craft! I'd love to try one myself, someday, but I'd have to set up the appropriate machinery first. You need a mini workshop, just for all the cutting and sanding, then there's the jig making, etc? I once chatted to a guy at a show, who told me that he built his boats/ships, from plans that he bought online. Quite inexpensive, if I remember correctly? But then you have to get the wood, steam it, bend it, and when you have the bare bones of it, you have to get all the metal parts, and the bill runs into hundreds of pounds/euros/dollars. However, as my aging body begins to slow down and retirement slowly approaches, it might give me something else to do, instead of my American Trucks?
Excellent work buddy, you truly are a craftsman, and this thread deserves every single like that it's got 👍
28 December 2023, 02:59
Gentlemen, thank you for your kind words.
Bozzer, your work is phenomenal. Wood is very forgiving. More so than plastic. I am sure you will do well. It is usually the rigging that derail completing a project. My advice is to start with a single mast ship and work your way up to a multi-master.
28 December 2023, 17:53
Holy Cow! That was certainly a work of art, Villers! It was fascinating to see how you methodically assembled every section from the keel to the sails - the discipline needed to make sure the wood didn't bow, or the panels come out incongruent is phenomenal! Thank you very much for sharing this with us!
29 December 2023, 17:54
This is true craftsmanship Villiers, my compliments!
I've always wondered what building a wooden ship model would be like.. Now I see this, I think I will stick to my polystyrene and resin kits.
16 February 2024, 11:27
Wow thats one of the cooles Models i ever saw. Like Building a real ship. Would love to see more pictures of the finished model.
17 February 2024, 08:12
Thank you Dick and DuperScale for stopping by as well as your kind words.
17 February 2024, 11:33
That looks amazing. I'd love to build a Viking long ship to celebrate my partial Viking ancestry, but I don't think I'm up for building that one. Might have to just build the Revell kit instead.
9 May 2024, 01:11
David, you would be surprised how forgiving wood can be. With your skill set and starting off with a single mast ship like the Drakkar, you will be okay.
9 May 2024, 02:21
Album info
Viking ship, model in wood by Korabel.
This is a single plank on bulkhead model.
This is my second model in wood, and my first ship.
Additional sources of information:
vikingeskibsmuseet.d..haeological-research
nautarch.tamu.edu/class/316/oseberg/

