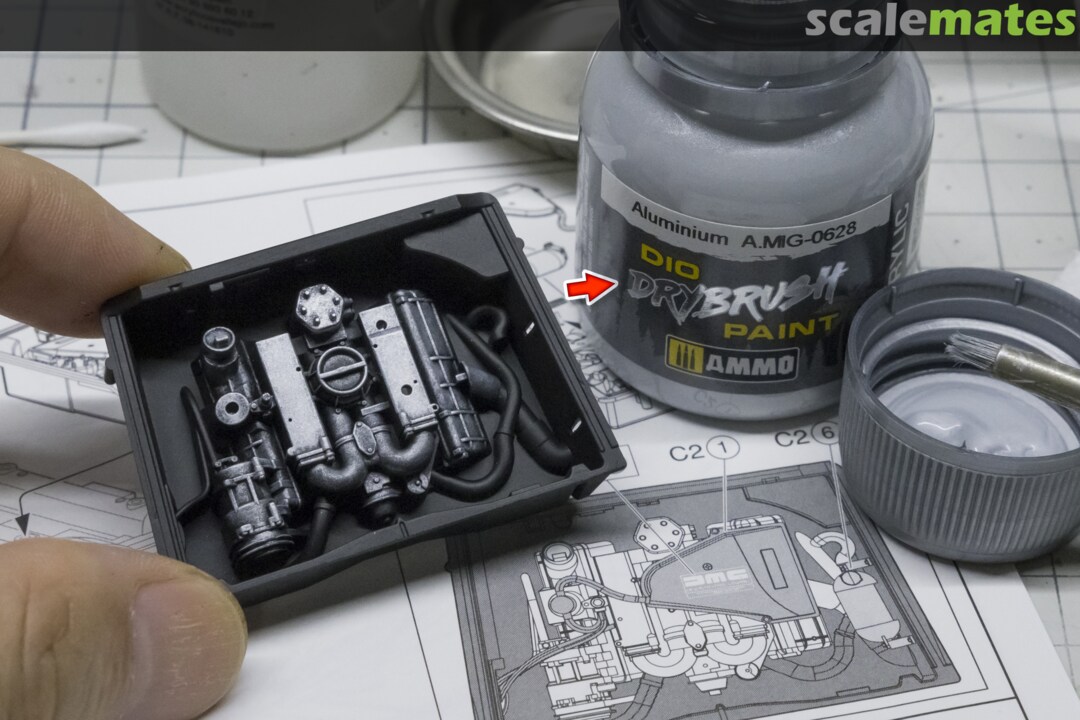
DeLorean DMC-12 - WIP
1October 24, 2025It always starts with washing.
2October 24, 2025The panel lines of the body shell have been deeply re-engraved.
3October 24, 2025Although it is not visible, if there is a convex mold on the back, there will definitely be shrinkage on the opposite side, so I sanded the entire thing.
4October 25, 2025I removed it because I will be using a metal sticker instead of the embossed logo badge.
5October 25, 2025Now, I'm going to create the hairline, which I think is the most important point of this vehicle, but before that, I've masked the front and rear bumpers.
6October 25, 2025The hairline was created using coarse sandpaper.
7October 26, 2025I measured the dimensions using masking tape to replace the front grill parts with etched mesh.
8October 26, 2025Replacement complete.
However, since the grille is recessed deep inside, it seems like there's no need for modification.
9October 26, 2025Now we're ready to paint it black.
10October 26, 2025First, I painted the body shell, and since the tail lights are complex and require multiple layers, I masked them and painted them in transparent orange early on.
11October 26, 2025As expected, the scratches are very deep and clear, and the surface is also quite rough.
12October 26, 2025I worked it again with a little finer sandpaper.
13October 27, 2025Masked tail lamp.
14October 27, 2025Painted with Clear Red.
15October 27, 2025I needed to mask the taillights to paint them black, so I decided to use a cutter. So I scanned the parts and created a vector data.
16October 27, 2025I cut them, but they were too small and dense, so they didn't cut cleanly. I made several, so I'll have to pick out the ones that look good and glue them together.
17October 27, 2025Because they were too small to be seen, an electron microscope was used.
18October 28, 2025I painted the body with black surfacer once more.
19October 28, 2025And I painted all the other parts that needed to be painted black.
20October 28, 2025There are a few deep scratches on the body, so I think it needs some more care.
21October 28, 2025I painted with silver. (IPP's Stainless Silver)
22October 28, 2025The frunk is so well finished that it doesn't need any further trimming. But...
23October 28, 2025I see a few places on the door that need to be fixed.
24October 28, 2025Likewise, there are places on the roof (although it is a door...) that need to be fixed.
25October 28, 2025After I corrected everything, I painted it again with the same color.
26October 29, 2025While trimming the parts, I assembled the parts that could be assembled before painting.
27October 29, 2025Since I don't have the paint listed in the manual, I plan to paint it with a similar color. I also plan to paint the front and rear bumpers using a mixture of the three paints listed below.
The instructions say to mix silver into the bumper, but I think using pearl paint would be better.
28October 29, 2025Masked.
29October 30, 2025I painted f/r bumper and other parts.
30October 30, 2025When I removed the mask, it was a brighter color than I expected.
31October 30, 2025After much thought, I decided to re-mask to paint again.
32October 30, 2025I like it now.
33October 30, 2025I forgot to paint the rubber band next to it. I got lazy and just roughly masked it off.
34October 30, 2025The result was a miserable one.
35October 30, 2025The same goes for the other side.
I have no choice but to paint over it with a brush.
36October 30, 2025The actual wheel should have a hole in the center between the spokes, but it's blocked.
I waited for a 3D-printed, separate product to be released, but there was no news.
So I just painted it with a brush, like I was adding panel lines.
37October 30, 2025I also drew a panel line on the body.
38October 30, 2025I should've put rubber strips on the door, but I forgot. I quickly masked it off and painted it, but I didn't take a picture.
39October 30, 2025The engine room was painted using the dry brushing.
It is a water-based paint for dry brushing by AK, and I liked how it applied smoothly, as if dry brushing with enamel.
For reference, the engine room will be completely covered by the middle cover, so you won't be able to see even 1% of it after completion.
40October 31, 2025The brush painting work has also been done.
41October 31, 2025I dug a deep hole in the muffler and filled Vanta Black into it.
42October 31, 2025Ready to assemble.
43November 1, 2025Start assembling.
I should have painted the marked area, but I forgot.
I don't care because I won't be turning it over anyway.
44November 1, 2025I applied glossy varnish to the DMC logo on the wheel.
45November 1, 2025I also put on a few decals.
46November 1, 2025Interior done.
47November 1, 2025The engine room expressed with only three parts.
48November 1, 2025Lower body complete.
49November 1, 2025Another view.
50November 3, 2025I discovered the shrinkage area late. I had hoped it wouldn't be visible after completion, but it was actually quite visible.
51November 3, 2025I ended up sanding it down and repainting it.
52November 3, 2025Assembled door.
53November 3, 2025Attached front wind shield.
54November 3, 2025A custom-made metal sticker logo was attached to front grill.
55November 3, 2025The actual wheel doesn't have an embossed logo, but I already had a metal sticker made, so I just used it instead. Since it's applied over the decal, I had to use an electron microscope to ensure it was in the same spot as the decal.
56November 3, 2025I also attached it to the handle.
57November 3, 2025Assembled head light.
58November 3, 2025The backs of the left and right blinkers were painted in Vallejo Silver, and the front blinkers were attached to the back with chrome tape.
59November 3, 2025I made a robot kit and attached the leftover silver tape to the rear view mirror.
60November 4, 2025I measured the size of the location where the room mirror would be attached.
61November 4, 2025And I cut the Hasegawa sheet into the shape.
62November 4, 2025Then, I glued the rearview mirror on top of it so that no adhesive marks remained.
63November 4, 2025I attached the mirror parts of the side mirrors to masking tape and then cut them out.
64November 4, 2025I attached the cut masking tape to thick silver foil tape and then cut it.
65November 4, 2025Now I attached it to the side mirror and removed the masking tape.
66November 5, 2025The assembly instructions say to attach the side skirts at this stage, but because they are curled inwards, it seems like they will cause trouble when joining the upper and lower parts later.
67November 5, 2025So first I assembled the face. And then...
68November 5, 2025Assembled rear parts.
69November 5, 2025And, The engine compartment cover and rear sunshade were assembled.
70November 5, 2025Only then did I assemble the upper and lower parts and attach the side skirts.
As expected, it would have been quite a hassle if I had attached them in advance.
71November 5, 2025I waited for the side skirts to be firmly attached before attaching the front and rear under cover.
I roughly painted the marked areas because I thought they wouldn't be visible after assembly, but they were exposed.
There's no way to fix it now, and it's only noticeable enough that you wouldn't notice unless I specifically pointed it out, so I don't really care. 😛
72November 5, 2025Finally, attach the door and the entire assembly is complete.
73November 5, 2025As an additional step, we added a logo badge to the exterior.
74November 5, 2025And, I attached the DMC logo to the side.
75November 5, 2025Now that everything's finished and finished, the marked area is slightly warped.
Upon closer inspection, I noticed the sunshade itself was slightly bent.
I'm hoping that if I tape it down and put it in the dryer for about a month, it'll be fine.
76November 5, 2025All done~
It seemed like there were a lot of parts and assembly would be complicated, but once I actually built it, it wasn't difficult and assembly was easy.
Anyway, this is the only DMC 12 kit so you don't have a choice. 😉
77November 5, 2025Thanks for watching...
Commenti
7 June 2026, 23:47 -
paper modeling database | gestore della mia scorta


