

Martin SP-5B Marlin - completed


Commenti
As usual I begun the project somewhere on the outside: on the horizontal tail with separating of the ailerons.
Hi mates. A lot of free seats in the front rows...🙂
This morning I researched a bit about the colors of the Marlin.
Not that easy...
I found out this: the first batch of Marlins (P5M-1) was painted overall glossy sea blue (FS15042).
Corresponding with the 1955 changed paint order all (newly produced) seaplanes should be painted seaplane grey (FS26081, semigloss variant of engine grey).
At the same time (1956) the Navy order to paint the upper side of the hull white as protection against flash and sunlight.
Because of that 4 different color schemes of the second production type of Marlin (P5M-2, first flight 1954) are possible in my opinion: sea blue, sea blue/white, seaplane grey and seaplane grey/white. I think, existing sea blue machines were not repainted in seaplane grey because both colors are very similar.
In 1962 the designation and painting scheme was changed again: P5M-2 became now SP-5B and was painted gull grey FS16440) on the bottom and white on the top.
RP7931 on the 1st picture looks for me as sea blue, white and more fluorescent orange FS28913 than FS12197 international orange.
Your attention to detail seems obsessive. That's meant as a compliment 🙂
THX Martin🙂. Today I finished the main beaching gear. The rear coming soon.
Thank you Patrick.
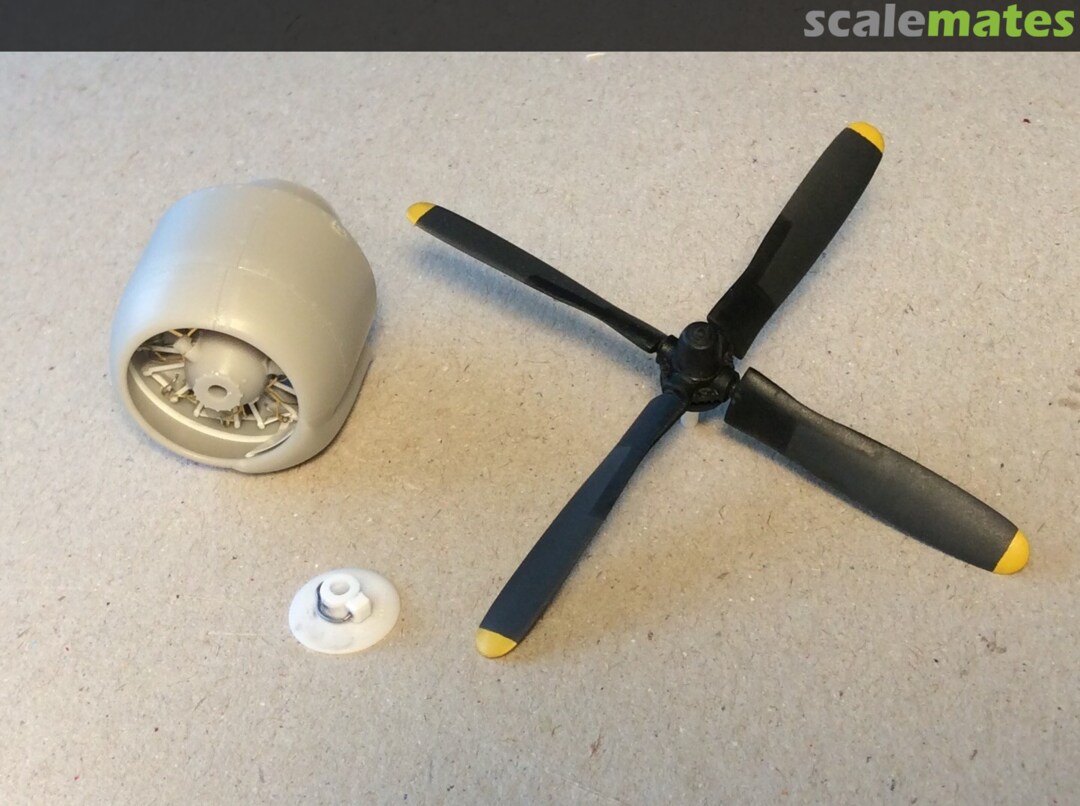
A question to all Mates who know the construction details of Marlin. Which function does the dish behind the prop have? Is this a part of the prop or is it an extra part mounted on the gearbox of the 3350? Piping on the prop: I suppose that is a part of the deicing system... Electric? Pneumatic? See the 3 last pictures. Every help will be appreciated.
Looks like some sort of protective cover. Not certain though. Perhaps to keep salt water spry out of the propshaft bearings?
It could also be part of the prop deicing system also. Like Martin not sure. I think prop deicing was electric.
Over here: superconstellation.o../motor/motor-en.html is a drawing of the engine. I can't find the disc. The search continues.
If the deicing was pneumatic, there would have been some rubber flaps in the prop bblades? I can't see that surviving at high rpms.
Hi Martin, hi Clifford. Thx for your ideas. Last days I looked the pictures several times again and again. Indeed I think the deicing systems worked electrically. But without "sliding contacts". I can't imagine that end 40 it was possible to build sliding contacts for such high turning speed and working-time (most of Marlins missions was 10-12 hours long).
I think Martins solution of this problem was induction. In my opinion the base dish is a "fixed and not turning" part of the prop (black like the prop and not engine grey like the gearbox) and consist a part of the "dynamo" probably magnets. The coil(coils) probably were integrated in the prop.
Łukasz & Bart: thank you.
Yesterday I worked on the nacelles and cowling. Fortunately Hadegawa "spent" the cowling no (wrong) panel lined. So it was easy to make the new ones. I'm waiting for the Radials from Plus model.
Classic Schrock: small bit here, some strip there and all if a sudden you have an ultra detailed model 👍
Today I have come back to the nacelles. First I added the inner structure of the cowling and completed one engine with only three cylinders to test if the 3350 fits into the nacelle: a bit too large so I have to shorten the cylinders.
The radial engine expert at his best ! These R-3350s look absolutely marvellous ! Hard to believe they're not 1/48....👍
THX Hanno.
The last days I was busy with the inlets. I was not happy with the first solution: the inlets have constant height and so I had to remove the intake dividers. I added on both sides a piece of plastic to create intakes with constant height. After looking at original pictures this turned out to be the right decision because there were no dividers in the middle. There is only one very narrow divider on the nacelle-side.
Down or not down? That is the question!! On most pictures of standing aircraft the flaps are in up position. So I decided to mount them up as well. For this I had to rework the hinges and the attaching points on the flaps and the wings.
To make it less boring I'm mixing up the tasks. Now I'm starting yesterday airbrushing of the parts. By experience the best base for the fluorescent orange is pale orange. So I can vary the intensity of FO via different thickness.
By the way: I decided to build the RP 16 (Bu-Nr 147931) in the late color scheme with engine gray.
On the picture of the original machine it's clearly visible that the floats are lighter (except a few areas the leading edge of the strut) and more matt. Moreover the cowlings have different shades of engine grey.
Kit lacks the retractable round taxi lights on lower side of both wings. Good visible are the navigation lights on the tips. Only the forward half of each light is transparent (red and green). You want to know why I painted this as well? It is very difficult to mask the front half of such a tiny drop. So scratching off paint is easier.
Unfortunately the decal sheet 72040 of Caracal Models is sold out. Because of that and because of lack of information I assumed that the location of the unit number (16RP) on the upper side is the same as "NAVY" on the lower side.
Star on the lower side: instead of waiting patiently I tried to iron out the folds. Result: the folds stayed🙁🙁🙁 (grrrrr). When I tried to sand off the folds I took off too much blue. So I had to repaint the insignia with a mix of R51 and H189.
Detailing and correcting if fuselage completed. 3 windows in area with curved cross section of fuselage glued, sanded smooth and polished yet. All other will be glued after painting. Ready for white and engine grey.
Right side: windows in place. Hold for gluing with CA in the correct position with a stripe of Tamiya tape. After drying of CA remaining gaps filled with Future (from inside and outside).
Bernhard, is there a reason you already painted the fuselage halfs instead on joining them first and cleaning up any joints?
Clifford. THX.
Patrick: I painted the fuselage halves "only" in the area of the windows but not in area of the joints. Except for three windows in curved area (should be glued, sanded and polished before painting) I mounted all windows for better & cleaner result AFTER painting (from inside). By the way: see the article about Shin Meiwa. I did the window task on the same way and this works very well.
OK, thanks for the explanation. So basicaly you leave the area to be glued untouched.
Just noticed that I make a mistake: the letters and numbers (RP 16) are not the old style (45* edges) but new style with 60* edges🙁 (grrrrrr).
Time for interior. If you have enough information the modeling and scratbuilding are great fun😎. So I worked first on the cockpit. Floor & rear bulkhead, ruder pedals, center console and steering columns are completed. Instrument panel, seats and side consoles coming next.
Thank you Choppa & Clifford.
I had luck and get from an Mr. Tom Bigley (LCDR, flown the Marlin especially the RP16 too) excellent information about the cockpit🙂
Your seats are amazing! I assume the large springs on the rear of each seat frame are shock absorbers for those rough water landings?
Patrick: the pink material is a kind of PU foam and calls UREOL. It's available in different colors/strength. Pink=soft. It's very light possible to cut, sand and carve.
Very impressive, Bernhard! In fact, if you cast resin copies of your cockpits, you could make a ton of money!
Dutch and Patrick: thank you. I have to divert a part of the praise to Mr. Tom Bigley who kindly shared Marlins' pilot manual with me. Nearly 500 MB and 480 pages! It leaves no questions open: for example see the picture showing 4 ditching seats in the rear section (finished this evening).
amazing detail as always Bernhard. your attention to detail is to be praised
And knowing you Bernhard, you will put them in there, though they will not be visible through the small porthole!
Dutch: you will be surprised. I plan to detaili only the aft fuselage area visible through the square observation windows and under the observer cupola behind the rudder. Through the round ones it is hard to see: so there will be no detailing🙂
What a great WIP thread almost missed me when I was on holiday😉
So Adam, remember that for the rest of your life: never EVER go on holiday when you could do modeling! 😄
Great work and a delight to watch this marvel growing- as always!
About 1/3 of interior in the rear compartment completed.
Interior completed minus tail observer compartment: last lap to run🙂. Choppa & Danumurthi: THX.
That scratched interior is nice.... What an effort till the tiniest detail like the foot of the seats...
Yippie! The interior is completed and next I could close the fuselage. But it seams that the effort in the rear fuselage was not really worth it. Despite the size of the windows you can see nearly nothing....
Bernhard, that is incredible....that must hurt hiding all this effort between the fuselage halves in the end, but at least you made good pictures
Bernhard, What beautiful work you have done! Before closing the fuselage, why not put in soem LED lighting?
This is amazing work. I aspire to have the patience for that level of scratchbuilding detail.
Amazing indeed, you must have a lot of patience. Great work on the interior 👍
at least we have the pictures... a very nice effort, and almost a shame to hide...
I'd be willing to take the "Alice in Wonderland" small pill and shrink myself to man this Marlin. Those seats actually look comfortable! Astounding work Bernhard! Take a few more pics and close her up! Let's see what she looks like 100% assembled. You are a master!
Bernhard, ever thought about video? You could be the Bob Ross of scale modeling. "Let's add a little more detail, let's do a seat - there...". I'd certainly subscribe. So enjoyable. 👍👍👍
@Burkhard "How about a happy little seat over here...and maybe he has a little friend over here so he isn't so lonely...THERE *whispers* 😄 😄
I have at least as many ideas to respond to all your supportive comments as I have for modeling but my English is literally not up to scratch ( 🙂 ) so I will just say: thanks a lot. I appreciate you comments.
My English is also the reason why the chances for a video are pretty slim... I promise to take pictures and comment the tasks. 🙂
Bernhard, that is not a model, that is a little original! You are something like a detail fetishist?! What a great project! 👍
I am really intrigued by your way of painting the model one are after the other. Very pragmatic but also well planned. 👍
That eye and love for detail but also the quality of execution are incredible...very inspiring!
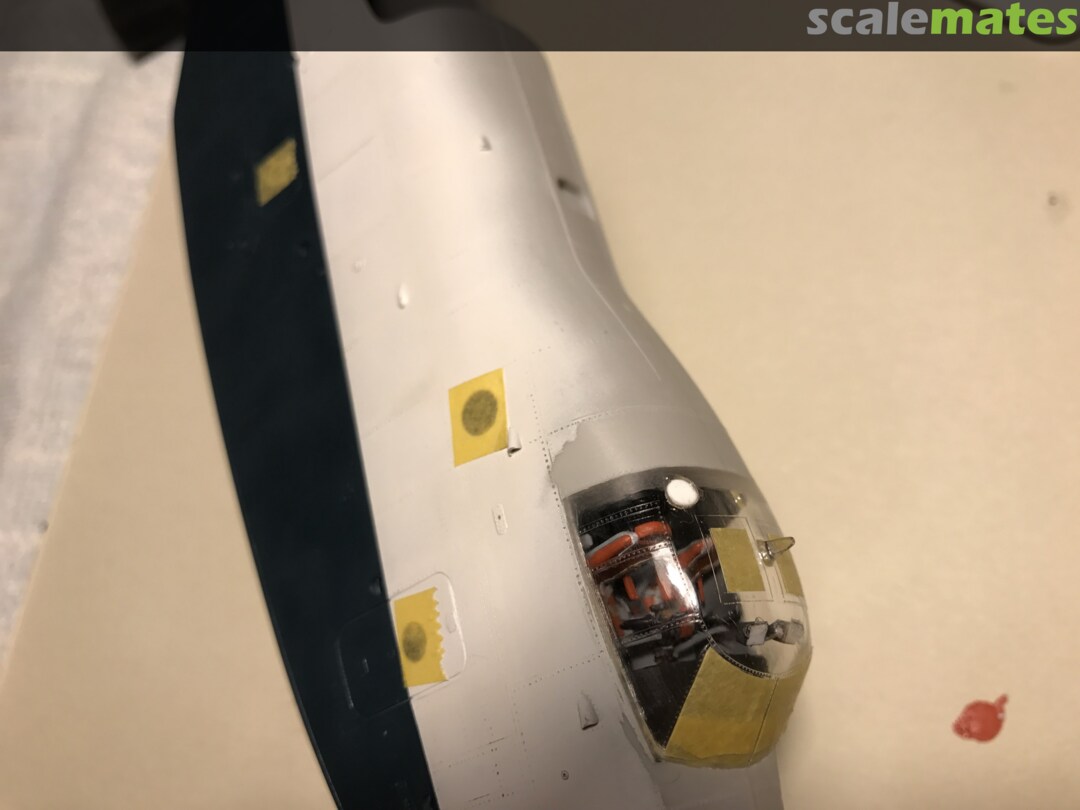
Masking of canopy (and other clear parts):
cast iron rule: if possible and useful do not cut masks on the model! Instead cut somewhere else, especially curved masks. Canopy masked for gluing on the fuselage. On both sides temporary masks in place only as protection until sanding flush with the fuselage. Finally side-masks still on white sheet. I intend to divide in three separate windows on the model by using a piece of Dymo-tape.
Bernhard, Are you aware that Caracal released decals for this particular Marlin in 1:72 scale? Unfortunately, the sheet has sold out. scalemates.com/kits/967623-c..s-cd72040-p5m-2-sp-5b-marlin
Looks great, a quick question though what are the curved "rulers" in the picture 153?
Dutch: yes, I know this decal sheet. As you say it's unfortunately sold out🙁 So I had to make all markings "do it your self".
Dave: photo etched tools for riveting (see the holes). Very usefull for cutting Tamiya tape.
There is nothing worse than rushing!! Three days ago I had a little bit time (actually too little time) for what I wanted to do. So I deviated from my rule (1st: as little CA as possible. 2nd: sealing gaps with Future and 3rd. Filling the remaining gaps with CA). The result was fogging on the right side.
Three days later: I knew that I would be never be happy with this and so I decided to drill a hole into the roof and to try to remove the fogging.
Patrick: I had luck because there was few fogging only in area of the side windows. I used a very thin/small micro brush, thinned additionally the shaft, bend them and "rubbed" the fogging away. The biggest challenge was to avoid drilling dust on the inside: so I used a vacuum cleaner.
Bernhard, you are not alone! i ripped the canopy off again of my skyrocket, because i used too much ca. this fish will be a superb model!
Thank you for the joy to look at this modeling-gem! Not only your modeling skills but also your ingenuity and creativity solving modelling- challenges are most inspiring!
Indeed Roland. In a case like that I would have easily given up on the model. Bernhard took up the gauntlet and solved the problem in a creative way.
Hallo Bernhard, es ist immer wieder schön, deinen Projekten zu folgen. Viele Grüße Stefan
Thank you mates. Indeed its a great challenge because the Marlin is so big. I'm short-sighted and have to hold the fuselage close to my eyes and it keeps hitting the lamp. Despite of all these handicaps I'm very happy with today's airbrushing sessios. Canopy after removing the masks before reworking: 9 of 10🙂
Last lap orange finished. Unfortunately I noticed first AFTER (Murphys law) airbrushing white the "step" between the separate nose - piece and fuselage... One more round of sanding and airbrushing white.
Don't you hate it when that happens? Although I suspect you did it on purpose; to build up the suspense for us 😉
Beautiful work, Bernhard. Can't wait to see her finished and in full glory!
I absolutely HATE sanding. They way you form plastic with sandpaper is just stunning. Respect!
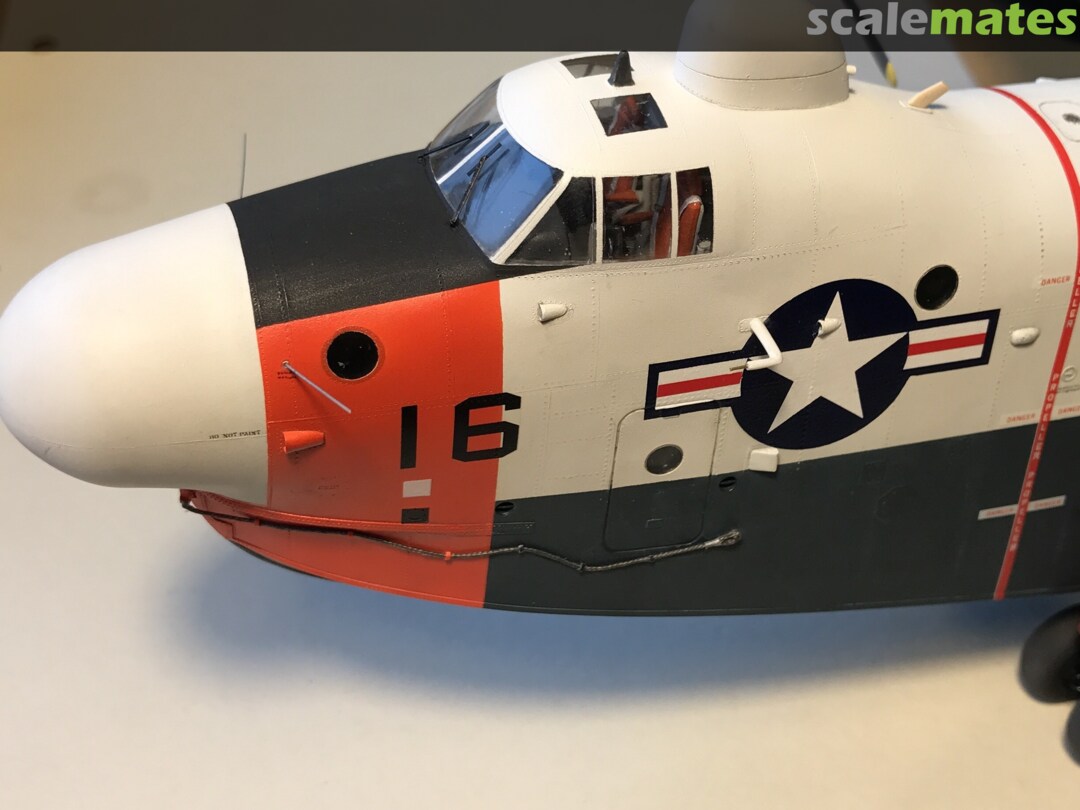
Finaly ready with painting of the fuselage: time for decals. 1st part (nose section) completed.
Do I dare? I know I shouldn't....
Bernhard, the top of the orange under the nose follows the riveted part in your build. In the project picture it's in line with the grey/white demarcation.
I personally wouldn't mind, but my builds are nowhere near perfection. Your builds are always way beyond perfection. 👍
Impressive to say the least. It's just incredible what kind of results you obtain with such an old kit.
Martin: you have eyes like an eagle and you are right🙂 I have overlooked this I already have fixed it (with two pieces orange decals). Thank you.
Your step by step building approach is truly "gewöhnungsbedürftig" 😄, but the results speak for themselves!
Clifford, Martin & Sören: thank you.
Alexander: the reason vor this "ungewöhnlicher/unusual" way is the size and complexity of the Marlin and his color scheme. I saw no other way to manage the scheme in addition of planned level of detailing...
Two more airbrushing sessions later: ready for mounting of the wing outer sections.
I'm slowly becoming out of breath...
Hang on Bernhard ! Almost there, just a few hundred hours more to go.....😄. Inspiring work as always !
No, he will return to start..
Nice painting, wouldn't dare doing it like that....
I think this is looking awesome, Bernhard. Mad props for such a great job (pardon the pun). Did you notice though that the propeller warning stripe has a spelling error?
PROPELLR🙁
Selective perception. You only see what you want to see. 🙂
That´s evolution in modelling thanks macro: from rivet countr to stencil readr! 🙂
There are good news: in only two hours I managed to glue both outer wing sections and clean and restore of details. I was very surprised because I expected to need more time. Maybe it because I have next week off. Who how's maybe I'm ready next weekend (Hannover VdPM?....🙂)
hello berhard, this is a beautiful fish! If it´s not Top Secret: Do you retouch/sand the stencils near the joint or did you mask them?
Moin Thomas. I have covered only the light grey stripes. The stencils WALKWAY are far away enough. My Iwata HPC has a 0,3 mm cone/nozzle and it is possible to airbrush very exact. In connection with low pressure (only 1 bar) this was no problem (no spraying dust, just done this task).
I have been waiting for this moment for several months: final assembly!!!!!!
The most tricky was the fitting of the main gear (flattened wheels coming soon). Despite the very small track (approx 1/10 of the wingspan) I measured wing tip height of 91,5 mm left and 91,5 mm right from the ground (I double-checked this two times,because I could not believe my eyes🙂🙂. Tomorrow: 2nd part of the assembly.
Just in Time I would say, looking forward to see it in real next Sunday !
All things are so perfectly painted and build, so each wing tip MUST have same height! Scale modeling at its best 👍
Can somebody please help me lift my jaw from the floor? I believe I dropped it...
Bernhard, Astounding achievement to nail the wingtip heights on the first go. You have my utmost respect.
Wow Bernhard, that is beautiful! What a cool looking aircraft and scheme!!!
First batch of pictures of nearly completed Marlin: while uploading of pictures just noticed that I forgot 2 pitotprobes🙂
craziness Bernhard !!! I admire just your patience and perseverance in such projects 👍
The result is ....... languageless ....... simple model building Oberliga 👍 👍 👍
Again Bernhard, your eye and love for detail are exceptional. I truly enjoyed this building report and the result is a gem!
Thank you mates: im glad that you like this "flying fish"🙂. Just uploaded 2nd batch of pictures. 2 more pictures including the missing pitot probes comming soon.
Beautiful !!!! The dark grey part of the sides look authentically "stressed and weathered". The little ring antennas at the rear end, did you scratch them or were they p.e. parts ?
Lovely finish. Incredible amount of detailing. I wish one day I'd get somewhere close to this level. 👍
Thx Hanno. The ring antennas are part of the MAD and were scratched from 0,13 mm plastic via self made circle cutter. I wish, I would have matching PE-parts....
You did it again- simply fantastic, such a gorgeous build! I dearly admire your sense for details!
Just simply outstanding. Your level of detailing and finesse is superb. Thanks for sharing your work here, always very inspirational.
What an ugly plane, Bernhard! But your work on it - just great!👍
Now you showed enough pictures of the original, I want to see the model!
😢
Thank you mates.
By the way: I would like attend at sunday the exhibition of VdPM in Hannover (finished just in time) and would like show the Marlin.
Von Bernhard zu Bernhard, wieder sehr schön gelungen, einfach ein Hingucker! 👍
Wenn man den bausatz kennt, dann weiß man erst was Du draus gemacht hast. Chapeau!
Mates: thank you for the nice comments.
Marc: ich nehme an, dass du den Bausatz auch hast? Ungeachtet der fast 50 Jahre ist es eine sehr solide Grundlage und m.E. besser als vieles, was in den 90 ger bzw. nach 2000 rauskam (siehe Z.B. die Passung des Mittelflügels).
Really nice job on the Marlin Bernhard. It's such a cool plane.
I have this kit also. I'll definitely be looking to your build for inspiration when I ever get to it. 👍
Thanks for sharing it.
Robert: I'm happy to hear about a next "coming" Marlin project! Indeed, the Marlin is a very interesant, unique and in my opinion "stylish" airplane. if you have questions don't hesitate to ask me.
Mal wieder richtig Klasse Bernhard. Ich bewundere Deine Ausdauer.
Thanks Bernhard, Not sure when I'll get to it, but,,, when I do I'll be looking back at yours ! Cheers
Hi Bernhard! Love your modelling 😄 I would like to ask you, please, if you may send me the link from Mr. Tom Bigley website. I would like to build my Martin SP-5B Marlin, inspired by yours.
Thank you so much
Hi Paulo. Thank you for the nice comment 🙂
look here: tlbigley.com/VP-40/
Album info
Our world ist really very small. During my research I discovered the website of Mr. Tom Bigley. He flew the Martin Marlin especially one of the RP 's of the VP-31 too. He was so kind to share with me a lot of very interesting information about the Martin Marlin.
The specific Marlin I am modeling belonged to VP-31 which was a training squadron based at NAS North Island, near San Diego, CA. It was designated as a "Replacement Air Group", referred to as "the RAG", and there was a sister squadron (VP-30) based on the east coast. ALL pilots and aircrew went through "final polish" training in the RAG, enroute to their operational Patrol Squadron. The students were a mix of brand new pilots and aircrew coming directly from the training com, second and third tour pilots and aircrew coming from other assignments and even officers headed to a squadron as the new XO/CO. (Information courtesy of Mr. Tom Bigley)


