

Two polish aerobatic TS-11 Iskras
 1December 7, 2022As the planes should be shown in flight, pilots were needed. Unfortunately no Poles could be found, so I opted for two modern Germans and will polish them. As they would not fit into the trainers ejection seats, some sanding and squeezing in a hot water tub was necessary.
I hope that the positioning of the arms allow a good grip of the control stick. 2December 7, 2022As usual everything starts with the cockpit. The Deluxe kit contains two planes and two PE frets per plane that allow you to further detail the planes down to the subatomic level.
Basic assembly and painting of the cockpit tub is done. 3December 7, 2022As there is a gap between the pilots instrument panel and the fire wall, I added hoses to the rear of the instruments and guided them through the fire wall.
 4December 7, 2022I call the detail painting ready.
 5December 8, 2022Pilots prepared with black primer and white lights.
 6December 8, 2022Basic painting done. Not quite happy with the hue of the flight suit. But it will have to stay like that.
 7December 8, 2022Them wings: for my project they pose four "problems":
- the lower part of the wing is too thick and had to be sanded down (which was annoying)
- a strong seamline at the airintake which I filled with glue gue
- a blunt end of the wheel well cover which has to be sanded to match the nicely fashioned trailing edge of the wings
... 8December 8, 2022...
- and finally the wheel well doors which are designed to be mounted in open position only. To attatch them in closed position some modifications of the doors themselfs were necessary together with some shims to prevent them to dislocate into the wells and finally the closure of some prevailling gaps with styrene. 9December 8, 2022Here my best result out of four. Some gaps are still to be filled.
 10December 8, 2022The second PE fret encompasses parts for further exterior detailling. Among them details for the wheel wells which I obviously did not need, the airbrakes, which I did not use and finally a replacement for the boundary layer fences which really add nicely to the appearance.
 11December 8, 2022So far only the bases of the boundary layer fences are added, the fences themselves will follow when the wings are attatched and ready for paint.
 12December 9, 2022I closed the fuselage. After sanding down the diameter of the front firewall and the disc attatched to the exhaust part I did not encounter any fit issues anymore. I only should have put in the pilots first as it was close to impossible to squeeze it in afterwards
 13December 9, 2022The halfs came together well and there was little to no gap which needed treatment.
 14December 9, 2022Minor imperfections could be treated with diluted Mr. Surfacer 500. The dent where the 30mm- gun should have been mounted was filled with sprue gue, as were a few small casting imperfections
 15December 11, 2022Dry fitting shows a good fit of front window and canopy.
 16February 10, 2023Now the air intakes look much better.
 17February 10, 2023One set of wings to go. Then I can finally mount them.
 18March 6, 2023Finally the wings are on. After the effort to get the air intakes right, I spilled glue over one wing. Flushing it away with water immediately, letting it dry for a couple of days and then sanding prevented disaster and loss of detail.
 19March 6, 2023Mounting the wing required quite a bit of dryfitting, sanding and scribing.
 20March 6, 2023Now I think the main hurdles of the build should have been passed. Finishing the cockpits with the pilots is next.
 21October 6, 2023Cockpits done. Pilots squeezed in, their hands wrapped around the control sticks. One or two details to be fixed that got lost during the vigorous handling to press the pilots into service.
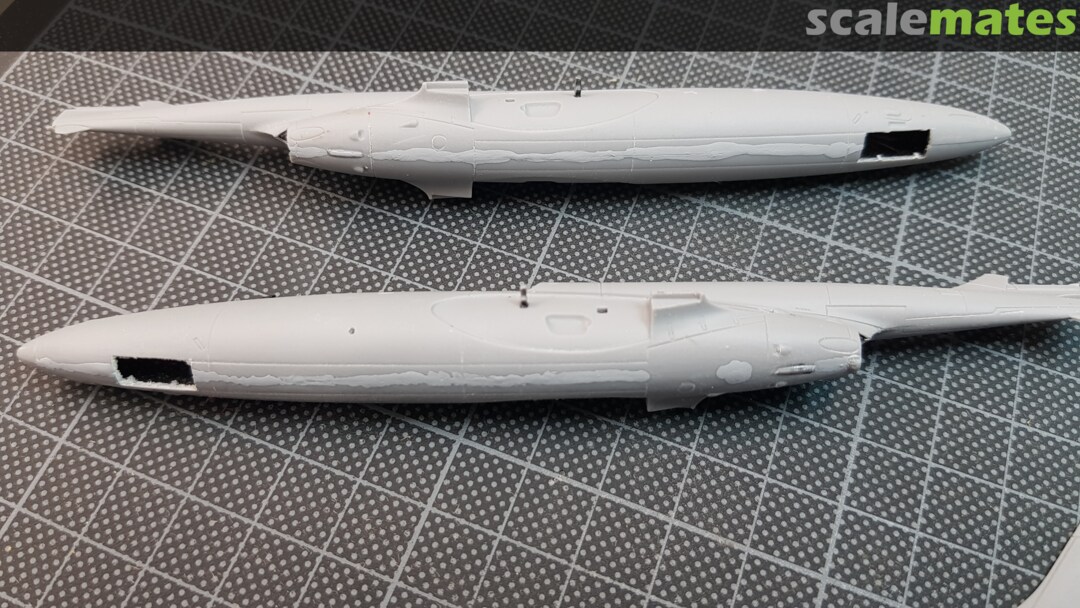
 22October 24, 2024The front wheel well doors didn't align nicely and left a hole. This I covered with styrene and Mr. Surfacer 500. The later was used to fill an access panel line for the gun which the arobatic machines didn't have.
 23October 24, 2024The engravings are Airfix style. At the small access panels I filled them partly with Mr. Surfacer 500. Some more casting imperfections found during sanding were adressed the same way.
 24October 28, 2024One done. Cockpit losses restored and temporarily closed. Some more scraping and dryfitting will be needed there later on.
Sink marks and unwanted engravings filled and sanded. 25October 28, 2024Same on the belly.
 26October 24, 2024Same on the undersides. The engravings at the wing tips were covered too
 27October 24, 2024Waiting for Mr. Surfacer to cure.
 28October 24, 2024To do list.
 29October 28, 2024A considerable gap at the lower part of the rudder was closed with plastic card and sanded to shape. A missing hole at the tail skid was drilled.
 30October 28, 2024The trailing edges were restored with superglue and plastic card where impaired by sanding the intake boxes into a sharp end
 31October 30, 2024So far I haven't noticed that the military version of the Iskra features two humps on the TOP of the forward fuselage while the aerobatic version has them located at the Lower forward fuselage. As drag an' drop unfortunately didn't work here I had to look for another solution...
 32October 30, 2024Once upon a time I bought this template from Hauler/Brengun. So now was the time to use it. After a few dozens attempts of melting and casting I achieved a success rate close to 50%. Now the challenge will be to separate it without destroying it.
 33October 30, 2024Fronts done. Hump relication, closing, filling, sanding and rescribing of the wheel well, adding the hinges of the wheel well doors and inserting a hollow needle at the tip as pitot tube (not to be seen here).
 34October 31, 2024Strapping the pilots inn proves to be quite fumbly. Well, a start is made.
 35November 1, 2024Finally both pilots are strapped in. Time to tackle the canopies.


Commenti
25 July 2026, 07:10 -


