[Tamiya] Alfa Romeo - Giulia Sprint GTA (WIP)
 1December 23, 2023Washed
 2December 23, 2023Sanding...
 3December 23, 2023I'm going to remove it, but I'm not sure what I'm going to do with it.
Maybe I think this winker is too small and shallow for simple replication. 4December 23, 2023Since we won't be using the bumper, we filled in the hole.
 5December 23, 2023There was a parting line in that area and it was not easy to remove.
 6December 23, 2023Take a 'pla-plate' and drill a small hole in it...
 7December 23, 2023Bonnet rod done.
 8December 23, 2023I painted the inside black to prevent light through.
 9December 23, 2023From the outside, the black on the other side has darkened the whole thing, and the thinner parts are heavily darkened.
If you don't do any light blocking, these areas will remain as a plastic texture. 10December 23, 2023White surfacer.
 11December 23, 2023Discolorated decal.
 12December 23, 2023Stick it to a shadowed window and...
 13December 23, 2023After 3-5 days, it should recover enough to be useful.
 14December 23, 2023Pre-painting.
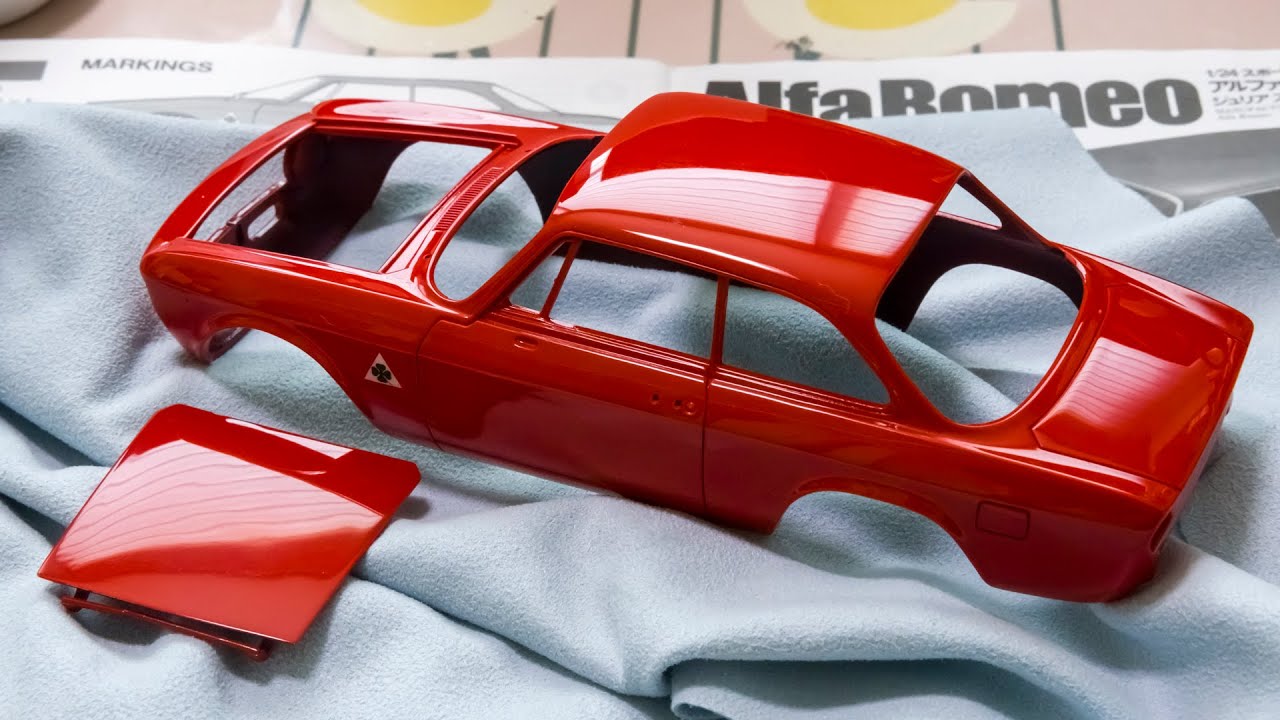
 15December 23, 2023Painted body color.
 16December 23, 2023Because of the nice injection color of the plastic, I decided not to paint the interior body color, so I painted only cabin black.
 17December 23, 2023As you can see, the unpainted side looks surprisingly painted.
 18December 23, 2023Decal.
 19December 23, 20231st clear coated.
 20December 23, 2023two layers decals...
I was concerned about the thickness, so I painted an extra coat of clear coat to that area. 21December 23, 2023Sanding...
 22December 23, 2023Sanding...
 23December 23, 2023Final clear coated.
 24December 23, 2023It's smooth well.
 25December 23, 2023While the bodyshell dried, I trimmed the parts.
When I was done, I only had a handful. 26December 23, 2023The muffler doesn't have a hole drilled in it, so I drilled it deep.
 27December 23, 2023These parts don't look like much, but I had to overpaint them a couple times. (Blue on the White, Chrome on the Gloss Black)
 28December 23, 2023Sanding.
 29December 23, 2023Polished.
 30December 31, 2023Masked.
 31December 31, 2023I did the masking roughly, and paint particles blown by the wind ended up outside the masking area.
So I had to clear it with a compound. 32December 31, 20232nd masked.
 33December 31, 2023and painted semi-matt black.
 34December 31, 2023Unmasked.
 35December 31, 2023Tamiya flat aluminium is very nice paint.
 36December 31, 2023I cut the silver foil stickers left over from the Gunpla with a circle cutter and stuck them on the gauge panels rim of dashboard.
 37December 31, 2023This time, I used Gunpla's silver foil stickers with a low sheen.
 38December 31, 2023Painted with paint brush.
I thought the matte aluminum parts were too bright, so I toned them down with a washing. 39December 31, 2023The edges were painted with a silver marker.
 40December 31, 2023It's time to make the blinker that I thoughtlessly got rid of, and this is what it originally looked like.
 41December 31, 2023It's a very small part, so I don't think I can do the same with my eyesight, but I'll just have to mimic it.
It's sad that I'm getting older. 42December 31, 2023I think I can attach the cut silver foil first, and then attach the clear orange parts right before completion.
But I don't know why it looks big even though I cut the foil according to the previously measured size. 43December 31, 2023Masking the tail lamps was a bit tricky, so I had to use a masking-sol as well.
 44December 31, 2023I will need to mask and paint the silver one more time and then paint the border black.
I also had to draw a tiny square with a very thin silver border in the center, but that was beyond my capabilities. 45December 31, 2023I coated the emblem in the middle of the wheel with UV resin.
 46December 31, 2023Painted panel-line.
 47December 31, 2023Ready to assemble.
 48December 31, 2023Assembled engine room.
 49December 31, 2023Assembled under parts.
 50December 31, 2023I dropped it, and it landed on the glue, and it fell upside down.
I really hate 'Murphy'. I like 'Sally' but I think she hate me. T_T 51December 31, 2023Sanded and recovered.
 52December 31, 2023Interior done
 53December 31, 2023Interior done.
 54December 31, 2023I think this was the most difficult part of assembling this kit.
When assembled without the net, the parts fit together well, but when the net is installed, they do not fit together at all. In the end, I had to force myself to attach it to the appropriate location and secure it. 55December 31, 2023The side window is installed from the inside like a snap kit, so I had to push them in hard until they clicked.
The front and rear glass must be attached from the outside and adhesive applied from the inside. 56December 31, 2023I lost the part shown, so I bent a metal-rod to make it.
 57December 31, 2023Now it's just a matter of gluing the remaining parts together as instructed.
 58December 31, 2023Done.
In fact, the front grille emblem, keyhole, and bumper holes still need work, but I've gotten them done for my last post of the year. 😉 59December 31, 2023Finish
 60December 31, 2023Finish
 61December 31, 2023Finish
 62December 31, 2023Finish
 63December 31, 2023Finish
 64December 31, 2023Thanks for watching and see you soon in the gallery album.


Comments
25 July 2026, 02:14 -
Album info
FHD Imges (1/2) - motorart.tistory.com/732
FHD Imges (2/2) - motorart.tistory.com/733
Youtube Video