

[Beemax] BMW M3(E30) - WIP
 1May 19, 2024Before I start, I duplicated the grill part because I thought I could use it on a very poor quality Fujimi kit.
scalemates.com/kits/..-m3-type-e30--210820 2May 19, 2024I removed protruding parts on the body.
 3May 19, 2024Fender was too thick, so I shaved it off thinly.
 4May 19, 2024I did the same thing to the rear fender.
 5May 19, 2024This kit can be manufactured in either #3 or #11.
In the case of vehicle #11, only one hole must be drilled in the marked area (refueling port?). (#3 requires two holes to be drilled) 6May 19, 2024Scraped panel-line and sanded.
 7May 19, 2024Washed.
 8May 19, 2024The tow hook was too thick, so I sand it thin.
The thickness is not uniform, but it doesn't really matter since only the end will be visible anyway. 9May 19, 2024The muffler was blocked, so I drilled deep.
Drilling the exact center of a cylinder cut at an angle is a bit stressful. 10May 22, 2024When I finished trimming the parts, it was only a handful. 🙂
 11May 22, 2024The antenna was too thick, so I decided to replace it with metal wire.
 12May 22, 2024The neck of the original part was cut off, and the stainless steel tube was cut and trimmed.
 13May 22, 2024I finished it by drilling a hole in the center of the root and inserting the cut tube and iron core.
I found out about it late, but when I looked at the manual, I saw that there was a spring, but it was annoying, so I'll just skip it. 14May 24, 2024I used the Zoom On product for masking the windshield.
 15May 22, 2024Since this is a light-colored vehicle, we painted it black to block light transmission.
And I collected other parts that needed to be black and painted them as well. 16May 22, 2024Uh-oh, why is this still here?...
 17May 22, 2024There is no space to hold the wing when painting, so I have to make a handle.
In that case, after finding an appropriate length on the runner... 18May 22, 2024That fixed like this.
 19May 23, 2024I painted white surfacer and other colors.
 20May 23, 2024Uh-oh, why is this still here? again...
 21May 23, 2024I should have painted the bottom and interior white anyway, but I forgot, so I masked the bottom at this point.
 22May 24, 2024The inside of the door could be painted with a brush, but I just masked it.
I didn't want to paint the roll cage one by one, so I assembled it in advance. 23May 24, 2024White surfacer.
 24May 28, 2024Gloss white.
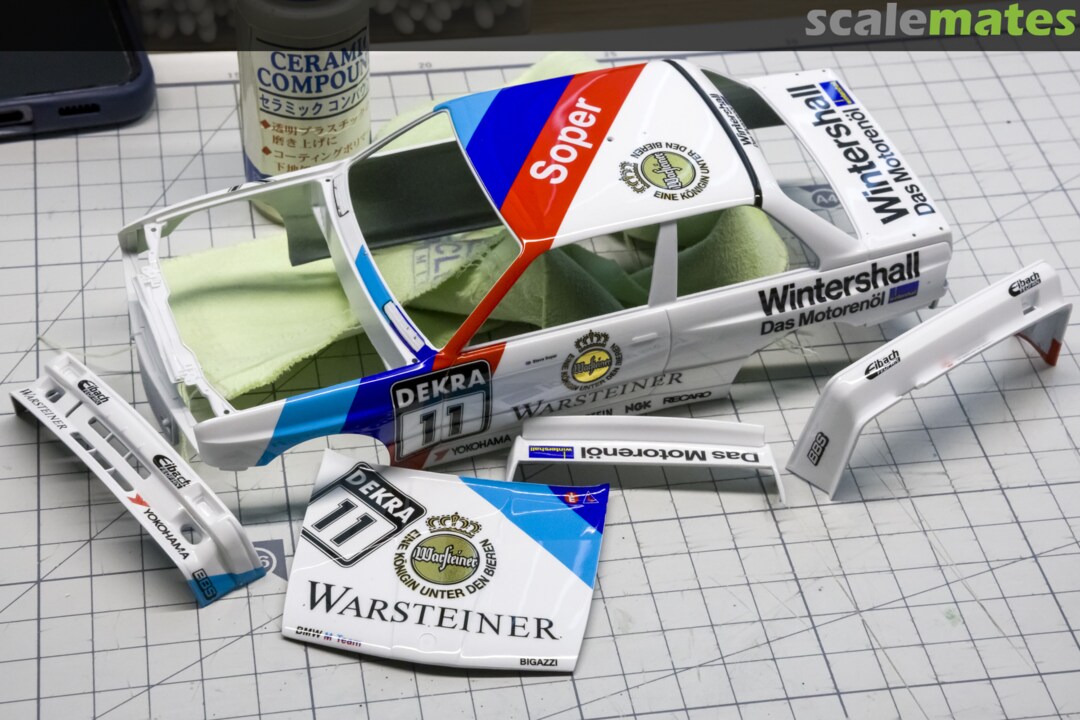
 25May 28, 2024Liverty decal started.
 26May 30, 2024Attached all decals.
 27May 30, 2024For some reason, I have a feeling it will be a silverring.
 28June 24, 2024I fixed silverring.
 29June 24, 2024The areas where the decals were short and the sections where the plastic was thick were painted with a brush.
 30June 24, 2024While I was brushing, I also proceeded with partial painting.
 31June 24, 2024If you look at the assembly instructions, it looks like the optional parts include a kill switch, but it is not included in the basic configuration.
So I heated and stretched the runner for make two kill switch.
 32June 24, 2024I cut the pla-plate into small pieces, glued them, sanded the edges to make them round, and painted them red.
 33June 24, 2024Clear coated. (x4)
 34June 24, 2024Sanded.
The clear was not curing well, so I let it dry for a long time. 35June 25, 2024Polished.
 36June 25, 2024Painted panel-line.
 37June 25, 2024I painted with paint brush to under body.
It would have been nice to have a Kevlar fiber pattern decal on the back of the seat, but the assembly instructions only say to paint it GSI H79 (dark yellow).
It won't be noticeable once it's completed anyway. 😉 38June 25, 2024I coated the emblem decal with UV resin.
 39June 25, 2024Result.
 40June 26, 2024There were decals that had not been attached yet, so I also attached the emblem in advance.
 41June 26, 2024Ready to assemble.
 42June 26, 2024Assembled bottom parts.
However, in my experience, if I install the wheels first, interference often occurs when join with the body shell, so I decided to assemble the wheels later. 43June 26, 2024It was decided to detail-up only the shoulder straps for the seat belts.
 44June 27, 2024I need a tiny hook. (I found this in an old etching I used to use)
 45June 27, 2024I drilled the holes, put the hooks through, and hung the seat clips.
 46June 27, 2024Assembled interior.
 47June 27, 2024Another view.
 48June 27, 2024Another view.
 49June 28, 2024Glued the nylon mesh to the front bumper.
I had to make some cuts where indicated to get it to fit well. (the mesh was included in the kit) 50June 28, 2024For the reflector of the winker, I cut and attached a silver foil sticker.
 51June 28, 2024Front bumper done.
 52June 28, 2024Assembled face.
The kidney grille and headlamp covers didn't fit well, which caused some stress when assembling. 53June 28, 2024Attached side mirror to side window.
 54June 28, 2024Glued windows.
 55June 28, 2024Inserted kill switch
 56June 29, 2024Assembled front.
 57June 29, 2024Assembled rear.
 58June 29, 2024Combined upper/under body.
I had to cut the male pins of the front splitter short so that it could fit tightly with the front bumper. 59June 29, 2024Lastly, attach the remaining antenna, fasteners, etc. and it's done.
 60June 29, 2024Done.
 61June 29, 2024Finish
 62June 29, 2024Thanks for watching 😉


Comments
24 July 2026, 23:10 -
Album info
FHD images.
1/2 - motorart.tistory.com/766
2/2 - motorart.tistory.com/781

