

Interflug Iljushin IL-62M


Comments
89 30 July 2024, 07:20
Taking a seat and I keep my fingers crossed that the building will be joyful and successful, Michael!
30 July 2024, 09:33
Can't miss an IF project 👍
That windshield is terrible - what's your plan for it?
And most importantly - are you going to build Lady Agnes? 🙂
30 July 2024, 14:27
Hi mates. Nice to have your interest and you on board. Thanks Zbynek. So far it took much more effort than I expected. Lets see how it continues.
@Mr D: childhood memories. I suppose you build it in scale 1:100? VEB Plasticard?
Lukasz, I bent and glued it und sanded it flush afterwards. As I will use the Authentic Airliner decals for the cockpit windows, they do not need to be transparent.
30 July 2024, 19:16
Hi Michael 👋,
Yes it was the Veb version, very basic....but l was enjoying building it as fast as l could.... Glue finger prints n all 🤣
Can you sort the cockpit glass ?? Surprised.... Zvezda usually very good.
Thanks for your upload..... I'm big Soviet era fan.
30 July 2024, 20:20
Good choice Sir, the AA window decals are super cool.
Unfortunately some of their livery decals have some errors.
30 July 2024, 20:24
Yeah, I was surprised by the fit issue too. On the upside are definitely very fine and consistent engravings which I hope to preserve.
And - by the way - it won't be Lady Agnes¹. I like to represent the plane I flew to Moscow with. Unfortunately I do not have a picture of this particular aircraft and am thus not sure about it's actual registration. The history of some a/c is available to me, so I can rule out some. And I photographed two parked IL-62M too while taxiing which I can rule out too.
With these informations I ruled out registration: SEW, SEC, SEF, SEG, SEY and SEK. So right now I will go for registration DDR-SET.
¹ a word for those not familiar with Lady Agnes. She is obviously an IL-62M too and was flown to Stölln. After being stripped of everything unnecessary she landed on a 900m grasstrip (how on earth did they manage to get a permission for that?!) and is used now as a Cafe there in it's original Interflug livery.
You've never heard of Stölln? It is located in the federal state of Brandenburg, about 40km west of Berlin and is the oldest aviation site on earth and in the history of mankind. No other that Otto Lilienthal tested some of his gliders there.
31 July 2024, 06:57
Watchimg with pleasure! Of course, I remember VEB Plasticard kit very well 😉 And thanks for the interesting story!
31 July 2024, 07:10
Oh, a very personal project - watching! Sorry, I digged so deep into my build that I missed yours.
So I'm now in and good luck!
Regarding putty: I'm now a fan of Tamiya light curing putty which hardens quickly with UV light.
If wee meet again I like to hear more background about this trip and can provide other insights 😉
1 August 2024, 21:14
Hi Frank. No reason for apologies. You are welcome anytime.
Looking forward to our next meeting.
2 August 2024, 14:10
Looking good, really nice shaped Airliner 👍
Do you use the black to find imperfections?? Or is it a pre-shading??
I'm in process of building the Veb Be-6 Soviet flying boat, and may help me to do similar.
Thanks for your uploads... Like anything from Soviet era n russian.
3 August 2024, 21:12
Welcome mate. Always nice to have you around.
Yes, Mr D, I use the black primer to identify imperfections as the grey one is too close to the plastic color and with the white one, flaws are not that visible. The downside is that it takes a lot of color to cover the black. So next time I will most likely go for a lighter primer color.
4 August 2024, 10:19
Thanks 👍👍 for letting me know, l built the Yak-3 made by Zvezda, lit was quite nice to build, some of the fine parts were really accurate, but then it was bit gapy around the wing, but otherwise pretty good.
4 August 2024, 11:08
Welcome Shar.
Construction and first paint stages of the engines done.
7 August 2024, 06:59
Nice to see the update on this one 😀.
The PE parts give a more crisp realistic effect.
Good stuff 👍👍
30 August 2024, 20:03
Welcome. Another set of blemishes is fixed and the primer coat repaired. A light sanding with grid 1200 ensured a good base for the polishing steps which will be next. No pics as all looks more or less the same.
3 September 2024, 16:23
Hey Michael - really beautiful subject you are modeling here and it's looking fantastic! I thought the fit issues on my JRS-1 made for a complicated build - this kit makes my JRS-1 look like it's a Tamiya kit! You did a really great job getting around that canopy issue and the PE engine fans are a really nice upgrade. Well done!
11 September 2024, 15:48
Oh man, two steps forward one step back. What, a grind, keep it up!
11 September 2024, 16:22
I just finished this book, might be interesting to you: a.co/d/c2WPeYB
11 September 2024, 17:07
Good work take's time, it's coming along nicely, good subject.... worth getting how you want it.
Like it 👍👍👍
11 September 2024, 18:53
Welcome mates and thanks for your encouragement and tips. Hope to continue in about a week.
14 September 2024, 08:04
One round of polishing didn't result yet in the desired effect. So, in for another one.
27 September 2024, 11:44
Started the paint job with the leading edges of wings, vertical and horizontal stabilizer. Started with Alclad stainless steel after another two rounds of sanding and polishing the wings. Unfortunately even a very thin mist of this color ate at the primer, dissolving it partly. Second attempt was done with Mr. Metalcolor 213 steel. This worked but gave a much less nice finish. As you can polish this color range I did that and got close to the Alclad finish by this. But with polishing I partly lost coverage at the trailing edges. These defects could be restored with the application of UvdR pigments Steel. Next will be the grey lower parts
24 October 2024, 22:54
I'm glad to see, Michael, that you're making good progress with the project.
What primer did you use? I've had very good experiences with Alclad, so I'm surprised that Alclad has eaten into the primer.
Fingers crossed!
25 October 2024, 12:56
Not all the Alclads do it the same way. I found stainless steel and airframe aluminum to be particularly aggressive. Primer was Mr. Surfacer 1500.
25 October 2024, 13:28
Oh, that's some stuff! 🧐
Admittedly, I've never sprayed Alclad stainless steel and airframe aluminum on surfacer, but always on polished Mr.Color C. And I've never had a similar experience. I usually paint the metallic leading edges and air inlets last before decalling. But I wouldn't say at all that these paints will behave that way.
I've used Alclad on a polished Mr.Surfacer before, it was fine, but I haven't used these Alclads.
So I learned something important again. Thank you, Michael!
Well, I hope things are going well for you now without any tricky surprises. 👍
25 October 2024, 18:45
I think there might also be a difference between these old Alclads and the 2nd generation (not mentioning the MiG rebottlings). I have a sample of each and the older it is the more agressive it seems.
25 October 2024, 19:14
In my case the two shades mentioned were aquired last.
I was pondering to do the metallic parts first or last. I think masking is easier this way. Let's see how it further progresses. I actually was highly motivated to go for the grey but had then to realise that a bit of detail stuff is required first.
Thanks guys for your input.
25 October 2024, 20:33
Progress!! That is a nice paint job so far, it is very clean looking.
25 December 2024, 20:56
Thanks mates. First layers of white applied. I am excited how the MRP paint sprayed right from the bottle. The black base is of course hard to cover and I will need another round, but the paint is so fine that all details that I didn't ruin before are preserved.
Was a happy surprise to find out that I have the necessary grey paint from MRP too.
13 January 2025, 19:11
Is this your first use of Mr Paint?
I LOVE them ❤️️ Wonderful paint to work with and beautiful color shades 👍
The paint is just not available in many shops, but can be ordered directly from the manufacturer: mrpaint.sk
14 January 2025, 09:18
Yes, I actually tried it after your recommendation. Now I am pondering whether it is smarter to apply the decals first and seal them and paint the underside grey after that or to finish the paint job first. I think I will go for option 1 as I think masking will be easier that way.
14 January 2025, 09:43
Masking on decal is always a bit risky ... I would try to avoid masking tape on them. May be you can cover the decaled areas with paper (Tempo tissue) and use only small tapes.
1 14 January 2025, 09:57
I will definitely seal them with varnish before. But there is only a small strip of white below the red window band and I am afraid that I won't be able to mask it beforehand as precise as I would like to have it.
14 January 2025, 12:45
Masking decals is risky, maybe a white decal stripe could help? There are some decal stripes available here and there.
14 January 2025, 13:11
or a white decal that you can cut in stripes like 95 x140 mm white (Interdecal CO01, No)
")
14 January 2025, 13:57
actually any white decal paper (meant to print own decals) would do and you can have in A4 size
14 January 2025, 14:15
Actually I do have white decal stripes. I will consider that. Thanks for your input.
1 14 January 2025, 19:08
Looking really good! Even at 1/144, this looks to be a very big model. Nice job!
15 January 2025, 13:46
These AA decals are grand indeed, I love them too, pity their marking sets are not that great.
16 January 2025, 18:43
this looks beautiful! Airliners need sometimes more attention than military models - lol
1 16 January 2025, 20:03
Looking great, nice now the white is going down and decals, the windows turned out ok👍 good work 👍
16 January 2025, 20:25
I press all my thumbs as strong as I could and hope that the masking for the grey paint will work ....
1 16 January 2025, 20:34
Michael, it's turning out great! Fingers crossed there won't be any complications with masking and further painting. 👍
17 January 2025, 15:25
Thanks mates for your nice and encouraging comments. Much appreciated.
Satin clear is on. Now I will hold my horses and let it cure properly.
First tests to find a colour mixture to match the red of the decals came close but not yet close enough. Will have to tweak that a tad more before I can finish the vertical stabilizer. Then the grey of the underside and wings will follow. So far I am quite happy.
Right now I am looking for stuff to accompany my plane on the apron. But soviet stuff of that aera seems to be pretty sparse in scale 1:144.
By the way: does anybody know which tugs were in use in the 80ies/90ies in the eastern countries. I found a few pictures with tugs that look similar to those used in the west, but have found only the BelAz 7421 of which no model or 3d file seems to exist. I´d appreciate any suggestion for alternatives matching the time frame.
20 January 2025, 20:51
Looking like a real gem Michael, it is all coming together beautifully.
21 January 2025, 00:54
Answering my own question concerning pushback tugs I found the following site (in German):
interflug-web.de/
Open the folder: "Interflug - Betrieb Flughäfen" and then the thread "Fahrzeuge auf den Flughäfen der Interflug".
Cheers
21 January 2025, 15:19
So bottomline you can use an BelAz 7421 or a Schopf 246, which are both not really available. A Schopf 210 comes close and can be bought from Rocast. At a german airport a Fortschritt Z300 or Z310 tractor is an option too, at a russian airport you might use as well a Kirovets K700. All not readily available in 1:144 but can be found as printable files.
I will go for the Schopf even if it is not 100 % correct.
23 January 2025, 09:24
Several tests have not lead to an exceptable result to resolve the issue with the vertical stabilizer. I wanted to blend in the decal with the areas that needed to be sprayed but that darkens the decal itself and makes it impossible to blend paint and decal. So two options remain: 1. redo the vertical stab in white, paint the red areas and apply a white Interflug logo. To do that I need the logo. Now I look for a copy or print shop that is able to print a white decal. Ordering another decal set with a white logo is another possibility, plotting masks seem to be an option too. 2. Look for another decal set which doesn´t have the issue of not matching decals.
Sorting things out...
23 January 2025, 09:30
Hm, sad news. Have you considered spraying a separate decal (e.g. white one) in red to match the same colour without overpainting the OOB stickers?
23 January 2025, 09:49
Jep, definitely another setback, but one that will be overcome one way or the other.
I haven´t considered your idea yet - thanks for the input - but I doubt that such a color match and precision at the edges can be achieved (by me) to make these borders visible only at second glance. In the meantime ordered another decal sheet from across the globe with white decals. So respraying and redecalling it will probably be.
23 January 2025, 10:14
Hmm, tried to cut a mask assuming a size of 11.2mm between the tips, see pics 5 and 6 here:
Screenshots | Album by bughunter
Looks not really nice, as the knife removes parts already during the cut process. Bigger would be much easier.
23 January 2025, 11:58
That looks super clean and tidy, very much enjoying the project 👍
23 January 2025, 12:28
I was actually quite optimistic tjat three coats of varnish and low tack masking tape would not harm the decals but I experienced a dose of realism.
Ordered new decals. Will sand down the ones applied and redo the paint job. Square 1. Ok - not quite.
Thanks mates for your interest and company.
29 January 2025, 15:55
that certainly unfortunate.... but i am sure you will succeed this time
29 January 2025, 16:15
Au 72 ou 48ème je n'oserais pas faire un tel avion qui doit-être parfait en montage et en peinture, mais au 1/144ème ... C'est de la folie ... Alors bravo Michael !!
11 February 2025, 12:08
Looking at your models I don't believe you. 😉
But thanks for your nice words.
11 February 2025, 15:58
Coming in late, just as this build is becoming a slog. Fingers crossed for successful recovery, it's on path to be a beautiful build 👍
12 February 2025, 19:01
Mit dem Abkleben üfr den weißen Streifen funktioniert schon. Habe ich bei meiner TU-134 auch gemacht. strykers144.jimdofre..olev-tu-134a-crusty/
19 February 2025, 09:38
Michael, I hope you haven't given up on this build yet and are just gathering the desire and motivation to continue. I'm keeping my fingers crossed and look forward to seeing new photos of the successful progress of the build here soon.
1 9 August 2025, 06:38
Thanks mates for your continuing interest in this build. It is just as Zbynek said: I am (just) gathering the desire and motivation to continue. To underline that I renamed my shelf of shame to shelf of maturing motivation. It will continue. New decals are already there.
2 10 August 2025, 10:40
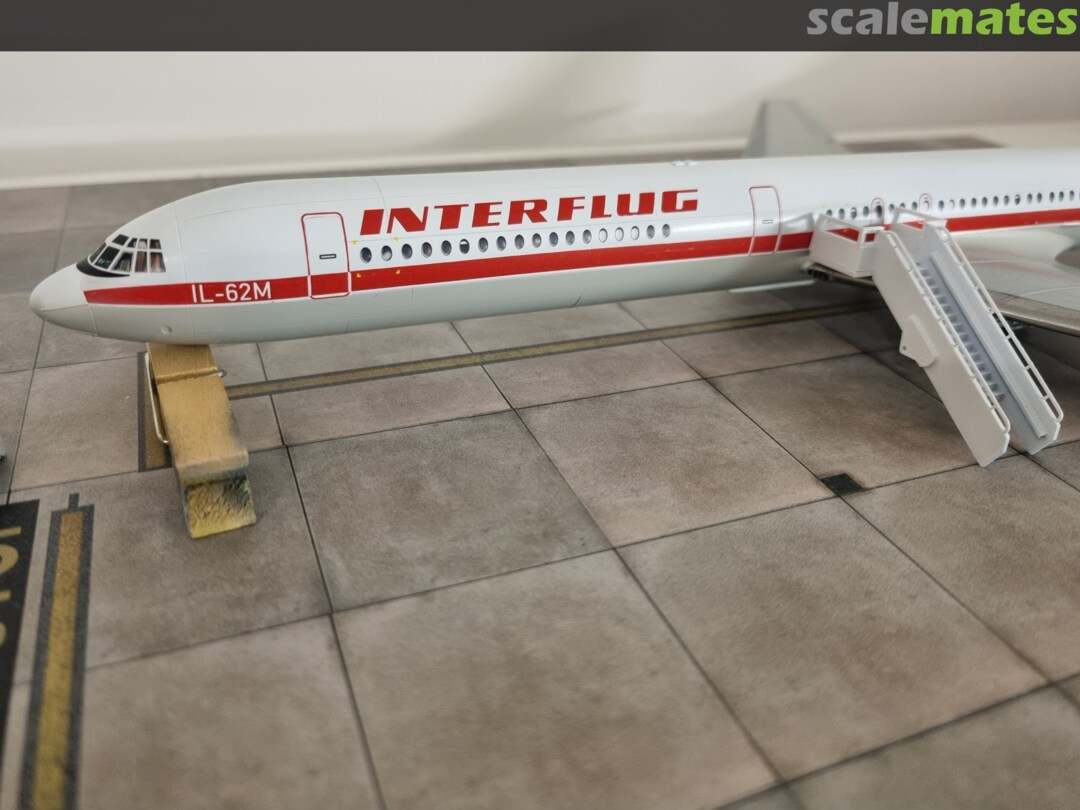
Erstaunlich! Der Effekt der Fenster Decals ist absolut verblüffend! Hättest du nicht geschrieben, dass es Decals sind, hätte ich gedacht 100-prozentig ohne jeglichen Makel eingebaute und abgeklebte Verglasung ist! Chapeau!
10 August 2025, 14:51
Jep, I really like those Authentic Airliner Decals. For my civilian stuff I always check whether they have a matching set available as those decals really bring a model to live.
2 10 August 2025, 20:13
Can only confirm, highly recommended. However their livery decals are not that accurate sometimes.
2 10 August 2025, 20:22
The windows and paint are very "crisp"; it is a spitting image of the real thing. Looking forward to seeing the project once it is complete.
1 17 September 2025, 05:04
Your renewed and continued interest in this project had me take it out from the shelf of maturing motivation again and really makes me want to continue.
Too many projects competing for my attention. I need more TIME! Anybody hear me?!
4 18 September 2025, 10:44
@Michael, that won't work! Murphy will make sure that when you have more time, you'll have more ideas, buy more, get more kits as present etc. You'll probably build more too. But you can forget about your stash getting smaller! Never! Not in a million years!
4 18 September 2025, 11:51
Frank, your soberingly realistic worldview collides heavily with my wishful thinking and is thus discarded. Please refrain in the future from disturbing me with facts. 😉
Thank you Spanjaard. I feel better now. Lets buy some kits...
2 18 September 2025, 13:15
Are the cabin windows decals? Trying to figure out how to mask cabin windows on one of my projects.
19 September 2025, 01:30
Yes, they are. With airliners I would generally prefer decals over windows, particularly if authentic-airliner-decals are available.
Then if course there are classic masks as you can find them for quite a selection of civil planes. KV models offers them for quite a range. I like to fill all those fuselage windows with crystal clear resin as this gives you a seamfree appearance.
A technique I will try in the future is painting the window strip before assembly. Then you put or pour in your windows, assemble the fuselage and sand the seam. Now you can mask the whole window row with one long tape and color the rest of the fuselage - best to blend it in quite a bit away from the mask so you avoid a step here. Zbynek pointed a video series out to me which - although incredibly long (6 × 45min) - contains a lot of useful techniques and informations. Check out his beautiful Boeing 737 build. There you find the link.
1 19 September 2025, 06:06
Whoow ein eher exotisches Flugzeug einer selten als Modell zu findenden Fluggesellschaft 👍
1 19 September 2025, 06:10
The decals for the vertical stabilizer turned out to be useless, as they did not fit at all. My attemps to make them work were futile. I tried to remove them which turned out to be a real pain and motivational killer - thus sending this project onto the shelf of maturing motivation. Maturing it did and I finally finished the job of removing the decals from the stab - save the East German flags. After several coats of white and acquisition of new - hopefully better - decals I am good to continue.
3 10 February, 09:46
Thanks mates for the heads up and the continued interest in this project. With the stab decalled anew I dare say I am back in the game. When back home again commencing the paint job will be next.
3 24 February, 18:43
Great work 👍👍 nice to see wings getting sorted. Big build but very nice model. 😃👍
1 24 February, 20:47
That is great news! Looking forward to seeing this one completed.
2 24 February, 22:22
Well done managing all these issues with the markings!!! Tradeoffs between paint/film can be very time consuming!!!
1 24 February, 22:40
I'm keeping my fingers crossed that the masking won't cause any damage and that no paint will seep underneath!
1 11 March, 10:43


