

Sikorsky H-37A Mojave, 55-0650 - completed


Comments
114 19 April 2021, 11:44
new wonder on the making. i will certainly sit, relax, and try to learn what i can 🙂
19 April 2021, 11:51
Łukasz: Thank you for participating the quiz. JGG have 2 engines but 10 blades...🙂
19 April 2021, 14:56
Sikorsky addicted?
Of course i'm in and the quiz.. hm. The windows appear to me like a S-58 but the exact positions are different to the original ones.
Ok S-58 or S-61 i would say
19 April 2021, 15:10
When the engines are started, it sounds like two Corsairs...🙂
19 April 2021, 15:45
Ah yes the S-56 fit that window positions
Didn't knew that there is a Kit around of it. Cool choice👍
19 April 2021, 16:11
Engines hanging on the side,clamshell doors yep will be watching as usual.
19 April 2021, 18:09
OMG - I have the precessor (Special Hobby) Kit in my stash and it is coming closer to the work bench --> "must watch". So I'm in.
19 April 2021, 19:55
@Juergen: Bernhard will quickly make you wanna abandon this brave idea 😄
19 April 2021, 20:07
Now that the secret has been revealed: Is there a Front row seat left for me please ?
Looking forward to this rather unusual bird taking shape .
20 April 2021, 08:09
A lot of seats are still free. You are all welcome. Meanwhile there are the first results of the joint venture with David! I'm totally impressed about the 3D visualization!🙂
20 April 2021, 15:20
That IS impressive ! Is this also based on the Bückeburg data ? Admirable CAD skills 👍 Base for the 3d print ?
20 April 2021, 15:27
Thx Hanno. Yep, David did use his excellent pictures. This is a result of the today's conversation via What's app with David🙂
20 April 2021, 15:35
it is a pleasure to work on a project with Bernhard. No part is too small, nothing is too detailed. His measurements are always excellent.
20 April 2021, 16:35
Joining for the ride - a great topic indeed... waiting for the usual magic... 😉
20 April 2021, 18:05
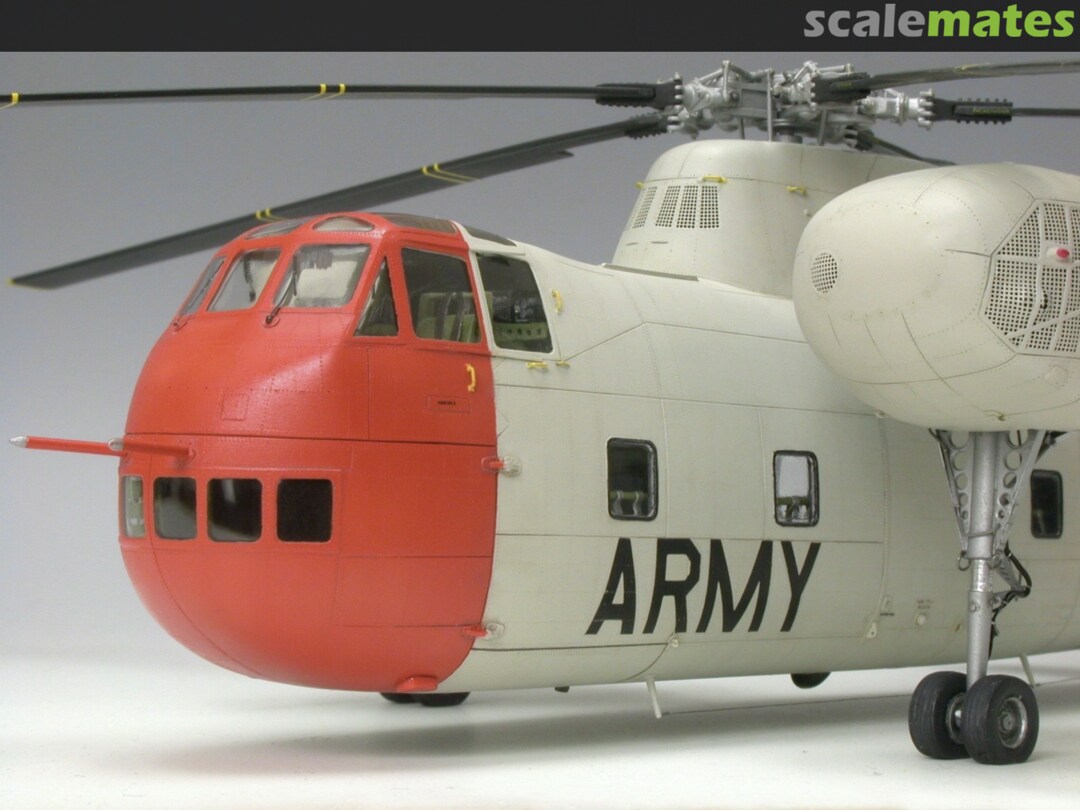
New research results: I heard that the USMC Version (C) of the Mojave has a foldable (!!!!) rotor. That means that I will certainly not build the this version! This project needs to be simpler. So it is going to be a US Army version. But I do not have Army decals. Who can maybe help?
22 April 2021, 18:48
Good news & more new research results: there were some C-versions without hydraulic, for example the XM-40 of HMX-1 seablue overall. 🙂
22 April 2021, 19:58
Hallo Bernhard, I now suspect a system behind it that creates new models for you that I already had in my Hand. I found my master there again. I am curious what you will do with it. 🙂
ffmc.de/modelle/flugi/bp_mojave/bp_mojave.html
22 April 2021, 20:26
Hallo Bernhard, schön dass Du "dabei" bist und mir den Link geschickt hast. So kann ich immer wieder über den Thread hier hinsprignen ohne lange suchen zu müssen.
Natürlich konnte ich es mir nicht verkneifen, zum wiederholten mal Deinen Artikel zu lesen und mich an den Fotos, Hinweisen und Tips zu erfreuen🙂. Die Lösung mit dem farblichen Gestalten des Innenraums ist genial und wirkt sehr überzeugend. Den Bausatz habe ich schon paar Jahre und so wie es aussieht hat es sch gelohnt zu warten. Die Gelenke von David sind großartig und werden den Bau ungemein beschleunigen/aufwerten.
Übrigens freue mich über alle ev. weiteren Tipps von Dir (und natürlich von anderen Mates, die Ihre Erfahrungswerte teilen wollen). Grüße B
23 April 2021, 07:23
In, this will be another treat... do you ever take a break and just build OoB over the weekend?
23 April 2021, 09:53
Sergiej, I fear it's not possible for me to build a model OOB. I think detailing und refining is a more important challenge than finishing of the model.
23 April 2021, 11:17
Today I felt like opening a Christmas presents: the package with the 3D printed rotor hinges has arrived! I'm over the moon!!
23 April 2021, 11:18
I hope there will be a day (soon) where one can afford buying and using a super precise 3d printer. I'm very familiar with 3d modeling on a computer. 🙂
23 April 2021, 11:20
Bernhard, I suspect you're back with a new crazy part number model in 72nd scale this time ?
23 April 2021, 15:45
David „Lightspeed" Funke ! That's what is called VIP service.... Parts look very good, now the fun begins !
Btw: The Mesh on the engine gondolas looks very transparent in your reference picture, will there be two P&W R 2800 ? 🙂 🙂
23 April 2021, 17:36
This time the rotorhead will be simpler but the interior of the engine bays worries me... I do have a rough idea how to proceed. Indeed it's going to be two Double Wasps. Each was installed at an angle of 80' to the inner side and 12,5' downwards to prevent an addiction gear box.
23 April 2021, 17:59
1:72 - super - mein Maßstab - da bin ich natürlich wieder aufmerksam mit dabei 😉
25 April 2021, 18:30
Great show - usually the rotor is the crowning piece coming at the end of your builds, this time we see the build proceed "from the crown down"... 🙂
Excellend detail beyond the reach of us simple spectators, and I can't stress enough how much I look forward to those side sponsons/nacelles... 👍
25 April 2021, 21:11
Thank you Oliver, Cuajete and Slavo. Today I could finish the rotor head. Just received the excellent publikation published by Steve Ginter. Unfortunately it's not possible to build a USMC variant... all early machines hat no hydraulic fold but a different tail & gear housing and all late machines has hydraulically folded main rotor (pandora box!!!). So I will build a Army heli in an arctic scheme (white orange).
26 April 2021, 11:10
I can't help but wonder, what type of glue do you prefer when fiddling with such tiny things? I am looking at the photos of the rotor head or whatever it is called.
26 April 2021, 11:12
Treehugger: as usual I use for such subassemblies 2 types of glue: classic plastic glue (f.e. Revell contact) when I had to adjust the parts and/or correct angle (f.e. the links on top of the rotor head star). After setting I apply additionally CA of Tamiya for better strength.
For glueing small parts such screw heads I use the CA of Tamiya.
26 April 2021, 12:04
Do you know the problem when you look at something five times before you finish something and only when you finish you realize everything is wrong. After airbrushing the tips yellow I checked the pictures which color the leading edges have and noticed that I installed the blade cuffs wrong... Now I can't start ripping of the cuffs but luckily David send me several spare parts. Thx David! 🙂
30 April 2021, 16:02
THAT problem I know only too well...🙂.... very comforting that these kind of mishaps happen to you as well
30 April 2021, 19:48
Thank you Mates.
Yesterday I continued the work on the right nacelle. I decided to install the wheel bay and engine later and glued all parts (minus mesh areas) together. The fit is poor but it's no problem for my technique using CA by Tamiya. I sanded all seams smooth and the research began. I discovered that the aft contour/shape of the cooling area is wrong and that the shape of the bulge in the underside is too massive / wrong. Usually most of the Mojaves fly without the panels covering the exhaust tubes so I reworked this area by cutting off a part of the nacelle and installed a bulkhead. Pictures coming soon.
8 May 2021, 05:36
Sounds like some schrocking moments, but you'll tackle it nicely for sure - as always! If there will be a modelling lifetime award, you're a front frow contender. Just briliant stuff!
13 May 2021, 21:14
Amazing work once again Bernhard, that rotor is simply amazing! Following to see more magic happening!
14 May 2021, 05:57
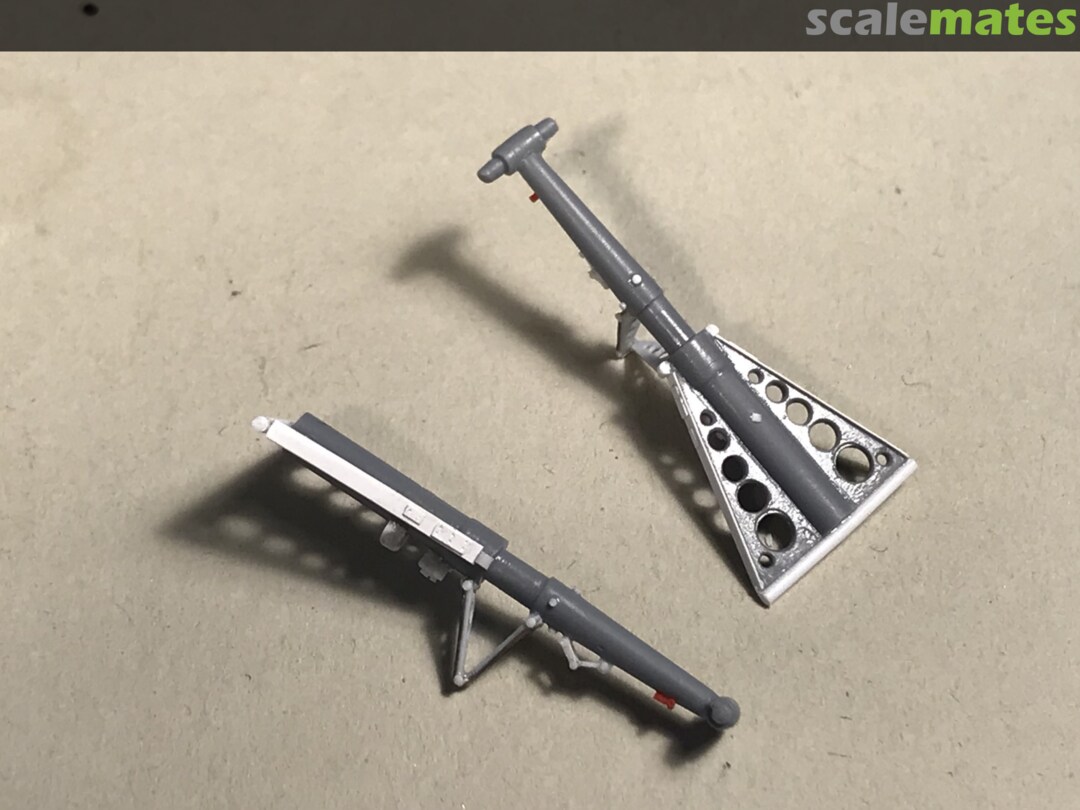
By the way: Oleo scissors for the main landing legs. In the most cases the etched parts are too thin. As usual I'm going to scratch them from thicker plastic and not use the etched parts. This time I tried something new: I separated the scissors, CA-glued them to a 0,3 mm thick plastic and spent only about 10 minutes to sand all 4 parts in shape of the etched parts. Voila: now I have 3D scissors in the correct thickness.
14 May 2021, 13:42
These are some pretty legs, but things again are escalating rapidly here, I'm afraid........😄 Roughly ca. 50 parts per leg ?
Love It !
14 May 2021, 15:28
Always a dizzying pleasure to watch your skill. I also find the original extremely cool!
15 May 2021, 08:59
The detailing on the outside of the nacelle and in the wheel bay is nearly completed. All templates for the etched mesh parts are measured. To warm up I installed the fire wall on the inside. Already I see a problem on the horizon. When I airbrush the wire mesh parts from the outside white, everything on the inside that has to be installed before will be discolored.
24 May 2021, 13:20
Ok.. this is absolutely ridicolous in all the right ways 😉 What a masterpiece and it´s not even done yet!
29 May 2021, 15:16
Gosh...how can you work that precise and clean with that tiny parts? I really admire your handiwork - great show ! 👍 👍
29 May 2021, 15:43
Im glad that you like my present Heli project. 🙂
A little progress. It was Ehe correct decision to install only 6 cylinders in the fron row. So it's possible to install the engine. The aft section with the auxiliary equipment will be completed, painted separately.
3 June 2021, 11:52
There are no usable pictures showing the exact engine installation. Because of that I had to improvise - also through the mesh panels you are not going to see very much...🙂 Now I'm waiting for the custom etched mesh parts.
5 June 2021, 10:57
Very realistic sooty looking engine ! Looks like it is going to start crackle and roar any time soon .
Are the exhaust pipes made of some kind of rubber-tube ?
5 June 2021, 18:15
Thank you Cuajete & Hanno.
I used thin isolation from isolated wire (0,4 mm wire diameter and 0,75 mm outer diameter) and combined them with 0,22 mm wire for better handling.
6 June 2021, 05:51
David: sorry for the late response. The kit offers only plastic parts with raised mesh details. So im going to replace them with etched mesh parts. Picture 65 shows the artwork for the etching process.
10 June 2021, 07:03
Today I began the work in the cockpit. After checking the pictures in the Steve Ginter book I noticed that the cockpit floor is incorrect. The middle console is too short and the entry hatch is not present.
I changed a second time the original machine because I would like to build an Mojave with 2 stabilizers. I researched that only the A version used be the Army had two stabiliser. Further I discovered that only the B version had the sliding door with the prominent rails. The door on the A and C was a swing type.
12 June 2021, 16:31
Very good looking central console and instrument panel ! Pieks < kleb ! 🙂 🙂
13 June 2021, 15:17
Thank you Gustavo and Dave.
Hsnno: exactly! Piex <Kleb? will be continued with Anyz after painting dark grey.
13 June 2021, 19:02
Bernhard, Du hast echt Glück, das das Teil nicht mehr eingesetzt wird. Dein Modell wäre sofort für die Ausbildung der Techniker beschlagnahmt worden! 😎
14 June 2021, 11:29
Fun part about detailing is that once you add more and more, it is bound to look good in the end I think. 🙂
27 June 2021, 18:29
I do agree with Bernd and VdeV. I am absolutely speechless about your skills...
30 June 2021, 12:34
Re. photo 86. Fascinating. I don't recall ever seen something like this before, adding such detailing on the inside of the clear part. 🙂
30 June 2021, 13:06
Frames and cockpit floor look very good 👍, are they cut or bent ?
30 June 2021, 14:49
Thank you mates.
The frames are cutted with a curve and bend carefully on the lower side (radius changed, on the lower side smaller)
30 June 2021, 14:59
Through the small windows you can't see much. Because it that I intend to add nothing in the fuselage. The only thing that you can see is the upper bar for the back of the seats. Today I will close the fuselage and Beginn with the detailing the surface.
3 July 2021, 06:36
Following the consecutive stages of your assembling the model is much more fascinating than watching good movie, I must say, Bernhard... I wish I had only half of your skills and patience... 😉
1 10 July 2021, 19:13
Thank you Mates 🙂
On the bottom is a large cargo hatch. Forward there is a second hatch known as Hell Hole consisting of 3 foldable panels. The outer ones are solid, the middle is made of transparent material and is fitted to the left one with a piano hinge. In the floor of the cabin is a second inner door which will be folded forward (180*). Unfortunately both lower hatches are missing in the kit. Because of little information, pictures of the bottom and drawings I spent yesterday about one hour to determine the correct position and size of the hatches.
12 July 2021, 08:09
I wonder, does a good riveting tool, simply dent the plastic, or does it supposed to be so pointy, that it pierces the plastic?
12 July 2021, 08:43
Thanks for the interest Treehugger. Most of my self made riveting tools has „dull" teeth and producing dents.
12 July 2021, 09:23
Nicht überliefert aber vermutlich weil man sehr tief fallen konnte wenn nicht angeschnallt...
12 July 2021, 11:33
W"ieder ein fantastischer Baubericht eines eher exotischen Modells, Bernhard 👍
12 July 2021, 17:20
Where do you source all these details Bernhard? And when will they land on the market? 😛
14 July 2021, 11:30
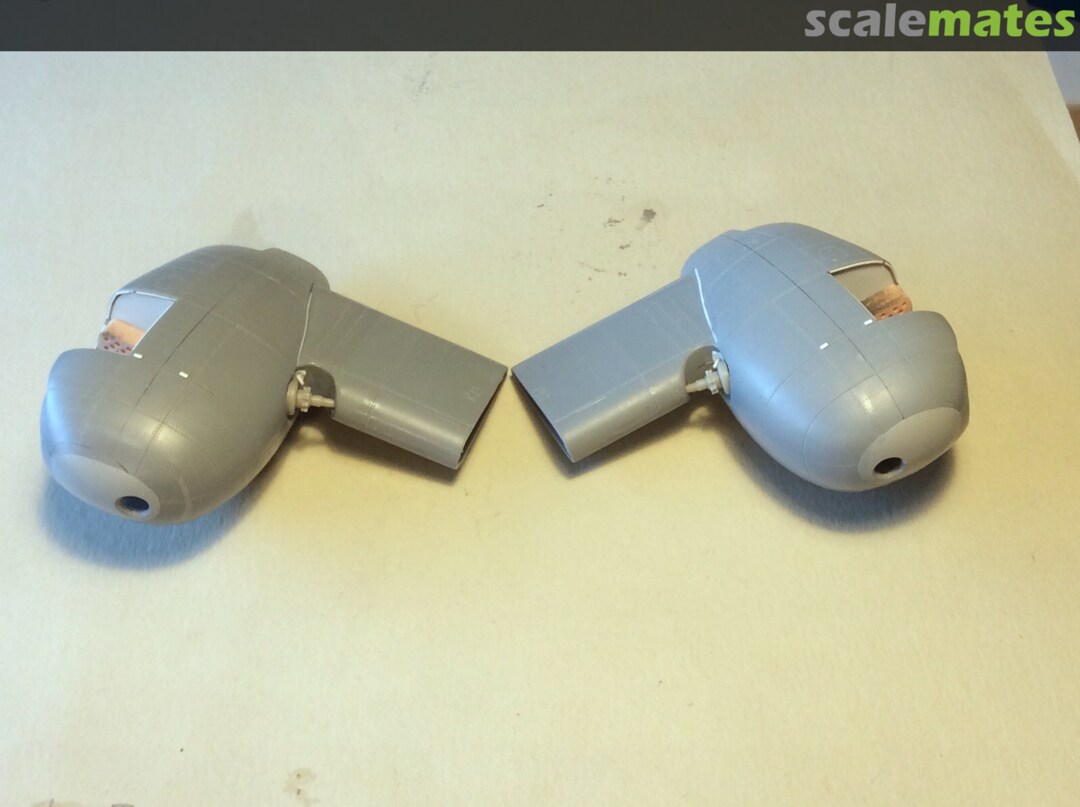
Also today I worked on the fuselage and added details. Every time I'm amazed how many details a helicopter has: drain and static points, electric and hydraulic connectors and mounting points for external equipment. For a change I finished the nacelles: washing, filtering and position lights.
1 August 2021, 16:57
Amazing work. I will keep a close watch on your progress. Did you 3Dprinted the blade bases on the main rotor?
1 August 2021, 17:11
Thank you Mates!
Eduardo: it's correct. Hinges of the blades are 3D printed. See please pictures 5-8.
1 August 2021, 17:56
Danke Jürgen. Freut mich sehr, dass es dir gefällt. Inzwischen habe ich die zweite Airbrush Runde hinter mir. Nach der ersten hat es sich herausgestellt, dass ich hier und da den CA nicht sauber verschliffen habe. Nun bin ich wieder auf Kurs. Die vorletzte große Hürde ist nunmehr genommen. Nur noch die zwei Glasteile sauber dran kriegen und es sind nur noch die letzten 195 m zu laufen. 🙂
6 August 2021, 16:46
The clear part is thin and distortion free. Unfortunately the framing is molded without sharp edge. So there are no clear "guide" for cutting the mask on the canopy. Because of that I cut all masks externally which cost a lot of time. Finally I'm very satisfied with the result: the was well spent.
7 August 2021, 16:59
Some kits just look crazy good... this looks planned-, intentionally and technically-flawlessly good 🙂 and still also crazy good too 👍
It's good to know where references for aircraft modeling techniques (albeit many off them a skill-level too far...) are to be found... here. 😉
7 August 2021, 19:48
Cuajete: thank you. Each "round" corner of the mask has in fact 3 edges (1x cut 45', 1x cut 22,5' and 1x cut 67,5')
Slavo: it's always great pleasure to read you comments.
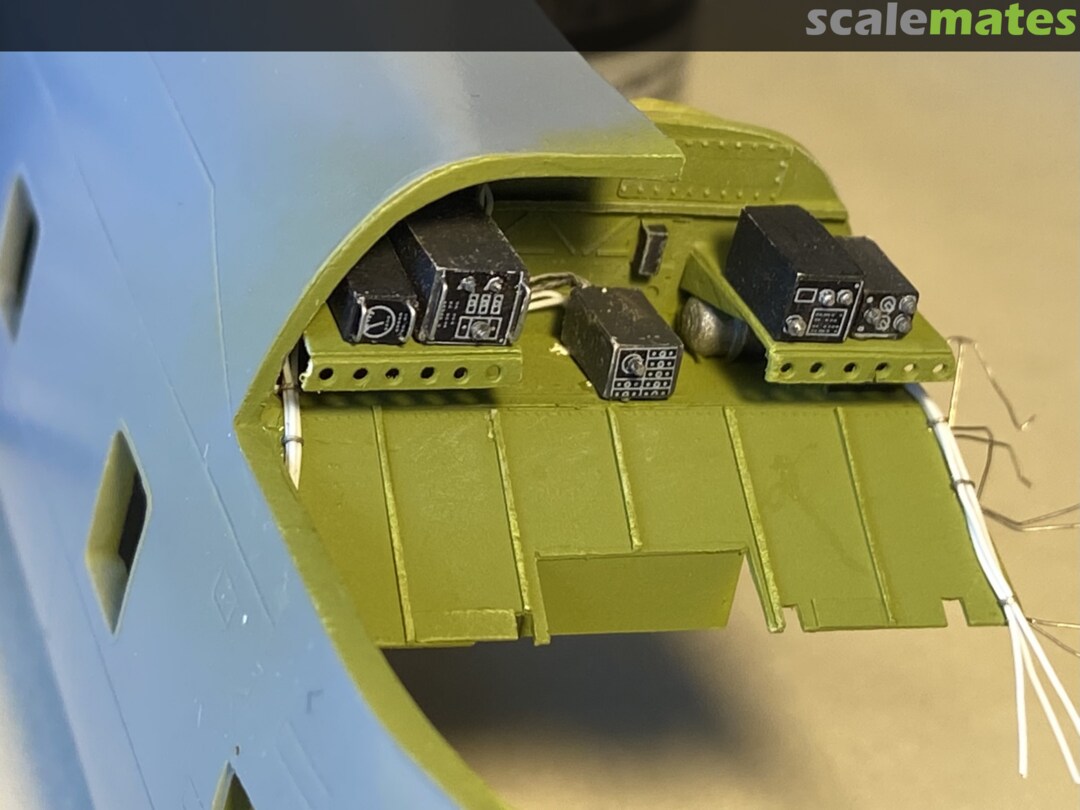
Today I did something you could call playing with fire: installing the upper console and cable trees to the inside and roof of the cockpit.
8 August 2021, 07:40
Out of this world! May I ask how do you get those rings to stay in place while you bend the trees to shape? Quantum CA droplets? Amazing job!
(edit) seems like you drilled holes on the inside to insert the loop ends , according to pic 144. Incredible nerves of steel if so. Chapeau.
8 August 2021, 08:30
Nice work on the canopy mask. I think I would have used four patches for a single "four corners" window to avoid too much trial and error, assuming the slight overlap of the four patches aren't noticeable in the end after airbrushing. An option could be to use a nice circle cutter, making perfect roundels, and then use a quarter roundel in each corner, but that would make for more overlaps though. I think I've seen someone using some kind of silvery tape for that, but perhaps only on large models.
One thing I may try if I get the 1:72 Hasegawa B-24, is to rely on strips from a silvery decal sheet to color the window framing. Ofc, that looks best if the windows aren't rounded in the corners, which I guess most windows tend to be. :|
8 August 2021, 10:29
You're the Jedi master, Bernhard - skillful and brave. The transparency itself with riveting is a masterpiece... I am deeply impressed already...
8 August 2021, 17:29
Thank you Mates. I enjoyed you comments🙂
David: each cable tree is installed first 5 times to the console. I used 0,2 mm wire for a loop around the cables. It's secured with CA from the bottom. After installing the console I drilled 4 holes through the clear part and repeated the procedure.
In the afternoon I played again with dangerous items, this time with "dynamite" and glued the canopy with CA. Because of distorted fuselage I had to glue the clear part under pressure. I know from experience that this will work with CA only.
8 August 2021, 17:58
David: the drawing is the language of an technician. See please picture 149.
8 August 2021, 17:59
Canopy fits like a glove - no fogging, no crackling caused by tension ! Expertly done, like usual…… 🙂 👍
8 August 2021, 19:18
Thank you very much, Bernhard. Your explanation was clear enough, but the drawing topped the cake. Deep respect.
8 August 2021, 19:54
@playing with fire... - I consider that several magnitudes safer and less nerve-racking than any work related to clear parts... 😄
8 August 2021, 21:00
…the last hurdle is taken: clamshell doors are in place without trouble. Now I have only the last 195 m to run.
9 August 2021, 11:04
OMG, its all I can do to build a troublesome kit straight from the box; you're an artist!
9 August 2021, 19:02
witnessing those 150+ pictures of pure precision in 1:72...its hard to bare for a mere mortal...
9 August 2021, 19:51
Seems like kind of S/M doesn't it? 😛 And then we have another kit to strike off the to-do-soon list (e.g. my Bellanca) 😉
PS. Bernhard, have you considered using "Hawkeye" nickname? 😉
10 August 2021, 07:26
Truly awesome! ?
Your build in progress is like watching a (good) hollywood blockbuster ?
11 August 2021, 05:30
Pic 155: maybe some pyrotechnics for the emergency clamshell jettison system?
11 August 2021, 08:36
Re. photo 155. Looks like, maybe two handles for an emergency opening system for the presumably two large swinging doors at the front. And looks like maybe there are some safety pins at the tip of each rod, maybe to be pulled out before opening I am thinking: [img1]

11 August 2021, 09:14
Yesterday was a very efficient modeling day: I managed three airbrush sessions. After the last (fire red orange) I immediately removed the masks and I'm very satisfied with the result. I think that with a little cleaning I could make the edges a bit more sharper🙂
12 August 2021, 04:24
Wahnsinn , bereits 4 Monate Bauzeit , freue mich schon auf das Endergebnis !
12 August 2021, 06:58
Thank you Villiers.
Danke Jungs. Die Mühe bzw. der Aufwand die Masken aus einem Stück anzufertigen hat sich gelohnt.
12 August 2021, 07:51
Superb result ! Highest level of perfection in cleanliness, I'm still striving to achieve........
Looks a bit like an overdimensional matchhead 🙂 🙂 🙂
12 August 2021, 14:12
Very impressive, Bernhard. I alway can feel how much you love this hobby. Very inspiring
15 August 2021, 04:48
Thank you Hanno.
Thank you Norbert. Indeed this is a important part of my life.🙂
Meanwhile I managed the washing, filtering and decaling without trouble.
15 August 2021, 05:15
Many many years ago I learned from a modeling friend and photographer that true black and true white (100%) is not existent in our modeling world. This is especially important for small scales such 1:72. Because of that I did not use H130 (snow white) but H196 (very light grey / off white) for the entire fuselage. But now this problem caught up with me: snow white on the US insignia 🙁 This morning I decided to use very strongly thinned Revels clear smoke to shade the snow white🙂. Now I'm on course again.
19 August 2021, 04:37
I've seen videos of people airbrushing a thinned mix of black over their decals to make them not stand out as bright white. I guess it would be more like airbrushing on thinner onto one's model, with a little bit of black in it. Haven't tried it myself.
19 August 2021, 06:25
I use a very pale wash of the colour adjacent, just to 'kill' the contrast of the decal colours, compared to those on the model itself. The further away that you view something, the less the apparent contrast.
19 August 2021, 07:23
One really needs a face-harness that keeps the jaw in place and prevents the eyes popping out when watching the updates here... 😉
19 August 2021, 12:23
Thank you mates. Slavo: one of the reasons why I'm putting in so much work is to read your comments🙂
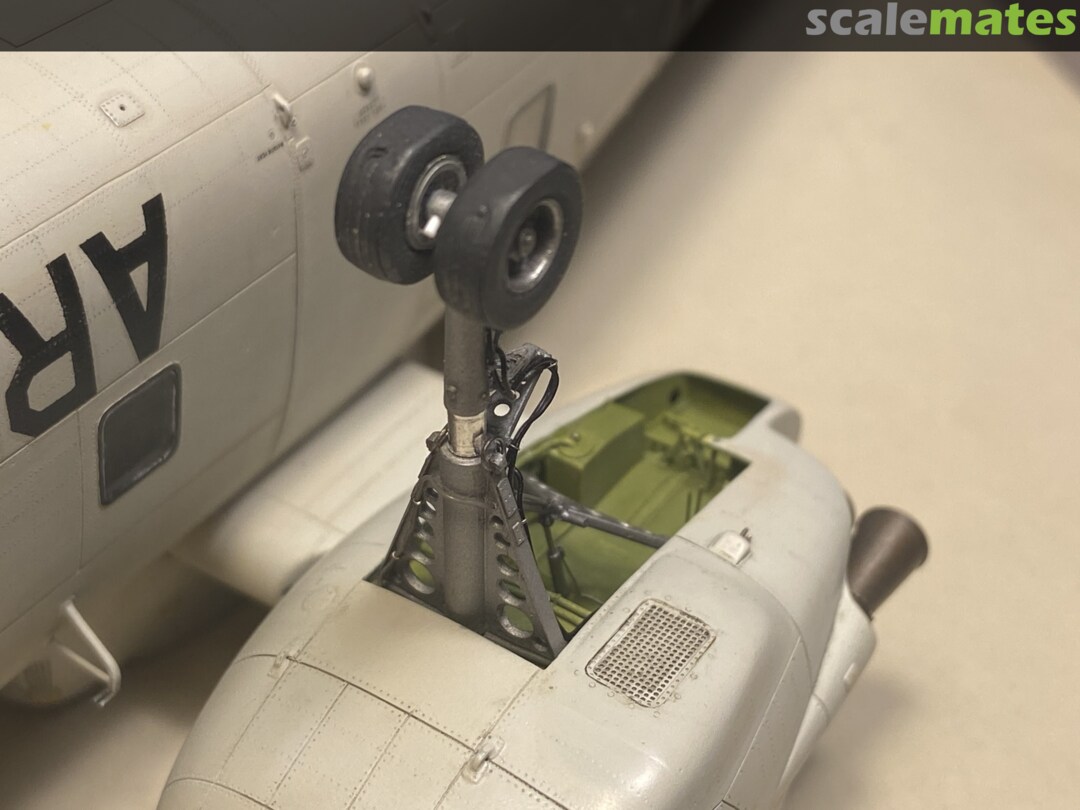
Just now I took the very last obstacle and installed the landing gear. Unbelievably everything worked like I planned it. 🙂
20 August 2021, 18:42
You're pulling our leg - there's no way this is 1:72! Once again, incredible details 👍
20 August 2021, 18:53
This morning I finished another long term project🙂. Because we did a long bicycle excursion just few pictures today. Second batch tomorrow.
21 August 2021, 19:27
The bright, wonderful madness! Not of this world..... 🙂 Congrats!
21 August 2021, 19:37
Absolutely, unbelievably fantastic... I am speechless... Chapeau bas, Bernhard!
21 August 2021, 20:14
Amazing!
Nicht schön aber selten und was ein herausragendes Ergebnis wow!
21 August 2021, 21:46
That is just beautiful, amazing detail, and a really interesting subject. Bravo!!!
22 August 2021, 00:31
Always a pleasure to follow your builds - and the final shots are the icing on the cake. Superb 👍
22 August 2021, 06:32
You obviously made sprint finish for the last 50 meters 🙂
Outstanding result once more ! Now I'm under pressure…….🙂
22 August 2021, 07:00
Wow. This one's a really beautiful recreation of a not so beautiful helicopter. 😄
Stunning work, Bernhard!
22 August 2021, 07:18
Agree with WhiteGlint, it's a bit of a beast, but you've crafted a beauty as always. Wow!
22 August 2021, 08:16
ugly and beautiful at the same time...and a display of unmatched craftsmanship, as always I am deeply impressed💪🏻
22 August 2021, 10:33
I will not achieve this perfection in my remaining years. I am looking forward to further projects. 👍
22 August 2021, 15:31
Strange Machine. Well done 👍 The motor grids look darker in the presentation photo 🤔
22 August 2021, 17:11
Still can't get over how you made the multi-piece hinges for the front 'doors'. Astonishing skills 🙂
22 August 2021, 17:11
Before this build, I did not properly know this helicopter even existed... Now, after following start-to-finish, I would trust myself to perform basic maintenance on the areas where Bernhard put his attention... 😄
The finesse of all surfaces & details is amazing, and you've truly mastered the balance of the typical "non-white"-orange combination, looks just absolutely real...
Congrats my friend, absolutely a league of it's own! 👍
22 August 2021, 17:39
Dear Mates, as always I enjoyed you comments and I'm very honored. Fortunately I'm able to scratch all details without magnifying glasses: but who nows for how how long... The same goes for a staedy hand: at the moment I can pick up (with the tip of an scalpel) 0,3 mm parts and position them precisely. Keep your fingers crossed🙂
22 August 2021, 17:41
Absolutely incredible. The result obtained is amazing. Fantastic handmade details.
Congrats!
22 August 2021, 17:54
Don't know why..., I was convinced and thought it was a 1/48. Now I see this is a 1/72 build 😮
Simply unbelievable amazing clockwork job. 👍
As for the painting, I would suggest a dark/darker pin wash in the rotor area photo 186, I think it would further enhance the excellent work of its construction to perfection, just a two cent positive intended opinion, of course. Anyway, Respect.
.
22 August 2021, 21:55
Amazing effort, detail and quality that you can be very proud of
23 August 2021, 05:21
You managed to turn this ugly chopper into a textbook model kit. And even make it almost elegant. Well done !
23 August 2021, 07:35
Nothing left to say.... another clean & beautiful build. Great.
23 August 2021, 13:44
Bernhard, frankly I am blown away by the quality of this build. I don't know how you do it. Amazing!
24 August 2021, 01:13
That's premium modeling at its best. Extremely well done Bernhard 👍
26 August 2021, 20:02
Bernhard you are an artist, great modeling skills and a lot of knowledge of what are you doing. Great!! Congratulations
27 August 2021, 09:03

