

[Tamiya] Porsche 959 - WIP
 1October 6, 2025Washed.
 2October 6, 2025I plan to remove the side blinkers and make them by cutting out transparent pla-plate.
 3October 6, 2025The taillight's surface wasn't in good condition, so I sanded it down.
I was afraid it would break if I sanded the entire thing, so I only sanded the wide center area. 4October 6, 2025And because the curvature isn't right, it doesn't fit snugly. Even when I pressed it down to make it fit snugly, it was little bit short.
 5October 6, 2025I scraped off a lot of the reflector area with the tool shown below.
The length is no longer short, but the curvature is still off, so I'll have to use some glue later. 6October 6, 2025Maybe it was because the mold was old, but the headlamp didn't fit snugly against the body, and was so loose that it just passed through. The photo was taken while it was barely hanging on, but the headlamp housing is buried in the body.
 7October 6, 2025After kneading the epoxy putty and applying it to the body, I applied Vaseline to the headlamp housing parts and pressed them down.
 8October 7, 2025For some reason, the rear cowl doesn't fit snugly against the body. A gentle press ensures a smooth fit, so I suspect the cowl is bent.
 9October 7, 2025I decided to attach the wing later because I thought that if I attached the segmented, integrated wing in advance, I would end up cutting off the marked area when fitting the cowl and body.
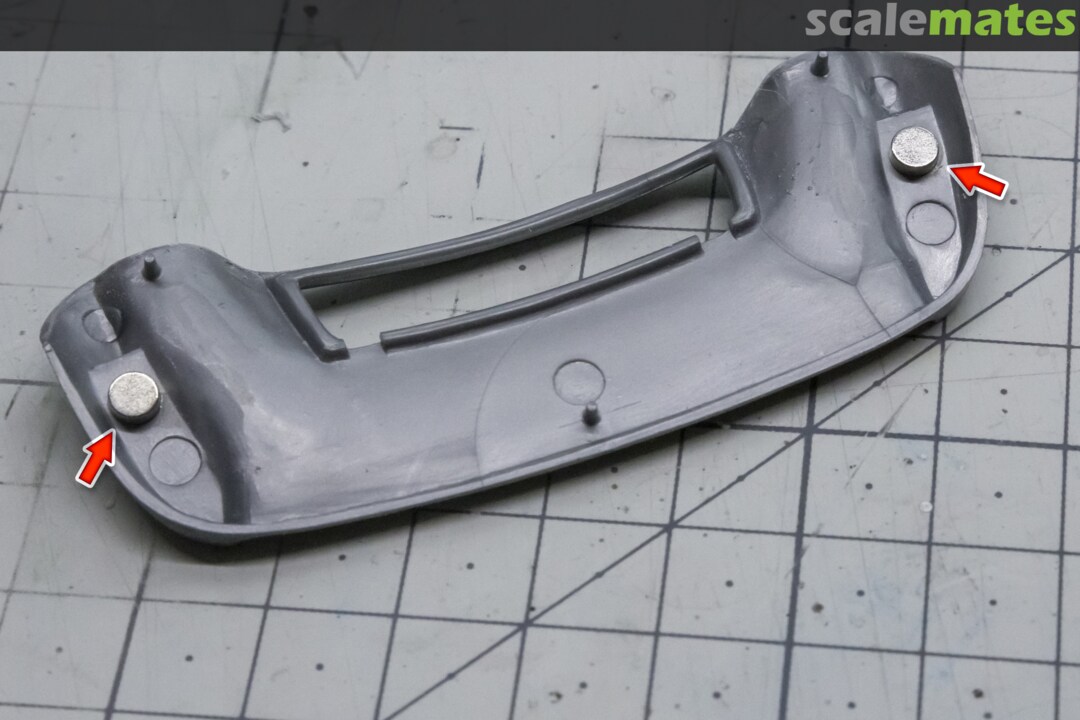
 10October 7, 2025The fact that it fits well when pressed lightly suggests that the body and cowl would have the same effect if pulled together. So, I attached a neodymium magnet to the inside of the wing and...
 11October 7, 2025And I glued neodymium on the inside of the body so that it would be pulled together with the cowl.
 12October 7, 2025Here are the results
 13October 8, 2025I painted surfacer.
 14October 8, 2025The area around the headlamp was almost trimmed up in one go.
 15October 8, 2025The cowl was too tight and awkward, so I modified it to be similar in thickness to the surrounding panel lines.
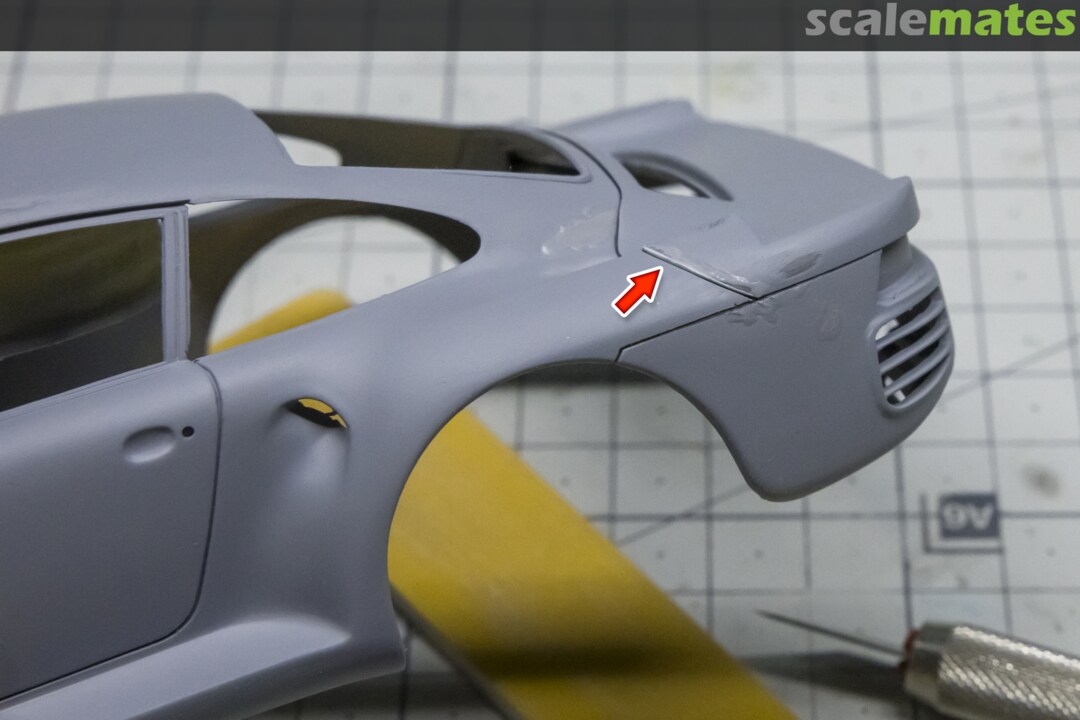
 16October 10, 2025The space in the indicated area is too wide, and seeing that it is wide in other works as well, it seems that the original mold was shaped like that.
 17October 10, 2025Slice the thin plastic sheet into thin strips and...
 18October 10, 2025Attached like this and sanding...
 19October 10, 2025The width is now the same as the adjacent panel line.
 20October 11, 2025Now it's time for some serious sanding.
It's really tricky to sand concave areas like the ones shown. 21October 11, 2025The roof shows signs of rough scraping with power tools. The parting line marks on the front fenders weren't completely erased, so I kept resanding them. The area in front of the headlights now only needs finishing.
 22October 11, 2025I painted the surfacer again.
White surfacer to wheels and seats. 23October 12, 2025I don't think the front part needs any further work.
 24October 12, 2025I think the rear cowl part needs some more work.
 25October 12, 2025The roof has a very faintly uneven surface.
 26October 12, 2025Sanded.
 27October 12, 2025Sanded.
 28October 13, 2025Next, I attached the wings and applied poly putty generously.
 29October 13, 2025The inside of the wing that touches the cowl was protruding a lot, so I roughly cut it off with electric tool.
The outer surface also had subtle curves that did not look natural, so a lot of carving had to be done. 30October 13, 2025Surfacer once more.
 31October 14, 2025Putty once again.
 32October 14, 2025Sanding the concave area inside the wing was quite a pain.
 33October 14, 2025Last surfacer(maybe...). Almost done.
 34October 14, 2025Finally, I polished it a bit more and finished it.
 35October 14, 2025I was wondering what body color to choose, but surprisingly, the 959 rarely comes in black. So I did a search for black...
 36October 14, 2025It wasn't a solid black, but a black that had a metallic look when reflected.
And unlike regular metallic black paint, it seemed to have a characteristic of having almost no particle feel. 37October 14, 2025So I decided to make the black color by overcoating.
1st. I painted the black surfacer, and I was planning to paint the wheels white, so I painted them white with a white surfacer. 38October 16, 2025I thought it would be best to use the darkest metallic as the base, and I was debating between gunmetal and metallic black, so I ended up using IPP's metallic black.
 39October 16, 2025And then I overcoated it with IPP's clear black.
I sprayed it on too many from the beginning, so the metallic particles underneath became unstable, but I figured it wouldn't matter since I was going to paint it dark enough to almost look black anyway. 40October 16, 2025The color felt a bit blue, so I overcoated it with Tamiya's smoke.
You can see some areas where the paint is a bit clumpy because I had to apply too much to make it black. 41October 16, 2025The result was a color that was almost identical.
 42October 16, 2025I like this color. 😉
 43October 16, 2025I sanded and cleaned the surface once before coating it with the final clear.
 44October 16, 2025Painted Super Clear III
 45October 16, 2025I coated wheels too.
 46October 16, 2025While waiting for the paint to dry, I trimmed the other parts.
 47October 16, 2025Masking...
 48October 16, 2025I painted Metalic Gray, Clear Orange, Black Surfacer.
I like to put car logos on license plates, but this kit only included the logo in black letters. So I repainted the black license plates white. 49October 17, 2025The paint flew off and stuck to the opposite side. I think I need to replace the filter in the spray booth.
 50October 17, 2025Masked.
 51October 17, 2025Painted clear orange and matte/gloss aluminum. The red disc seen behind is part of another kit.
 52October 17, 2025I masked the taillights and painted them Clear Red.
 53October 17, 2025I painted the three steps of gray on the seat with a brush. I thought I was done, so I washed the brush and cleaned the workbench. Then I realized I should have painted the marked areas, so I ended up painting them again.
 54October 17, 2025Masked again.
 55October 17, 2025I was wondering what color to paint the interior, and since I saw a lot of examples of red-brown and chocolate colors, I decided to paint it a milk coffee color.
 56October 17, 2025I mixed the paints shown below and painted them. I mixed them under the LED lights at dawn, so the colors didn't quite match, but I still like them.
 57October 18, 2025I assembled(?) the side winkers I had made.
 58October 18, 2025I had to glue two sheets together, but they were so small that I had to use an electron microscope to make sure they were glued together properly.
 59October 18, 2025It's hard to see, but the winkers are painted clear orange and the housing is painted matte black.
 60October 18, 2025The tail lights were painted over several times after masking them so that they appeared to be of various shades rather than a single color.
 61October 18, 2025Last sanded.
 62October 18, 2025Polished.
 63October 18, 2025It has a nice shine thanks to its unique roundness. But.....
 64October 19, 2025Although not very visible, The Tamiya Smoke layer in the marked area appears to have been worn away due to a bit of over-sanding.
 65October 19, 2025This part is the same, However it's okay because you have to look up from below to see it.
 66October 19, 2025The biggest problem is that the same problem occurred in the wing.
It's too late now to do anything about it, but the good news is that it's not easy to spot if you don't tell me when you actually see it. 67October 19, 2025Another problem is that the rear cowl is attached with magnets, so it's easy to just toss it around for fun. However, the magnetic force is so strong that the paint on the impact-marked area is slightly chipped.
 68October 19, 2025Anyway, I masked it to paint the rubber seal on the windshield.
 69October 19, 2025I don't usually mask indoors, but I did so because I thought it would be visible through the rear window.
Since it has rounded corners, I punched holes in the masking tape and then cut it into four pieces and attached them. 70October 19, 2025I handled it very carefully, but unfortunately, it just broke without any strength.
 71October 20, 2025I was worried that it would break again if I kept masking it, so I decided to paint it first and then attach it instead of attaching it now.
 72October 20, 2025It seems impossible to completely repair it, so I tried my best to glue it without spreading the adhesive and without it appearing warped or bent. (The marked area is where it broke)
 73October 20, 2025Painted with paint brush.
 74October 20, 2025Ready to assemble.
 75October 20, 2025I started assembling it according to the assembly instructions.
 76October 20, 2025Engine complete.
 77October 21, 2025Mounted.
The parts didn't fit well, so I had to use various adhesives to secure them. 78October 21, 2025I kept blowing on the glue to dry it, so I got dizzy and had to use a tool.
 79October 21, 2025Assembled front axel.
 80October 21, 2025I forgot to color the marked area.
 81October 21, 2025I roughly painted it in with a marker.
 82October 21, 2025Adhesioned the decal.
The license plate was carefully placed in the right direction so that it did not become 656. 83October 21, 2025Assembled interior.
 84October 21, 2025Another view.
 85October 22, 2025Removed the mold marks from the tire.
 86October 22, 2025The tool used was a nail clipper, and the blade is curved, making it very easy to remove.
For this reason, I often wander into nail art supply online stores. 87October 22, 2025I saw these 959 wheels on Google and they looked pretty so I tried them.
 88October 22, 2025The lower body and internal assembly are complete, now only the body shell remains.
 89October 22, 2025Because it's an older car, the rearview mirror is designed to be attached to the windshield. If I just stuck it on, it would leave adhesive marks and look messy, so I measured the dimensions first. And then...
 90October 22, 2025I cut and pasted the Hasegawa sheet.
I'm going to attach a rearview mirror on this. 91October 22, 2025From the outside, it will look like this.
 92October 22, 2025I made a robot kit on the mirror part and attached the remaining silver foil stickers.
 93October 22, 2025For the side mirrors, if you stick thin silver tape on them, the reflective surface may not be flat, so I cut the thick metal tape that came in the Tamiya case and stick it on.
 94October 23, 2025Attached side and rear window.
 95October 23, 2025The windshield was supposed to be attached from the outside, but the temporary fixing proved tricky. Furthermore, the adhesive surface was insufficient, and it was difficult to apply the adhesive from the inside.
 96October 23, 2025I painted the reflectors of the headlights with AK's Super Chrome.
 97October 24, 2025The transparent cover was glued using a Micro-Scale's Krystal Klear.
 98October 24, 2025Reflective film was applied to the rear fog lights and front turn signals.
 99October 24, 2025Attached front winker.
 100October 24, 2025Attached rear lamp.
The marked area is where it broke. Fortunately, it's not that noticeable 😉 101October 24, 2025The top and bottom need to be fitted, but I hate that method of fitting them by spreading the sides apart. I'm worried it might break or the paint might chip, but the one consolation is that it's easier than the Hasegawa Stratos.
 102October 25, 2025Assembling side blinker.
 103October 25, 2025It was too small and my eyesight was getting worse, so I ended up using an electron microscope.
 104October 25, 2025Attached.
 105October 26, 2025Finally, I painted the '656 badge' with an AK marker.
 106October 26, 2025It's done.
 107October 26, 2025I also forgot to put the Porsche emblem on the nose.
Thanks for watching.
See you next time on the finished album. 😉


Comentários
26 July 2026, 18:03 -
