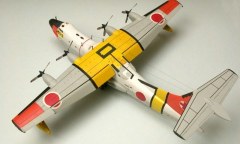
Shinmeiwa SS-2 (prototype) - completed starting with picture 127


Комментарии
5 8 July 2014, 18:30
This one would be a good candidate for the The Neglected Kit Resurrection Groupbuild (TNKR) 😄
9 July 2014, 07:51
Hi Choppa, my English is not the best🙁. What is exactly mean with NKRG?
9 July 2014, 08:18
yeah, what Urban said 😄
And no worries about your English, mein Deutsch ist nicht so gut ja, mein Deutsch ist ein bisschen 🙂
9 July 2014, 08:31
You are welcome! Do any of you have pictures of the cockpit OLDER Shinmeiwa version? Today I searched about one hour in www and found 1!!!!!! picture (temporary in album for info).
9 July 2014, 18:57
It's pretty hard to find cockpit photos of this bird, But the ones you have with the glass cockpit might help when i get around to doing the 1/72 US-2 kit i have. 🙂
10 July 2014, 00:12
It's really stunning that such large airplane is powered by such small propellers...
12 July 2014, 12:37
Ausgezeichneter paint Job, Bernhard. Das wird eine sehr schöne Maschine.👍 Beautiful paint Job.
12 July 2014, 13:28
I like it when we get both the German and the English 😄
This is lining up to be another corker !! 😄
Btw how big are the propellers in comparison to the rest of the airframe ? and what engines does this plane have ?
If they are turboprops that might explain the small blade diameters as they could be high reving props, the engine nacelles suggest that this might be the case
12 July 2014, 13:54
Nice work so far, looking forward to your progress Bernhard. Cheers, Christian
12 July 2014, 14:48
Thx mates!
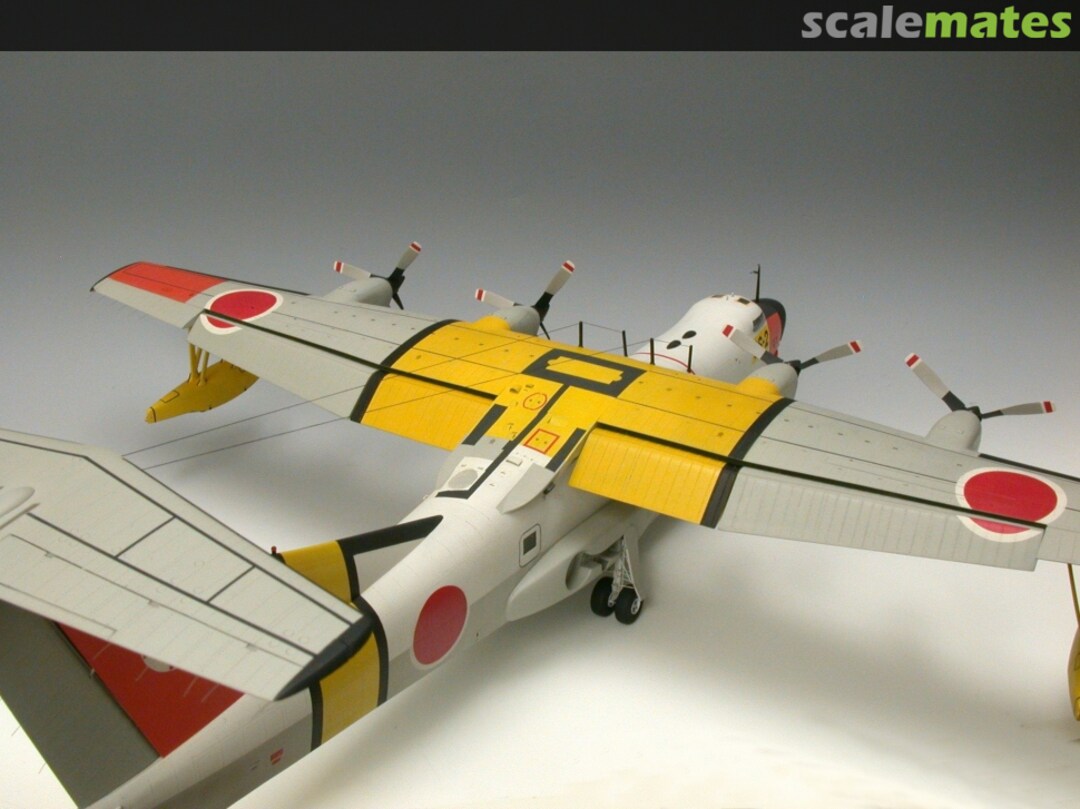
Choppa; I add two pics for comparison with the fuselage and wing. The props are "only" 4,2 m in diameter and have extremely twisted blades. I think this is the "key" for the high performance. Shinmeiwa has 4 very powerful propeller turbines with each 3100 HP (early variant, total power 12400 HP, 2,5 times more than a B-17 and approx. 50% more than a B-29).
12 July 2014, 19:11
33 m long and "only" 33 m span thanks to high lift wing and 5th engine for airflow control.
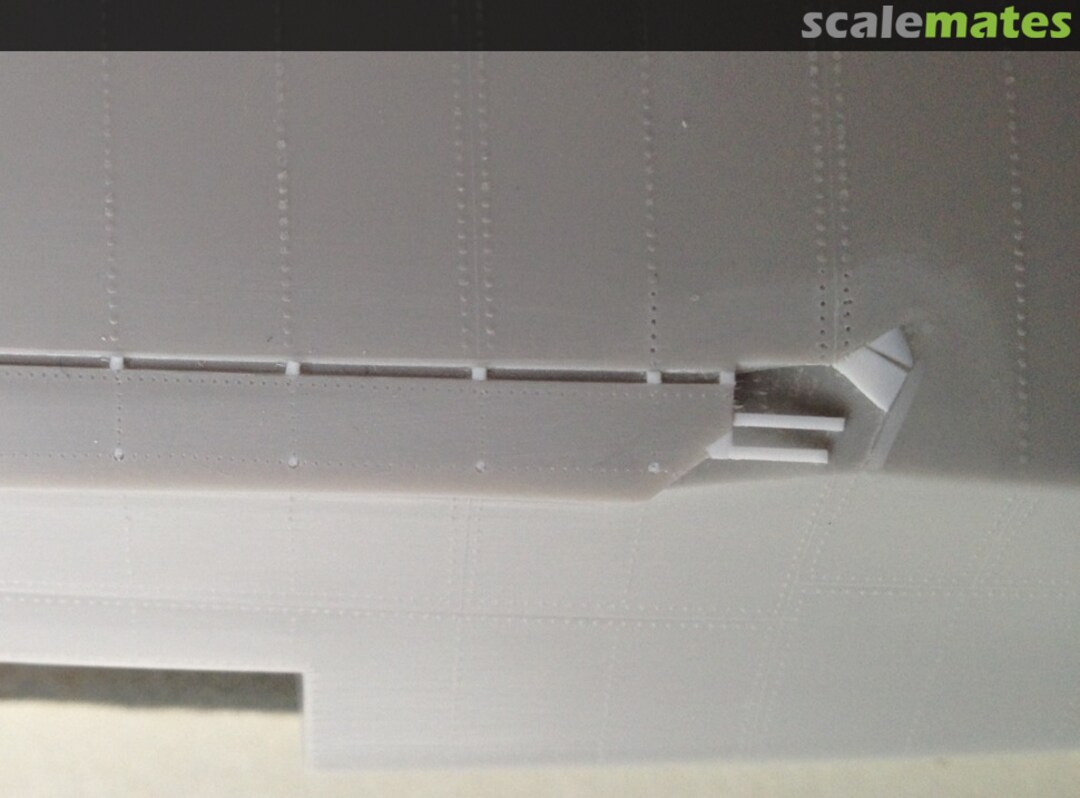
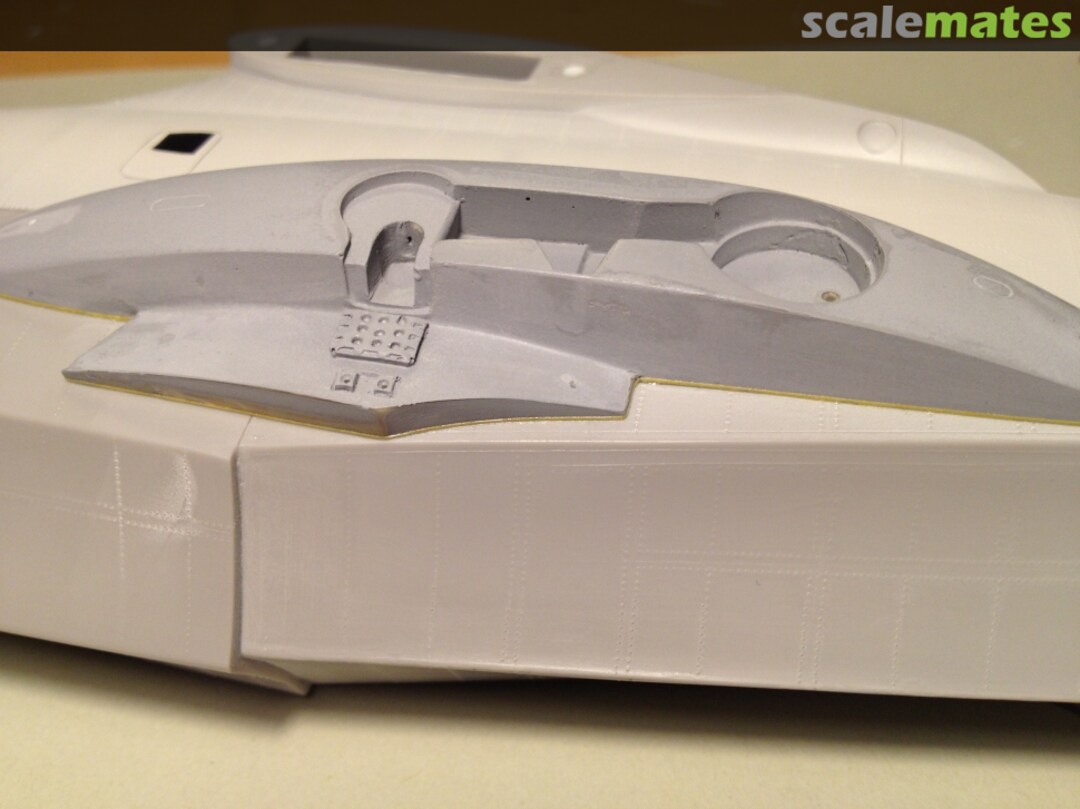
Something for a rainy sunday: unfortunately the prominent gaps for enhancing the water performance are missing in the kit...
13 July 2014, 13:54
Stay the course. my mariner and coronado took decades on and off. That is a big model and a pretty one. you will enjoy it.
19 July 2014, 13:50
This morning I created windows from Bondix (liquid transparent plastic hardened with UV-light).
First step: prepaint the fuselage with white (outer side) and dark grey (inner side).
2nd step: mask the openings on the outer side with a small piece of transparent tape (Tesa film).
3rd step: fill the windows with Bondix, coat as thin as possible and let it harden.
4th step: fill the windows 2nd time with Bondix, put a piece of thin transparent plastic into the wet Bondix and let it harden.
5th: step; remove the Tesa film from the outside and carefully remove the Tesa-glue from hard Bondix with cotton swab and Humbrol thinner.
Last step; coffee time! 🙂
20 July 2014, 08:39
Hi Bernhard! Thank you for sharing nano-technologies with us 🙂 Is this product: bondic.de/index.php?id=107 ? Interesting for how long the glue keeps it's condition. I assume you do not use it every day 🙂 However... did you try to use it as a filler? And how about sanding/polishing?
Sorry for so many question, but this is something new and interesting to me. May be I will get it. I found it on bauhaus.info/bondic/../produkte?q%3Dbondic for 20 Euro Is it a good price?
21 July 2014, 08:17
Hi Nikolajs. You and questions are welcome. Yes: this is the correct product, from Bauhaus. Price in Germany at Bauhaus for complete set about 10 €. I'm using Bondic only for lights and for windows. Not as filler because it is transparent and lacks contrast. Further in my opinion the adhesion of Bondic is not very good and it shrinks after hardening about 10%.
21 July 2014, 09:11
Thank you for explanations once again, my friend! BTW some time ago I was considering to use 2K auto clear coat to implement the same solution, but never tried 🙂 Clear coat also shrink and it cure out completely for few hours. In this regards Bondic looks better..
I just wonder why they put price 20€ on the web while you say you got it for 10€! Did you get it from the shop store or by web (like the link I sent)? 🙂
21 July 2014, 09:23
Sorry you are right; complete set online and in the shop 19,95€. Tube with fluid cost 8€, IR-lamp 4 €. The rest (box and sanding tools) is not a must have but only a nice to have.
21 July 2014, 09:44
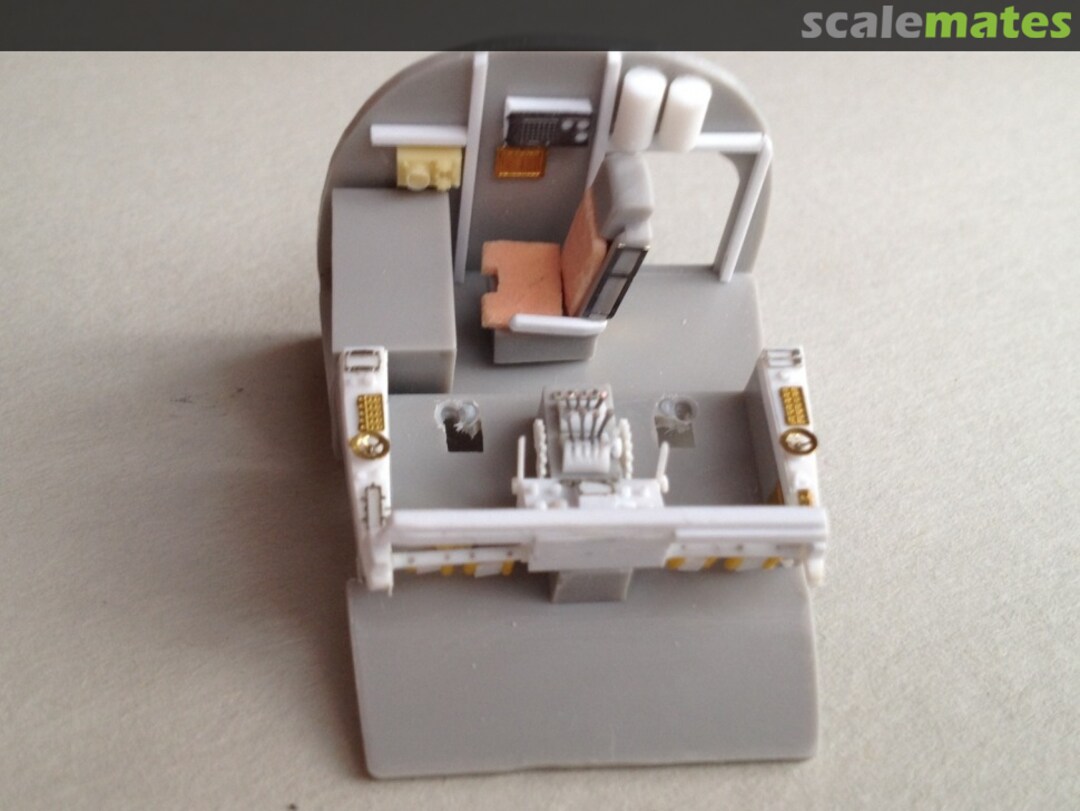
30 celsius degree: too hot for the bicycle trip. Thanks to cockpit 3 hours and approx. 100 parts later. Will be continued because the workstation of the flight engineer must be completed.
21 July 2014, 13:54
Bernhard, ach manno - jetzt mag ich meine nicht mehr bauen ... das schaffe ich ja nie so wie du
21 July 2014, 14:42
one assumes that the seat and dashboard will be removed before painting ? 😄
21 July 2014, 14:53
Don't worry Felix! Bekanntlich wird nichts so heiß gegessen wie es gekocht wird! Nachdem gestern der dritte Arbeitsplatz fertig wurde, habe ich etwas "erstaunliches" entdeckt; zuerst war ich "entsetzt" und dann brach ich in schallendes Gelächter aus! Gut dass ich heute viel gelassener bin als früher. Bei Zeiten werde ich dir (nach einer angemessener Geheimhaltungszeit🙂 die Geschichte erzählen. Und nun ran an deinen Speck äh Shinmeiwa. Wird bestimmt klasse🙂
22 July 2014, 18:36
It's correct Choppa! I have "clumsy" fingers: it's easier to paint separate parts.
22 July 2014, 19:04
Ah I see you have given the word "clumsy" a new meaning, highly dexterous ! 🙂
Guess I'll have make do with my immobil hooves.... 😄
22 July 2014, 19:39
2 hours later: it is really stunning which effect a little bit of paint, some instrument decals (Mike Grant) and belts made of animal-sticker cause....
24 July 2014, 16:05
Just saw that- I am glued in for watching another masterpiece grow!
24 July 2014, 16:30
6 months later (january 2015): game over again, 4th match.
17 January 2015, 16:12
A absolutely stunning build ... all the small details, the painting ... awesome!
18 January 2015, 09:49
Beautiful work and amazing detail! I really love your work!
18 January 2015, 16:35
Today I have produced "files" and sanding dust. Thank you for supporting me. I think I am going to make it this time🙂
19 January 2015, 20:48
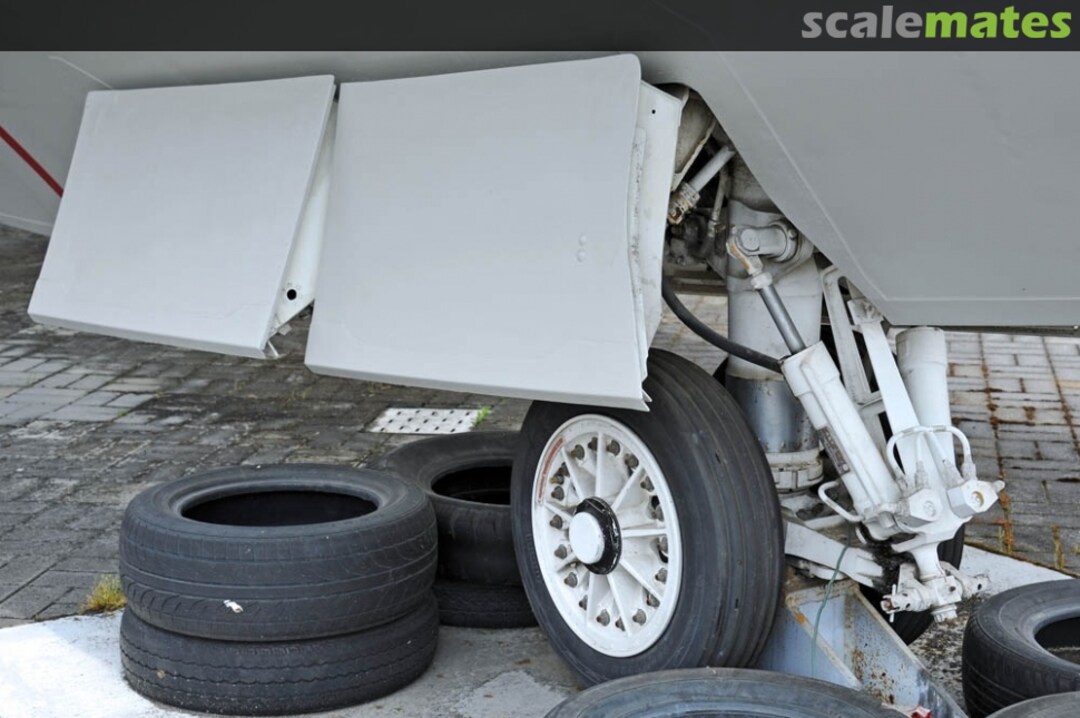
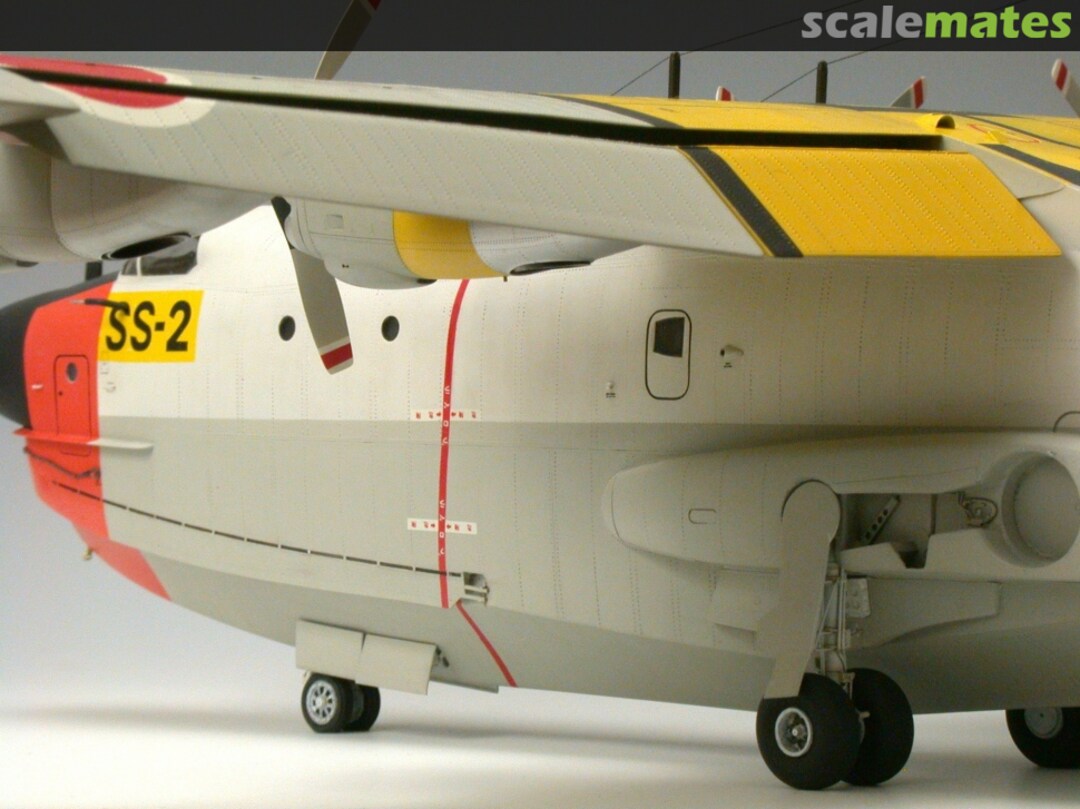
The kit is very old but concerning the proportions ok. Only the bulges on the underside of the hull have a completely wrong shape. Fortunately Hasegawa corrected this error with extra resins parts they are added to the newer kit releases. My kit was one of the older ones but I was lucky: a friend helped me out with copies of own resin parts. A few imperfections I cold fill with plastic and CA-glue.
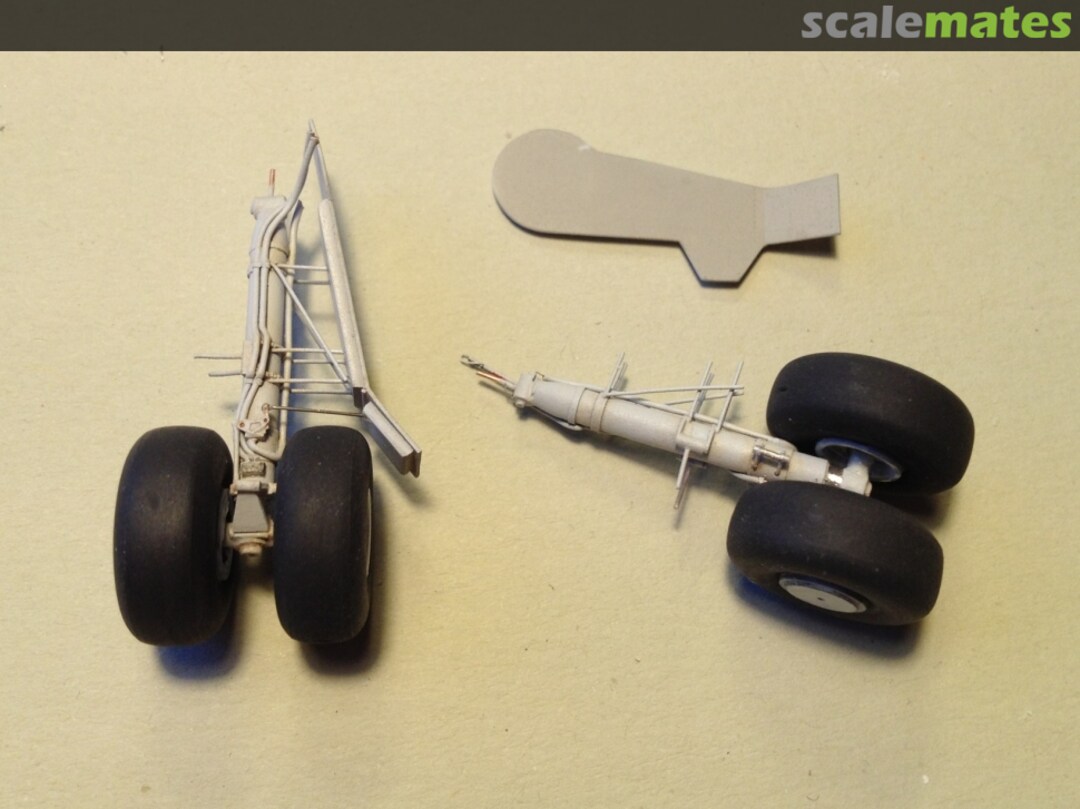
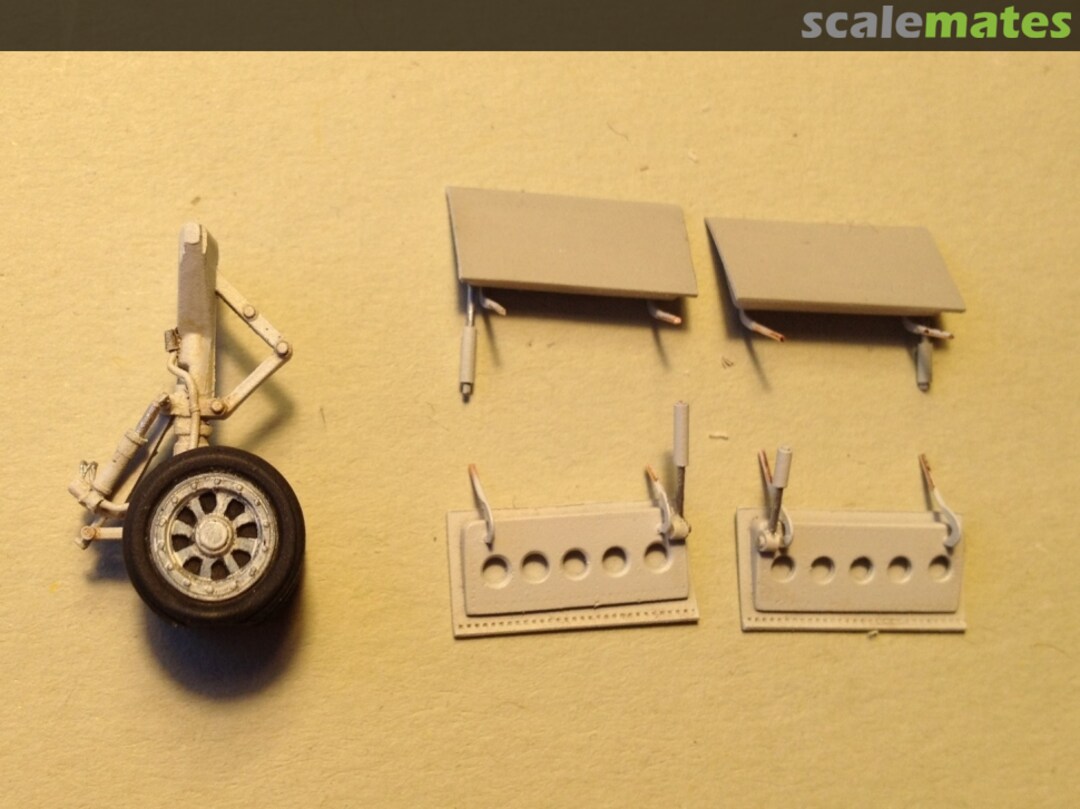
Here again it became clear that it is important to compare everything with original pictures: I noticed that the parts are correct in shape but do fit the old landing legs. But the legs are wrong. And so the resin bulges have a cut out where the should not have one. See pictures.
I quickly saw that the landing legs hat to be made new.
26 January 2015, 12:31
My friend, I am looking forward to get your sign on a book called "Scratch-building is easy" by B.S.😉
27 January 2015, 12:39
I did it! The lower fuselage part has been attached! It was not as bad as I thought🙂 Yesterday evening I left fear aside, and today, after less than three hours, I am done!
But to tell the story in the right order : before I started, I checked the internet for building reports, and I found an article by Bob Zoglio on MM. I was shocked when I saw his reinforcement superstructure for the fuselage-🙁 This was also the reason for the last break of more than 6 months. I did not want to go to such lengths, but had no idea for an alternative. What helped me was an idea I had when I built the NH-3. The problem for the Shinmeiwa was how I could get enough CA glue into the closed fuselage to give the glue edges enough strength just with plastic stripes.
This is the solution: I drilled 7 0.4mm auxiliary holes at an angle on both sides (yellow pieces of tape on one of pictures). The glue was supposed to diffuse on its own because of the capillary effect. It worked as I hoped! In just two hours the glue patches were sanded, the superfluous glue was gone and the raised rivets were restored.
1 February 2015, 14:23
Hi Bernhard could you explain how you restored the raised rivets please ? 🙂
1 February 2015, 14:39
Fantastic detail work! The paint is incredible too. Another amazing aircraft Bernhard!
1 February 2015, 16:48
Very elegant solution, Bernhard! 🙂
I will put it in my pocket😉
2 February 2015, 10:14
Hi Choppa. In the five last pictures I documented the 4 steps for restoring raised rivets.
2 February 2015, 18:54
I take it the paste you used expands during drying ?
or is the pushing of the pin into the plastic enough ?
Anyhow, thanks 🙂
2 February 2015, 19:10
Hi Mates. Good and bad news. Good: One if the sponsons is in place. Bad: in different places the resin primer will not dry....🙁. I had to wait about one week. Then I would like to share another technique with you. It is not necessary to put a lot of work to fill a gap around a large uneven part glued onto flat ground. A thin tape is more than enough. I save the tape with future and was ready after 5 minutes without any milligram putty🙂
2 February 2015, 19:51
Today I checked the Resin-Primer and MrSurfacer 500 on the sponsons: on the critical places still wet and "soft" 🙁 after three days they should be dry....
Then I had an unusual idea (I had nothing to loose). I scrubbed/sanded the primer off the wet places and brushed on two coats of Future. Stunning: the future dried!!!
@Choppa: the paste does not expand, quite the opposite: it shrinks. It does not matter, after airbrushing the little "craters" are filled a little more with paint.
3 February 2015, 20:42
Today I managed the last of the tricky tasks: gluing of the two clear parts for the windscreen to the fuselage. Before gluing I brushed on the inside a thin coat of Future as protection against fog from CA-glue. As hoped it was quite easy. The front edge of the windscreen I "glued" with Future. I was stunned that Future (very thin, like water) was able to fill a remarkable gap...
6 February 2015, 20:04
Future is such a cool stuff! You can fix nearly everything regarding clearparts!
Cool build, BSH! Good to see that this model didnt went into the bin!😢
7 February 2015, 12:35
On the weekend I detailed the fuselage and I'm ready for airbrushing🙂 The outstanding walk around of the US-1A was very useful even though the prototype SS-2 was probably different in some places. Unfortunately there are no pictures of the SS-2 on the Internet🙁
8 February 2015, 19:56
Hi Bernhard, wie immer wieder sehr beeindruckend. Viele Grüße Stefan
8 February 2015, 21:44
Shinmeiwa und ich haben ein Problem🙁 einige Stellen an den Resin-"Beulen" (Fahrwerksschächte) werden nicht richtig trocken. Daher Frage an alle Resin-Spezialisten. Zuerst sei aber der komplette Werdegang geschildert.
Zuerst habe ich (Trottel!!!) schnell schnell schnell eine Schicht HU-129 geairbrushed. Leider erst danach fiel mir ein, dass ich besser mit dem Resinprimer von Gunze anfangen sollte. Also habe ich die noch recht frische Humbrolfarbe mit Humbrolverdüner ausgewaschen. Nachdem Auspusten/trocknen der Teile mit der Airbrush (nur Luft) kam eine fette Schicht Resinprimer und eine fette Schicht Surfacer 500 aufs Resin.
Wie bereits vor fast 2 Wochen geschrieben wurde es an einigen Stellen nicht richtig trocken. Also habe ich an den kritischen Stellen beides abgeschliffen und das Problem einigermassen mit Future in den Griff gekriegt. Nunmehr nach fast zwei Wochen (heute morgen HU-129 geairbrushed) sehe ich an einigen Stellen Verwerfungen.
Kann es sein, dass das Resin Mikroporen hat und sich wie ein Schwamm mit dem Humbrolverdünner vollgesogen hat, der nunmehr die Farbschichten auf dem Resin beeinflusst?
Ein Mate hatte vor über eine Woche die Idee, dass Luftfeuchtigkeit das Problem sei. Glaube ich nicht, da der Keller geheizt ist.
9 February 2015, 18:14
Ich bin kein Spezialist, wenn es um Res in geht, aber so etwas ähnliches ist mir auch mal wiederfahren... da lag es wohl an der Porosität des Resingusses...
9 February 2015, 19:23
Hi Bernhard, hab Dir mal die Antwort von einem Freund per Mail geschickt. Viele Grüße Stefan
10 February 2015, 07:27
Moin Holger: danke für Feedback. Hab schon eine weitere Idee, wenn die Stellen (zum Glück sind's nur wenige) nicht trocknen: die Feuchte werde ich mit Abziehbild (mit Future aufgeklebt) aussperren.
Moin Stefan. Danke. Hab schon gelesen bzw. kenne Axel noch von sehr viel früher. Fülle mich mit ihm verbunden da er bei der Superconny sehr viele Probleme hatte.
10 February 2015, 10:19
Na das klingt doch als wenn es klappen würde, Bernhard!🙂 Go for it!
10 February 2015, 11:49
Hi Bernhard, I would leave that wheel bay for sometime. Myself will check with those who use resin if they face same issue. But need to find a way how to fix it. May be CA glue can help.. Or buy new one?
Anyhow I believe you can manage this. With all your experience😉
10 February 2015, 12:10
Hi Nikolajs,
Thank you for response: each help is very appreciated!! Sorry for describing my problem in German: it was too complex for my English. But you have understood my explanation: respect🙂 The idea with CA is new, I will try it.
Holger & Christian:
danke für Motivation. Ich hab den "point of no return erreicht: wird fertig egal ob mit trockenen oder nassen Schächten!!!
10 February 2015, 14:39
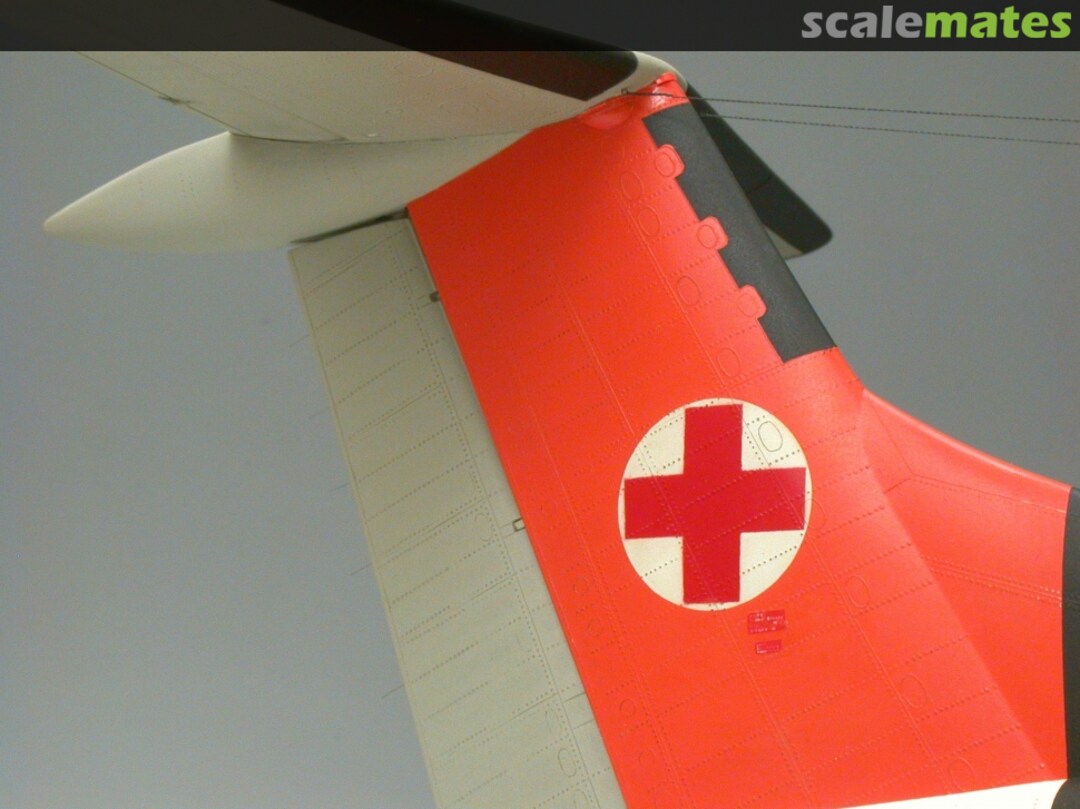
Pictures 82&83:
Masking for orange not removed jet except the circle (82). Good visible are the FORMERLY heavy raised rivets. Before spraying white I took down the rivets with Micro mesh 3200. After airbrushing white I took down a second time the rivets with 1000 Tamiya sandpaper. Result: light grey and minimally raised rivets on white surface. Now I'm going to wipe the orange surface with a little piece of newspaper so the will be some "ink" left on the surface. Result: middle gray and minimally raised rivets on orange surface. The red cross in the middle of the circle (comming soon) will receive the same procedure.
12 February 2015, 13:49
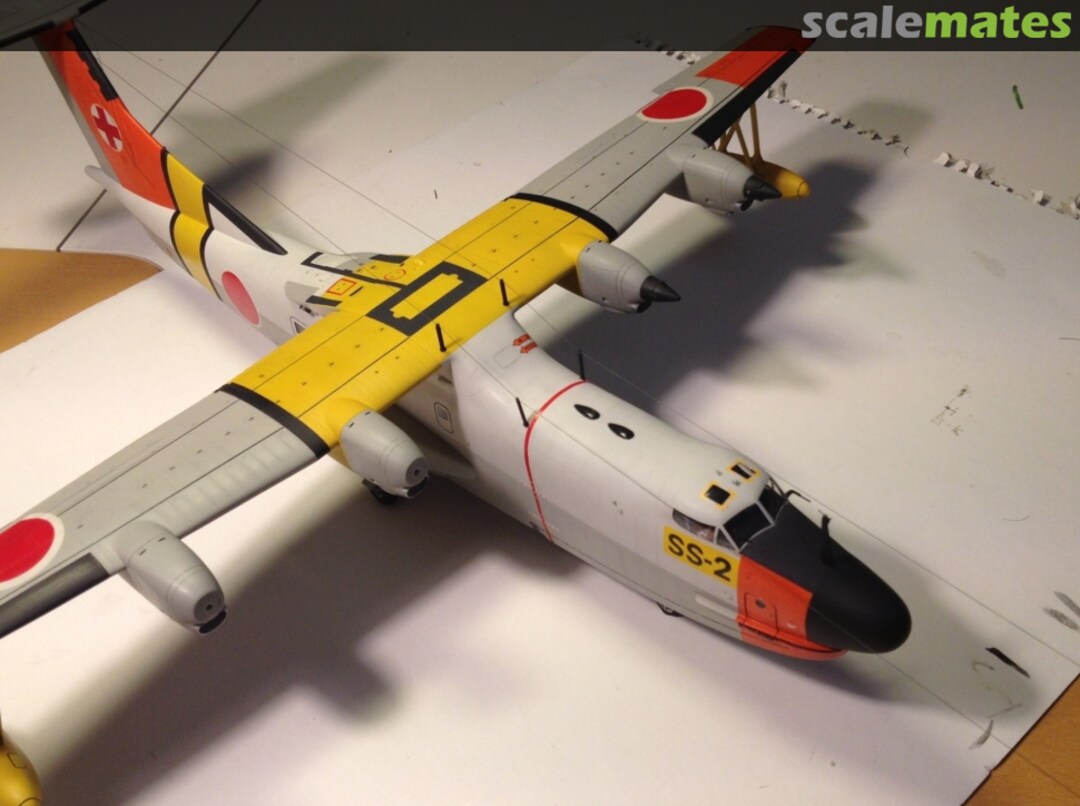
Step 3 (yellow) & 4 (black/darkgrey) are complete. Step 5 (gull grey) coming next.
14 February 2015, 15:09
@Nikolajs: yesterday I tried your proposal with CA-glue. It worked🙂 Despite of that I must stop the project (I hope one or two weeks or so is enough) because I have problems in other places...
14 February 2015, 20:49
Hi Bernhard, kennst Du schon diese Bilder?
nabe3saviation.web.fc2.com/waUS1.html
14 February 2015, 21:38
Moin Marc, danke für den Tipp. Ja kenne ich, eher Fluch als Segen🙂 Der Webmaster ist ein genialer Modellbauer. Hast du schon seine Trojan und Superconnie gesehen? Einfach nur genial!!
14 February 2015, 21:43
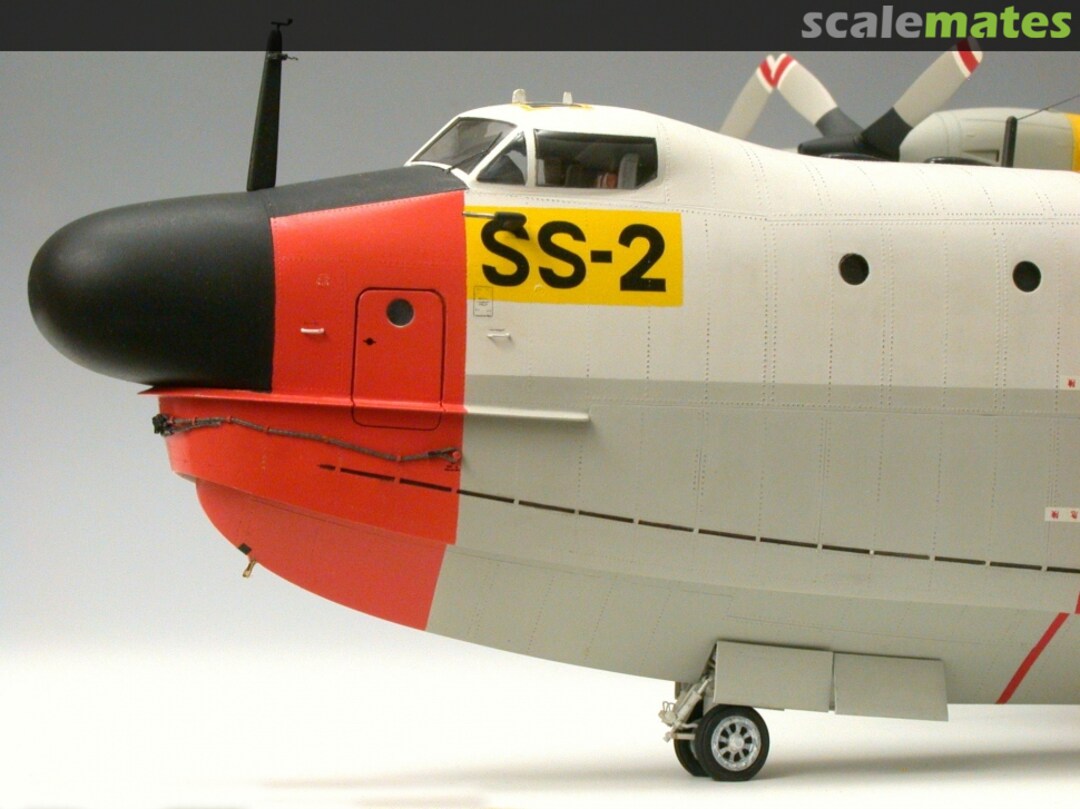
A little paint for the bow. In the pictures the difference between dark grey (anti glare panel) and black (radome) is not visible jet. The radome will be polished a little.
17 February 2015, 20:36
The crew door accents in a burnt orange ( brown-orange) would accent more life-like than in black if you would care to try something different.
18 February 2015, 02:07
Today was a very good modeling evening. I removed the masking of the canopy and I'm very happy with the result. Then I had a second success. I found a safe solution to solve the "wetness problem". Thick self adhesive aluminium foil (isolation tape for foam coated heating lines). I wonder why I did not have this idea earlier.
18 February 2015, 20:34
Looks fantastic Bernhard, I love the colours, and your accuracy is excellent!
19 February 2015, 06:51
Hi Bernhard, es immer wieder schön morgens bei einem Schluck Kaffee den Baufortschritt zu sehen. Viele Grüße Stefan
19 February 2015, 08:14
Your masking is perfect, this build has been so well done, congratulations
19 February 2015, 20:29
Very bad news.... I thought this was a good idea (thin 0,4 mm tape for the covering the gap between the fuselage and the resin parts); this was the most stupid thing to!!!! Future that I used for sealing the tape obviously dissolves the plastic! I have no idea how to rescues the project🙁🙁🙁🙁🙁
21 February 2015, 07:33
arse thats not good m8, fingers crossed you can think of a way to salvage..
21 February 2015, 10:35
Only very few can afford to to show close-up macro views, your level of perfection is amazing.
Sad to hear about the mishap, but Michael'l advice is wise. I'm sure you'll find a way. 🙂
21 February 2015, 10:43
Use Milliput water based two part expoxy putty. Apply the two part mix over the gap/joint use a wet cotton bud to wipe off the excess about half an hour to an hour later will give you a fill material with no damage to the model.
21 February 2015, 15:15
Future could not have been the culprit. The adhesive on the tape is something to test before ever using the tape again. goood luck with finding a fix. I prefer plastic to plastic on load bearing joints. STYRENE SHEET SHIMS AND STRETCHED SPRUE (Oops caps lock unintended) are my 'go to' methods. if you can find my Coronado here, the entire section between the wings was covered in thin sheet to solve this issue ( after the wing roots were firmly bonded with shims).
21 February 2015, 15:42
Hi Mates. Thank you very much for "moral support" and ideas. Normally I do things exactly as you say. Plastic and CA glue or epoxy putty are my favorite materials to fill. In this case I wanted to make it more simple and save the raised rivets🙁
Because the fuselage is nearly completely painted it is too late for most solutions. Just now I set up my last line of defense: CA-glue and aluminum. If this does not stand, I have to abandoned the project...
21 February 2015, 16:41
These are dramatic words, I can´t imagine you would be really going to abandon this ...marvel!
Good luck!
21 February 2015, 18:31
HI Bernhard, sometimes i use "Paketklebeband", sorry i don´t know the english word, to mask the rivets and protect them. So you can use putty and sanding paper on a local area. Cheers Stefan
21 February 2015, 18:53
Tut mir sehr leid zu hören Bernhard, hoffe du bekommst das wieder hin, wäre ewig Schade!
21 February 2015, 19:07
Sometimes great Projekts need some breaks to get the mind clear and got new view on it
21 February 2015, 20:09
Good news for a change-🙂
aluminum on the left side does obviously stand. One hour after airbrushing HU129 today morning I noticed only 2 really very small "glossy" (wet) spots on the resin bulge.
22 February 2015, 10:06
72 hours later: still everything looks good🙂 Today I finished the decaling and was suprised, that the nearly 30 years old decals were still usable. Here and there were little tears but with fine pincers this was no problem.
25 February 2015, 20:05
A lot of thanks for you comments!
Result of a mini-modeling task of today: ropes for anchoring on the bow. By the way: this kind of task suit me🙂
26 February 2015, 20:07
Hallo Bernhard!
Also mir gehen so bei kleinem die Superlative aus... Ein Modell schöner als das andere!
27 February 2015, 19:33
Grandmaster Yellowwing in action. I cannot get enough of this. Awesome.
27 February 2015, 20:02
The next step is complee: the flying boat has a horizontal stabilizer.
28 February 2015, 17:08
Dein Grad an Perfektion ist ernüchternd .... ich muss glaube ich nochmal üben ....
28 February 2015, 23:31
Bernhard... mach so weiter und ich flute meinen Modellbaukeller... da wird man ja depressiv...😉
1 March 2015, 09:39
Ralf: Wenn Du es mit Kölsch machst helfe ich beim Auspumpen🙂
Just I have passed the "41,5 km mark"... I have still 695 m to run. Floats in place without trouble.
1 March 2015, 13:54
Kölsch??? da hat ja Wasser mehr Geschmack und Alkohol... mit dem Zeug werd ich immer zum Durchlauferhitzer... Ich bin hier in Norddeutschland... datt Flenst... *Plopp*
1 March 2015, 14:03
Der beste Beweis dafür das es gar keine schlechten Bausätze gibt. Nur Modellbauer mit viel oder weniger Talent. Ich denke das Du aus jedem Bausatz ein Meisterstück machen kannst! Das würde ich auch gerne können.
1 March 2015, 19:12
Christian: Grundsätzlich hast Du recht. M.E. Es ist vor allem auch die Frage der Zeit und des Aufwandes, den man investieren muss um aus einem nicht optimalen Bausatz ein ansehnliches Modell zu bauen. In meinem Fall sollten die Modelle aber nicht zu groß sein🙂 Shinmeiwa ist das größte Modell dieser Komplexität, welches ich gebaut habe... Beim hantieren im Keller vor einer Stunde beim Airbrushen von Gelb (Übergang oben) habe ich beide Stützstreben auf der linken Seite herausgebrochen🙁 Deine Worte (und der Bordeaux aufm Couchtisch) sind daher sehr willkommen🙂
1 March 2015, 20:09
Very nifty build KUDOS. I understand delayed/staggered builds. Usually they don't finish out this cleanly. Nice job.
1 March 2015, 20:19
Good news🙂 I could repair with minimal effort the two little mistakes of yesterday (airbrushing yellow on the top). Today was a good modeling day: the landing gear is in place and Shinmeiwa is only slightly of balance. The height difference of the wing tips to the ground is only 4 mm and not visible.
Unfortunately I also have bad news: because everything is so fragile I'm afraid that Shinmeiwa going to suffer the same fortune as my Sikorsky S-43 Babycliper (modellversium.de/gal..rsky-s-43-sword.html) which has never seen an exhibition🙁
2 March 2015, 17:47
Alter Verwalter... Du kitzelst aber auch das allerletzte aus diesen Plastikklumpen raus... Die sieht top aus (Die S-43... zur Shinmeiwa hab ich mich ja schon geäussert.)😉
2 March 2015, 17:59
Hi Bernhard, wonderful work on this ugly duck You have shown us what is possible in modelmaking if you spend time and patience compared with good ideas and skills. Very well done mate!
P.S. No modeling show for the bird – I dare you. You can build a second one if it gets damaged. Now you know how it works🙂
2 March 2015, 18:14
I also have this kit in my stash. But when I look at this great build, I will let it in my stash for long long time! I'm impressed by your skills.
2 March 2015, 19:30
very nice build, a nice way also to restore rivets, are these protruding also in this way?
3 March 2015, 12:15
Still 195 m to run, the last lap... Thank you Mates for the energy drinks and bananas on that last kilometer🙂
3 March 2015, 20:19
I can see why this build has been testing your patience Bernhard. Shows some amazing detail and skills!!
4 March 2015, 06:37
Jo! Bernhard das ist wieder einmal ein Modell geworden bei dem einem die Worte fehlen! Einfach nur spitze! Da kannst Du mit recht stolz drauf sein !
5 March 2015, 19:12
Vielen Dank Christian! In der Tat, mit einem Kaffee in der Hand saß ich im Wohnzimmer und konnte mich an der fertigen Shinmeiwa nicht satt sehen. Unbewusst drehte ich die zeit zurück und hab mich an den Anfang des Projektes erinnern. Einige Tage in Travemünde, aus einem nicht sehr erbaulichen Anlass... aber das ist eine andere Geschichte.
Aufgepasst: einige Fotos vorab. Der Rest folgt morgen (es ist schon spät🙂
Attention: the first pictures are ready! The rest comming soon, probably tomorrow.
Thank you Mates for support on this Marathon🙂
5 March 2015, 21:08
Hi Bernhard, bin immer wieder auf Neue beeindruckt, hoffe nur eines Tages die Shinmeiwa auf einer Ausstellung zu sehen. Viele Grüße Stefan
5 March 2015, 21:20
One very beautiful airplane Bernhard,there is nothing else I can say.
5 March 2015, 23:00
Was für ein Ereignis! Das, kurz gesagt, Beste, was ich jemals im Flugzeugmodellbau gesehen habe... eine einzige Augenweide, zum nicht Sattsehen... Ich gratuliere!
6 March 2015, 06:11
I'm honoured abound these comments!!!!
As promised the second batch of pictures.
6 March 2015, 17:28
Absolutely awesome. I can't really say much else, greaf effect after such effort! And great tricks here and there 🙂 Wonderful piece of modelling!
6 March 2015, 20:29
Ein fantastisches Modell. Einfach eine Augenweide. Meinen tiefen Respekt vor diesem Meisterwerk!
6 March 2015, 20:47
I am very glad you manage to finish such a "beast", my friend! And I am especially happy that you managed to overcome all inner and outer challenges to complete this great model! Looking forward for your next project😉
10 March 2015, 14:59
Awesome!!! Absolutely great!👍
Congrats for your patience. I hope to see the Shinmeiwa at the next Stammtisch in Hamburg.
11 March 2015, 06:21
Hi Bernhard, nice to meet you in Heiden and see the amazing Shinmeiwa SS-2 and Sikorsky NH-3A live. Cheers Stefan
30 March 2015, 11:41
Oh, a second wave of nice comments! Thank you. This makes me especially happy because: yesterday I wanted to put Shinmeiwa into the glass case and set up the Guardian in the living room instead ("recent model place" ). Then I noticed that the plastic/glue/tape/resin problem has returned. Looks quite awful in some spots (argghhh🙁 ). I hope that it does not get worse.
7 July 2015, 15:44
Album info
- About 5 years ago I separated the first parts from the spruces...
- In early 2013 after a true never ending story I completed and airbrushed the wings and floats...
- Now I have reactivated the retired Shinmeiwa.
- 6 months later (january 2015): game over again, 4th match.